Have you ever tried removing a GPU from a motherboard? It may seem like a daunting task at first, but with a little guidance, it can be done with ease. Whether you’re upgrading your GPU or troubleshooting an issue, it’s important to know how to safely remove it without damaging any of your components. Think of it like removing a puzzle piece – you want to be gentle and precise to avoid losing any important parts.
In this blog post, we’ll guide you through the steps of safely removing a GPU from your motherboard, so you can upgrade your hardware with confidence.
Preparation
If you need to remove a GPU from your motherboard, there are a few easy steps you should take to prepare first. First, make sure to shut down your computer and unplug it from any power sources. Next, locate the GPU and any screws or clips holding it in place.
Depending on your motherboard and GPU, you may need a screwdriver or other tools to remove it. It’s also a good idea to ground yourself first to prevent any static electricity from damaging your components. You can do this by touching a metal object or using an anti-static wrist strap.
By taking these simple precautions, you can safely remove your GPU without causing any damage. Remember to handle all components with care and take your time to avoid any mishaps.
Gather necessary tools and materials
When it comes to any DIY project, preparation is key. Before you start any home improvement task, it is essential to gather the necessary tools and materials to ensure that you have everything you need to complete the job. Whether you are hanging a new light fixture, installing new flooring or building a piece of furniture, the right tools can make all the difference in the finished product.
It is important that you have a clear understanding of what you need, so you can avoid any unnecessary trips to the hardware store. Some tools and materials may seem obvious such as a hammer or nails, but it is always a good idea to double-check and make a list of everything you need. By taking the time to prepare and gather your tools and materials, you can save yourself time, money, and frustration in the long run.
So, before you get started on your next project, take the time to make sure you have everything you need to get the job done right.
Power down and unplug your computer
When it comes to preparing your computer for maintenance or repairs, the first step you should take is to power down and unplug your system. This simple task has several benefits. Firstly, by turning off your computer, you reduce the risk of electrical damage or short-circuiting.
Secondly, unplugging your system ensures that there are no remaining electrical charges in the system, which can also cause damage if left unchecked. Lastly, powering down and unplugging your computer is a safety precaution that reduces the risk of injury to yourself or others. By taking this simple and easy step, you can ensure that your computer is ready for whatever maintenance or repairs need to be done.
So, next time you need to take a closer look at your system, make sure to power down and unplug before diving in!
Removing the GPU
If you’re looking to upgrade your GPU, or simply need to replace a malfunctioning one, it’s important to know how to remove it properly from your motherboard. First, power down your computer and disconnect all cables from the back. Open up your computer case and locate the GPU.
Typically, it’s towards the bottom of your motherboard and held in place by a few screws or a latch. Carefully remove the screws or unlatch the latch and gently pull the GPU straight out of the PCIe slot. Depending on the size of the card, you may need to wiggle it a bit to loosen it.
Make sure to hold the card by its edges and avoid touching the circuitry as it’s delicate. With the card removed, you can now install your new GPU or troubleshoot any issues you were experiencing. Remember to properly dispose of your old GPU if it’s no longer functioning to avoid any harm to the environment.
Knowing how to remove and replace a GPU is a valuable skill to have, and can save you time and money in the long run.
Locate the GPU on the motherboard
If you’re looking to replace or upgrade your GPU, the first step is to locate it on the motherboard. Depending on the type of GPU you have, it may be located in different areas on the motherboard. Some GPUs, such as those integrated into the CPU, are located near the center of the motherboard.
Other GPUs are located towards the bottom of the motherboard, near the PCIe slots. Once you have located the GPU, the next step is to remove it. This can usually be done by releasing a small lever or latch on the PCIe slot, and gently pulling the GPU out.
It’s important to handle the GPU carefully, and avoid touching any of the sensitive components on the card. By taking these steps, you can safely remove and replace your GPU, and get your computer running smoothly with a new and improved graphics card.
Disconnect power and data cables
When it comes to removing the GPU from your computer, the first step in the process is disconnecting the power and data cables. This is an important safety precaution that should not be overlooked. Begin by powering down your computer and unplugging all cables from the back.
Once everything is disconnected, locate the GPU and carefully remove any screws or brackets that are holding it in place. Make sure to handle the GPU gently and avoid touching any of the delicate components. Once the GPU is free, gently unplug any power cables and data cables from the card.
Take your time and be patient, as rushing this step could result in damage to both the GPU and your computer. With the power and data cables disconnected, you can now move on to the next steps of removing the GPU. Remember, always take the necessary precautions when handling computer components to prevent damage and ensure a successful removal process.
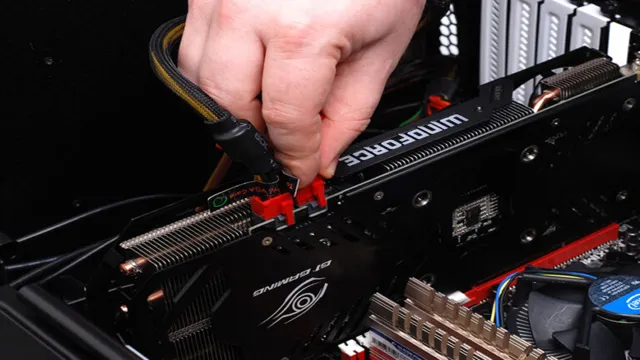
Release the locking mechanism
Removing the GPU from your computer can be a daunting task, but it doesn’t have to be. The first step is to release the locking mechanism that holds the GPU in place. This is typically located at the end of the PCIe slot and can be released by either pressing a button or pushing a lever.
Once the locking mechanism is released, gently wiggle the GPU out of the slot. It’s crucial to avoid pulling too hard, as this can damage the pins on both the GPU and the PCIe slot. If the GPU seems stuck, try gently twisting it back and forth to loosen any dust or debris.
With a little patience and care, removing the GPU can be a simple and stress-free process.
Gently remove the GPU from the slot
Removing the GPU from the slot in your computer can be a daunting task, but it doesn’t have to be. If you’re experiencing issues with your graphics card, removing it is likely the first step in resolving the problem. The process starts by powering off your computer and disconnecting all cables; then locate the GPU slot inside your computer.
The slot is generally located near the bottom of your system’s motherboard. Once you find the slot, it’s essential to discharge any static electricity by touching a metallic object or wearing an anti-static wrist strap. Carefully remove any screws or latches that secure the GPU to the motherboard, and gently lift it out of the slot.
It’s crucial to be extra careful not to damage any of the sensitive parts of the GPU as you extract it from the system. With the GPU removed, you can perform maintenance or troubleshooting. Whether you’re replacing a faulty graphics card or merely upgrading your system, carefully removing the GPU from the slot is an essential first step.
Clean up and Storage
If you’re planning on upgrading your GPU or replacing it altogether, you’ll need to know how to remove it from your motherboard. First, shut down your computer and unplug all cables. Make sure you’re grounded to prevent any electrostatic discharge, then locate the GPU on your motherboard.
Typically, it’s the largest card that’s plugged into the PCIe slot. Once located, unscrew and remove any securing clips, gently lift the card straight up and out of its socket. Do not pull from the top of the card as it may damage the PCIe slot.
With the GPU removed, it’s essential to clean off any accumulated dust and debris. Use compressed air to blow out any particles and a soft-bristled brush to clean the fan blades and heatsinks. Store the GPU in a safe, dry place, and take care not to bend or apply any pressure to the card’s components.
Remember, removing a GPU from a motherboard can be a delicate process, so if you’re unsure how to proceed, seek professional assistance. With these steps, you can remove the GPU safely and efficiently, ready for your next upgrade.
Clean and inspect the GPU and motherboard
If you have a gaming PC, it’s important to keep it clean and well-maintained to ensure optimal performance. One of the areas that often gets overlooked is the GPU (graphics processing unit) and motherboard. Dust and debris can build up over time, causing overheating and potential damage.
To clean the GPU, start by gently removing it from its slot and using compressed air or a soft brush to remove any dust or debris. You can also use a small amount of isopropyl alcohol on a soft cloth to clean the contacts. When it comes to the motherboard, be sure to remove any peripheral components such as RAM, graphics cards or cooling fans to give yourself unobstructed access.
Use compressed air to blow away any dust or debris, and use a soft, anti-static brush to remove any stubborn dirt. Taking the time to clean and inspect these components will help extend their lifespan, saving you money and headaches in the long run.
Properly store the GPU for safe keeping
When it’s time to store your GPU for safe keeping, it’s essential to follow a few steps. First and foremost, you’ll need to clean your GPU thoroughly. Use a soft-bristled brush or compressed air to remove any dust or debris that may have accumulated on or around your graphics card.
Once it’s clean, place the GPU in an anti-static bag, which will help protect it from any potential electrostatic discharge. If you don’t have an anti-static bag, you can use a cardboard box that has been lined with a non-conductive material, such as bubble wrap or foam. Finally, store your GPU in a dry, cool, and dark place to ensure maximum protection.
Properly storing your GPU will help you extend the life of your graphics card, preserving your investment in high-quality hardware. So take the time to clean up and store your GPU correctly, and you’ll be sure to enjoy the benefits of a well-maintained piece of equipment for years to come.
Conclusion
Removing a GPU from a motherboard may seem like a daunting task, but fear not! With a few simple steps, you can bid farewell to your graphics card and say hello to new possibilities. Remember to power down your system, disconnect all cables, and identify the locking mechanism before gently lifting the GPU out of its PCI-e slot. And voila! You have successfully removed your GPU.
Now sit back, relax, and bask in the glory of your newfound tech skills. Just try not to get too cocky, or you might end up accidentally removing your whole motherboard (trust us, it happens). Happy upgrading!”
FAQs
What tools are needed to remove a GPU from a motherboard?
To remove a GPU from a motherboard, you will need a screwdriver, anti-static wrist strap, and thermal paste remover.
Can I remove a GPU from a motherboard without unplugging the computer?
It is highly recommended to unplug the computer before removing a GPU from a motherboard to avoid damage to both the GPU and the computer.
How do I know if a GPU is compatible with my motherboard before removing it?
You can check the specifications of both your GPU and motherboard to ensure compatibility. You may also consult the manufacturer’s website for compatibility information.
Is it okay to remove a GPU from a motherboard without wearing an anti-static wrist strap?
It is not recommended to remove a GPU from a motherboard without wearing an anti-static wrist strap, as it can cause damage to sensitive computer components.