Is your computer not turning on? Before calling the IT guy or rushing to the store for a new motherboard, try jump starting it yourself. Jump starting your motherboard can be a quick and easy solution to fix a range of computer-related issues. But first, what is a motherboard? It’s the main printed circuit board in your computer that connects various components like the CPU, RAM, and hard drive.
And a jump start, or power cycle, is essentially restarting the motherboard to clear any glitches or errors that might be preventing it from functioning properly. So, how can you jump start your motherboard? There are a few steps you can take to do so, like disconnecting and reconnecting power cables, clearing the CMOS memory, or testing the power supply. Each step requires a bit of technical know-how, but with our step-by-step guide, you’ll be able to jump start your motherboard in no time.
Don’t let a malfunctioning motherboard get in the way of your computer use. With these tips and tricks, you can quickly get your computer up and running again with minimal fuss and frustration.
Gather necessary tools and equipment
Jump starting your motherboard may seem like a complicated task, but with the right tools and equipment, it can be relatively simple. The first thing you need to do is gather the necessary equipment. You will need a screwdriver, a power supply unit, a jumper cable, and a working computer to use as a power source.
Once you have all the equipment, you can begin the process of jump starting your motherboard. First, you need to unplug your computer from the wall and remove the cover to expose the motherboard. Next, connect the jumper cable to the power supply and the motherboard, making sure to connect the positive and negative ends correctly.
Now, plug in the power supply and turn on the working computer. Finally, press the power button on your motherboard, and it should start up. With these simple steps, you can successfully jump start your motherboard and get your computer up and running again in no time.
Tools include a screwdriver, jumper cap, and power source.
Before proceeding with any type of electronic work, whether it’s building a computer or troubleshooting a faulty device, it’s important to gather all of the necessary tools and equipment. For this task, you’ll want to make sure you have a screwdriver, jumper cap, and power source close at hand. The screwdriver is perhaps the most essential tool, as it’s required for removing and attaching screws that hold your devices together.
Jumper caps, on the other hand, are small plastic caps with a metal interior that connects two pins on a circuit board to complete a circuit. And, of course, the power source is necessary for testing your device. Make sure that you have all of the tools required for your specific project before you get started – scrambling to find a tool in the middle of a project can be both frustrating and time-consuming.
Keep everything organized and readily available so that your work can proceed smoothly and efficiently.
Turn off power and unplug cables
Are you having trouble jump-starting your motherboard? One of the most important steps is to turn off power and unplug all cables to ensure your safety. This will prevent any accidental electrical shocks or damages to your device. Once the power is off and the cables are unplugged, you can proceed with jump-starting your motherboard.
This process involves shorting two pins on the motherboard to reset the BIOS settings. Remember to use caution and refer to your motherboard manual for specific instructions on which pins to short. Jump-starting your motherboard can be a great way to resolve hardware issues and get your computer back up and running.
Don’t forget to stay safe and follow the proper steps before attempting any repairs!
Disconnect power cables from computer and unplug power supply.
When you’re ready to unplug and disconnect your computer, it’s important to do it safely. First, turn off the power to your computer before unplugging any cables. This will help prevent any damage to your computer or accessories.
Once you’ve done that, make sure to disconnect all power cables from your computer and unplug the power supply. This will help prevent damage to your computer and ensure safe disconnection. With the power disconnected, you can safely handle your computer and accessories and move them to a new location or store them away.
Remember, always take the necessary precautions to avoid any damage to your computer or accessories. Taking these small steps will help keep your computer running properly and prolong its lifespan.
Locate clear CMOS jumper
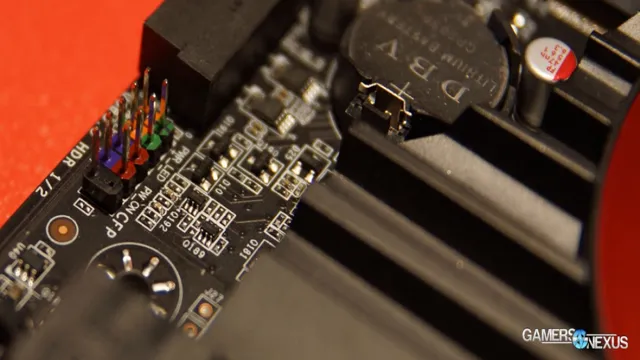
If you’re having trouble with your motherboard, one common solution is to jump start it, but first, you need to locate the clear CMOS jumper. This jumper is typically found near the CMOS battery on most motherboards. It’s a small, three-pin connector that has a jumper cap on two of the pins.
When you move the jumper cap from the two pins it’s currently on to the other two pins, you’ll clear the CMOS and reset the motherboard to its default settings. This can help fix any issues you’re having, such as a boot failure or incorrect BIOS settings. Just be sure to refer to your motherboard manual for specific instructions on where to find the clear CMOS jumper and how to safely jump start your motherboard.
Following these steps can help you get your motherboard back on track and running smoothly again.
Refer to motherboard manual for specific location.
When it comes to resetting your BIOS settings, the first step is to locate the clear CMOS jumper on your motherboard. This can be found in the manual that came with your motherboard, and the location may vary depending on the specific model. The CMOS jumper is usually located near the motherboard battery or the edge of the board, and it is labeled as “CLR_CMOS” or something similar.
Once you have located the jumper, you can proceed with resetting the BIOS settings by moving the jumper from its default position to the clear position for a few seconds, then moving it back to its default position. This will clear any custom BIOS settings that may be causing issues and allow you to start fresh. Don’t forget to consult your motherboard manual for specific instructions and locate the clear CMOS jumper with ease.
Remove jumper cap
If you need to jump start your motherboard, the first step is usually to remove the jumper cap. You may have to refer to your motherboard manual to locate the jumper cap, as its location can differ depending on the model. Once you find the jumper cap, gently remove it using a pair of tweezers or your fingers.
The jumper cap is a small plastic piece that fits over two metal pins on your motherboard and is used to configure certain settings. By removing it, you are essentially resetting your motherboard to its default settings, which can often resolve issues that are preventing your computer from starting up. Just be sure to only remove the jumper cap if you know what you are doing, as attempting to mess with motherboard components without proper knowledge can result in damage to your computer and potentially even harm you.
Move jumper cap to the ‘clear’ position.
When troubleshooting tech problems, it’s important to know how to clear the CMOS (complementary metal-oxide-semiconductor). If you’re experiencing issues with your computer, one potential solution is to remove the jumper cap from the “clear” position. This will reset the CMOS settings and may resolve any issues you’re experiencing.
To remove the jumper cap, start by turning off your computer and unplugging it from the wall. Look for the CMOS jumper, which is typically located near the battery on the motherboard. The jumper cap is a small plastic piece that covers two of the three pins on the CMOS jumper.
Carefully remove the jumper cap from the pins by gently pulling it straight up. Be sure not to bend any of the pins or damage the motherboard in the process. Once the jumper cap is removed, wait a few seconds and then place it back over the two pins in the original position.
By moving the jumper cap to the “clear” position, you’re essentially erasing the CMOS settings and starting fresh. This can be a helpful step in resolving certain tech issues, but it’s important to note that it will also reset any customized settings you had previously configured. After completing this step, you may need to go back into your BIOS settings and configure certain options again.
In summary, removing the jumper cap and placing it in the “clear” position can be a helpful step in troubleshooting tech issues. Just be sure to take your time and be cautious when handling the jumper cap and motherboard.
Connect power source and turn on
If you want to jump start your motherboard, the first step is to connect the power source and turn it on. It may sound simple, but it’s essential to ensure that your motherboard can start functioning correctly. Firstly, you’ll need to locate the 24-pin ATX power connector that fits your motherboard.
Once located, connect it to the power supply, and turn the power supply on by flipping the switch located behind it. After powering on the supply, press the power button on your computer to start it up. If everything is working correctly, your motherboard should boot up and display the necessary information on your monitor.
If it doesn’t, you may need to troubleshoot the connections and ensure that everything is connected correctly. Jump starting a motherboard requires careful attention to detail, so take the time to double-check your connections and ensure that everything is working as it should.
Reconnect power cables and plug in power supply.
Before turning on your electronics, it’s important to make sure all power cables are properly connected and the power supply is plugged in. This step is crucial for a safe and successful start-up of your device. Begin by reconnecting any power cables that were disconnected during installation or maintenance.
Next, locate the power supply and ensure it’s securely plugged into a power outlet or surge protector. Once everything is connected, it’s time to turn on the device. Press the power button and wait for it to boot up.
Voila! Your device is now ready to use. Remember, taking the time to properly connect your power source can prevent damage to your device and ensure optimal performance.
Return jumper cap to original position
Jump starting a motherboard may seem like a daunting task, but it can be done with a few simple steps. To begin, locate the jumper cap on your motherboard and carefully remove it from its current position. Once removed, locate the two pins labeled “CLR_CMOS” or “CLRTC”.
Take note of their location as they will be the ones you will need to bridge in order to complete the jump start process. Using a metal tool such as a screwdriver, carefully connect the two pins by touching the tool to both pins at the same time for a few seconds. Once connected, remove the tool and replace the jumper cap back in its original position.
It is essential to remember to return the jumper cap back to its original position to prevent any damage to your motherboard. With these simple steps, you can easily jump start your motherboard and resolve any boot-up issues you may be experiencing.
Move jumper cap back to the original position.
Returning the jumper cap to its original position is an essential step that should not be overlooked when dealing with electronic components. Once you have finished your work on the motherboard or any other electronic device, it’s time to put everything back in place. As you begin this process, make sure you’re aware of the jumper cap’s location and follow any specific instructions provided.
In most cases, you’ll need to move this small plastic cap that connects two pins to change specific settings. However, if you don’t return it to its original position, you could face some serious problems with your device. It’s crucial to ensure that you don’t leave the jumper cap on the wrong pins or take it off entirely.
Doing so can disrupt the flow of electricity or damage the sensitive components on the motherboard. So, always double-check before powering up your device to avoid any unwanted consequences.
Reassemble computer components
If you’re planning to build a computer, then jumpstarting the motherboard is an essential step to ensure it powers up. First, ensure all the components are disconnected before proceeding. Then, locate the power switch connector on the motherboard and connect it to the power switch.
Connect the main 24-pin ATX power connector, CPU power, graphics card power, and SATA cables to the appropriate ports. Finally, reconnect the monitor, keyboard, and mouse, and power on the computer to test. If it boots up successfully, then congratulations, you’ve successfully jump-started the motherboard! Remember to be cautious and follow all safety precautions when dealing with computer components.
Put the computer back together and turn on power.
Once you’ve finished your computer upgrade or maintenance, it’s time to put everything back together. This can be a little daunting, but don’t worry – it’s not as tricky as it may seem. Firstly, gather all the components you removed and lay them out in front of you.
Begin by plugging in all the power cables, making sure that they’re secure. Next, attach the motherboard and graphics card, making sure to fasten them down tightly. After that, install any additional hard drives or optical drives, again taking care to secure them in place.
Finally, connect all the necessary wires and cables and screws everything back in place. Once you’re happy that everything is correctly reassembled, it’s time to turn on the power, and see if everything works correctly. Voila, your computer should now be up and running, ready for you to enjoy your upgraded computing experience!
Conclusion
Jump starting a motherboard is like jumpstarting a car, but instead of connecting cables to a dead battery, you’re connecting pins to a reset button. Just like with a car, it’s important to stay safe and follow the instructions carefully. And, if you’re really lucky, you might even feel a surge of energy flowing through your electronics, just like the adrenaline rush of revving up a car engine.
Happy jump starting!”
FAQs
What is the process for jump-starting a motherboard?
To jump-start a motherboard, you need to connect the power supply, CPU, RAM, and graphics card to the appropriate slots on the motherboard, and then attach the power switch connector to the power button pins on the motherboard. Once everything is connected, turn on the power supply and press the power button to start your system.
What are the common reasons for needing to jump-start a motherboard?
There are several reasons why you might need to jump-start a motherboard, including a dead battery, a faulty power supply, or a malfunctioning BIOS. You may also need to jump-start your motherboard if you have upgraded your hardware components and need to test your system before closing up your case.
How do I know if my motherboard needs to be jump-started?
If your computer fails to power up when you turn on the power supply, it could be a sign that your motherboard needs to be jump-started. Other signs include an unresponsive BIOS or an error message on your monitor when you try to boot up your system.
Can I jump-start my motherboard without a power button?
Yes, it is possible to jump-start your motherboard without a power button by using a jumper or a screwdriver to bridge the power button pins on your motherboard. However, this method should only be attempted by experienced users, as it can be dangerous if not done correctly.