Have you been searching for a way to find CHK on your MSI motherboard but haven’t had any luck? Don’t worry, you’re not alone. CHK is a code that appears on MSI motherboards when there’s a problem with the memory or CPU. It’s important to find and fix the issue as soon as possible to avoid any further damage to your system.
But how do you locate CHK on your MSI motherboard? In this blog, we’ll walk you through the steps to find CHK and resolve the issue. So, grab a cup of coffee and let’s get started!
Locating the CHK on Your MSI Motherboard
If you’re looking to find the CHK on your MSI motherboard, don’t worry! It’s actually quite easy to locate. The CHK, also known as the Clear CMOS Jumper, is a small plastic cap located near the CMOS battery. It’s usually labeled as “CLR_CMOS” or “JBAT1”.
The purpose of the CHK is to allow you to reset the BIOS settings on your motherboard to their default values. This can be particularly useful if you’re experiencing issues with your system, as it can often solve problems with booting or hardware detection. To use the CHK, switch off your system and unplug it from the wall.
Then remove the CHK cap and place it onto the other two pins for a few seconds before placing it back onto the original pins. Finally, plug your system back in and switch it on. The CHK has now reset your BIOS settings, and you should be able to boot your system normally.
Check Your Motherboard Documentation
When it comes to troubleshooting your MSI motherboard, one of the first things you should do is consult your motherboard documentation. This will help you identify the location of the CHK button. The CHK button is typically found near the BIOS battery or near the front panel connectors.
Once you have located the CHK button, you can use it to reset your motherboard’s settings to their default values. This can be useful if you are experiencing stability issues or if you have made changes to your BIOS settings and want to start from scratch. Remember to always consult your motherboard documentation before attempting any troubleshooting, as each motherboard model may have different locations for the CHK button or other important components.
By doing so, you can avoid causing damage to your system and ensure a successful troubleshooting process.
Check the BIOS Settings
If you’re experiencing issues with your MSI motherboard or are looking to optimize performance, checking your BIOS settings is a great place to start. However, finding the CHK (Clear CMOS Jumper) on your motherboard might not be immediately obvious. Typically, the CHK is situated near the battery, labeled as JBAT1 or CLRTC.
It’s a small three-pin jumper that can be moved to reset your BIOS settings. It’s important to note that resetting your BIOS will erase all customization and revert to default settings, so it should be a last resort when troubleshooting. Be sure to consult your motherboard manual for specific instructions and always proceed with caution when handling hardware components.
With a bit of patience and knowledge, you can optimize your MSI motherboard for peak performance.
Using Software to Find CHK on MSI Motherboard
If you’re using an MSI motherboard and you want to find the CHK code, there’s a simple solution that involves using software. One useful tool you can use is CPU-Z. Simply download and install CPU-Z, open it up, and click on the “Mainboard” tab.
From here, you’ll be able to see lots of information about your motherboard, including the CHK code. Additionally, you can find the CHK code in your motherboard’s BIOS settings. To access the BIOS, restart your computer and press the BIOS key (usually “Delete,” “F2,” or “F10”) when your computer is first starting up.
Once you’re in the BIOS, look for a section called “System Information” or “Mainboard Information” and you should be able to see the CHK code listed there. With these methods, finding the CHK code on your MSI motherboard is simple and straightforward.
Download and Install MSI Command Center
If you’re struggling to find the CHK on your MSI motherboard, don’t worry – there’s a software solution that can help. Downloading and installing MSI Command Center is a great way to locate the CHK on your motherboard quickly and effortlessly. This software allows you to access various features of your motherboard, including temperature, fan speed, voltage, and more.
With MSI Command Center, you can monitor your system’s performance in real-time, enabling you to identify and troubleshoot any issues that may be affecting your computer. It’s an essential tool for gamers, creative professionals, and anyone who wants to get the most out of their MSI motherboard. Give it a try today and experience the benefits of this powerful software firsthand.
Open the MSI Command Center and Check for CHK
If you’re an MSI motherboard user, you might have come across CHK files while using your system. CHK files are usually created when Windows discovers a problem while reading data from your hard drive. As these files don’t have any specific file extension, it can be hard to identify them on your system.
Fortunately, MSI has provided a tool to help users easily locate CHK files on their motherboards. You can use the MSI Command Center software to detect and remove these problematic files from your system. Once you open the Command Center, head to the “Tools” tab and select “CHK File Finder” to run the scan.
The software will then locate and display all CHK files found on your system. You can easily delete these files or restore them if you find any important data inside them. By using the MSI Command Center tool, you can keep your system running smoothly and efficiently.
Alternative Software Options
If you own an MSI motherboard, finding CHK files can be a daunting task. Thankfully, there are alternative software options available to help you locate these pesky files. One such software is WinHex, which is a powerful hex editor that can search your system for CHK files.
You can also try using a data recovery software such as Recuva or EaseUS Data Recovery Wizard. These programs can scan your computer’s hard drive to find any recoverable files, including CHK files. Another option is to use a file extension converter, which can change CHK files into a more recognizable format such as JPEG or DOCX.
Regardless of the option you choose, always make sure to backup your system beforehand to prevent any data loss. With the help of these alternative software options, finding CHK files on your MSI motherboard has never been easier.
Contact MSI for Assistance
If you’re having trouble finding the chk on your MSI motherboard, don’t worry, you’re not alone. It can be frustrating when you’re trying to diagnose a problem with your computer, only to get stuck on a seemingly simple step. But fear not, there are a few things you can try to locate the chk on your MSI motherboard.
First, check your motherboard manual or visit MSI’s website for support. They may be able to provide you with detailed instructions or even a diagram to help you locate the chk. If that doesn’t help, don’t be afraid to reach out to MSI’s customer service team for assistance.
They’re there to help you troubleshoot any issues you may be experiencing and answer any questions you have about your motherboard. So if you’re feeling stuck, don’t hesitate to contact MSI for the help you need.
Reach Out to MSI Support
Are you experiencing technical difficulties with your MSI device? Don’t panic, help is just a click away! MSI has a dedicated support team that is always ready to assist you with any problems you may encounter. Whether you need assistance with driver installations or have a hardware issue, the MSI support team is fully equipped to help you solve any problem. To get in touch with them, simply head over to the MSI website and navigate to the support page.
Here, you’ll find a wide range of resources and tools to help you troubleshoot any issues you may have. Alternatively, you can submit a support ticket or reach out to the support team via live chat. When you contact MSI for assistance, you can rest assured that you’ll receive prompt and friendly support from knowledgeable technicians who are experts in their field.
So, the next time you encounter an issue with your MSI device, don’t hesitate to reach out to the support team and get the help you need to get back up and running in no time!
Provide Your Motherboard Model Number
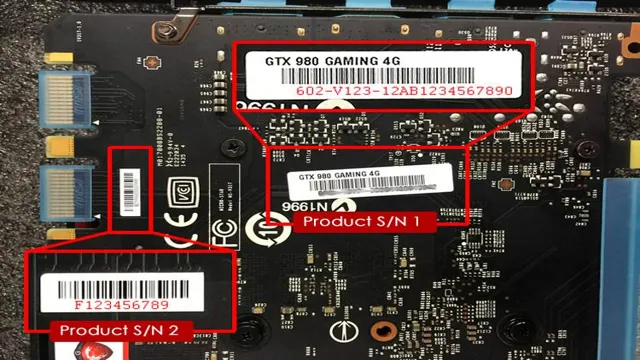
If you’re experiencing issues or need assistance with your MSI motherboard, the first step is to provide your motherboard’s model number. This information is crucial as it allows MSI customer support to identify your specific system and provide targeted and accurate assistance. You can find the model number on the motherboard itself, typically printed near the CPU socket or PCI-E slots.
Once you have your model number, the next step is to contact MSI for assistance. You can do this through their official website, where you’ll find a support section that provides various resources, including drivers, manuals, and FAQs. You can also directly contact their customer support team through email or phone for more personalized assistance.
Remember, providing the right information, such as your model number, can ultimately save you time and frustration in resolving any issues with your MSI motherboard.
Conclusion
In conclusion, finding the CHK on an MSI motherboard can seem like a daunting task. However, with a keen eye, steady hand, and a few helpful guides, you too can uncover this elusive little button. Think of it like playing a game of hide-and-seek with your own hardware.
So, get your magnifying glass and determination ready – it’s time to start the hunt for your MSI CHK button!”
FAQs
What is CHK?
CHK stands for Cyclical Redundancy Check which is a way to check for errors on data being transferred.
How do I find CHK on my MSI motherboard?
CHK is not a feature on MSI motherboards. However, some MSI motherboards come with a feature called M-Flash which can be used to reflash the BIOS, and during this process, a CHK value is displayed.
How do I use M-Flash on my MSI motherboard to find the CHK value?
To use M-Flash, you need to enter BIOS and navigate to the “Advanced” or “Boot” tab. From there, select “M-Flash” and follow the prompts to reflash the BIOS. During the process, the CHK value will be displayed.
Does finding the CHK on my MSI motherboard indicate that there are errors?
No, finding the CHK value does not necessarily mean that there are errors. It is simply a way to check for errors during data transfer.
What should I do if I encounter an error during the M-Flash process on my MSI motherboard?
If you encounter an error during the M-Flash process on your MSI motherboard, you should immediately stop the process and consult the MSI support website or contact customer support for assistance.