Removing a GPU from a motherboard may seem like a daunting task at first, but it is not as complex as it may appear. A GPU, or graphics processing unit, is a crucial component that handles the visual aspects of a computer. Although it is uncommon to remove a GPU from a motherboard, there are a few reasons why one may need to do so.
Perhaps your GPU is outdated and in need of an upgrade, or you need to uninstall it to troubleshoot an issue you have encountered. Whatever the reason may be, this guide will provide you with a step-by-step process to safely remove your GPU from your motherboard without causing any damage. So, grab a screwdriver and let’s get started!
Tools Needed
Removing a GPU from a motherboard can be a bit tricky, but with the right tools and some patience, it is definitely doable. First and foremost, you will need a Phillips head screwdriver to remove any screws that are holding the GPU in place. You may also need a pair of pliers or tweezers, depending on the type of locking mechanism your GPU has.
It’s important to take your time when removing the GPU and be gentle with any components to avoid damaging them. Always make sure to properly ground yourself before handling any computer parts to prevent static electricity from damaging the components. Once you’ve successfully removed the GPU, you should clean any dust or debris from the PCIe slot before installing a new card.
With the right tools and a steady hand, removing a GPU from a motherboard can be a simple and straightforward process.
Screwdriver
When it comes to using a screwdriver, having the right tools is essential. Besides the screwdriver itself, you’ll want a sturdy work surface, a pair of safety goggles to protect your eyes, and a work light to help you see what you’re doing. A small square of sandpaper or an emery cloth can also come in handy if you need to smooth rough edges or remove rust from the screwdriver.
If you need to turn screws in tight spaces, a stubby screwdriver or an extension bar can help. Additionally, keeping a few different sizes and types of screwdrivers in your tool kit can save you time and frustration. Whether you need a Phillips head screwdriver or a flat head screwdriver, having the right tool for the job can make all the difference.
So, before you start any DIY project or repair job requiring a screwdriver, make sure you have the tools you need to get the job done right.
Antistatic wrist strap
If you’re working on electronic devices, especially sensitive ones, you’re most likely concerned about electrostatic discharge (ESD) damaging them. That’s where an antistatic wrist strap comes into play. This simple tool can prevent the buildup of static electricity in your body by grounding you to an object with an opposing charge.
So what tools do you need to use an antistatic wrist strap? Firstly, you need the wrist strap itself, which is typically made of an elastic band with a metal snap. You’ll also need a grounding cord that attaches to the wrist strap on one end and clips onto a metal surface on the other. A conductive mat or table is ideal for this step.
Finally, you’ll need to test the wrist strap to ensure it’s properly functioning. A wrist strap tester is the best tool for this, but a multimeter can also work in a pinch. With these tools, using an antistatic wrist strap should be a straightforward and effective way to protect your electronic devices from ESD damage.
So, don’t hesitate to add it to your electronic tool kit today!
Preparation
Removing a GPU from a motherboard might seem like an intimidating task, but with the right preparation, it can be a smooth and easy process. First, make sure your computer is powered off and unplugged from any power source. Next, open your computer case and locate the GPU.
It will typically be located in a PCIe slot and secured in place by a retention clip or screws. Carefully remove any screws or clips holding the GPU in place, then gently rock the GPU back and forth to loosen it from the slot. Once it is loose, carefully lift it out of the slot.
Be sure to avoid touching any of the delicate components on the card, as static electricity can damage them. With these basic preparation steps, removing a GPU from a motherboard is a breeze – just take your time and be careful, and you’ll have that GPU out in no time!
Shutdown computer and disconnect all cables
It’s important to properly shut down your computer and disconnect all cables before doing any maintenance or cleaning. This will help prevent any electrical shocks while working on your computer and reduce the risk of damaging hardware. Start by shutting down your computer completely and unplugging it from the wall.
Next, carefully remove all cables, including the power cord, from the back of your computer. Avoid pulling on the cables too hard, as this can damage the ports. Keep all cables organized and labeled so that you can easily reconnect them later.
Additionally, make sure you have a clean and clear workspace before starting any maintenance or cleaning tasks. By taking these simple steps, you’ll ensure your safety and minimize the chance of any accidental damage to your computer.
Ground yourself
To start any task or project, it is important to prepare and ground yourself. Taking a few moments to focus on your intention and calm your mind can help you perform better and stay focused. One way to ground yourself is through deep breathing exercises.
This simple yet powerful technique can help you become more present and centered, allowing you to let go of any distractions or stressors. Another helpful technique is visualization, where you can imagine yourself as a tree with your roots firmly planted in the ground. This can help you feel anchored to the earth and provide a sense of stability and strength.
Practicing these techniques regularly can help you feel more grounded and ready to take on any challenge that comes your way. Remember, preparation is key to success, and it starts with grounding yourself.
Removing the GPU
If you’re planning to upgrade or replace your GPU, you’ll need to know how to remove it properly to avoid any damage to your motherboard. First, make sure your computer is unplugged and turn off your power supply switch. Locate the PCIe slot where your GPU is installed and gently press down on the release lever or button.
This will release the locking mechanism and allow you to remove the GPU. You may need to wiggle it slightly to loosen it from the slot. Once it’s free, gently pull it out from the slot.
Be careful not to pull too hard on the GPU or the PCIe slot as it may cause damage. Finally, make sure to store your GPU in a safe and dry place. With these simple steps, removing a GPU from a motherboard can be hassle-free and straightforward.
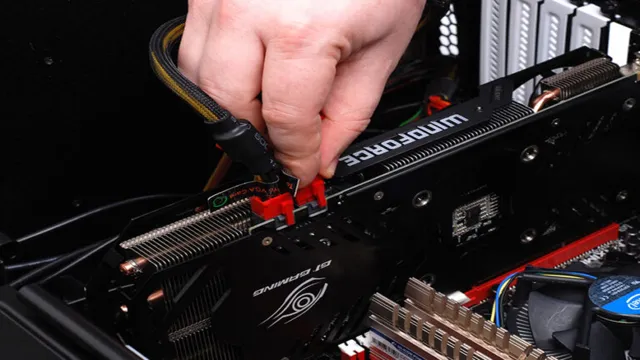
Locate the GPU release lever/screw
When it comes to upgrading or replacing your GPU, one of the first steps you should take is to locate the GPU release lever/screw. This is the mechanism that holds the graphics card in place, and you’ll need to remove it in order to install your new GPU. The release lever/screw can be located in different spots depending on the specific model of your computer or motherboard, but it is typically located near the PCIe slot where the GPU is installed.
Once you’ve located the release lever/screw, you may need to use a tool such as a screwdriver to detach it. After you’ve removed the lever/screw, you should be able to gently pull out the GPU from the PCIe slot. Just be sure to handle the graphics card with care and avoid touching any of the sensitive components.
By taking your time and carefully removing the old GPU, you can ensure a smooth and successful installation of your new graphics card.
Carefully release the GPU from the motherboard
To remove the GPU from your computer motherboard, it’s essential to take great care not to damage any of the delicate components. First, locate the locking mechanism holding the GPU securely to the motherboard. This mechanism will be different depending on the type of GPU and the motherboard it is attached to, so it’s important to do your research or consult an expert.
Once you have identified the locking mechanism, gently release it and slide the GPU out of its slot. Be sure to handle the GPU delicately to avoid any impact that could cause damage to the sensitive circuitry. At this point, you may also need to unplug any power cables connected to the GPU.
It’s important to take your time and work carefully, so you don’t damage any of the hardware. With patience and skill, you can safely remove the GPU, opening up the possibility for upgrades or repairs in the future. Just remember to keep in mind that any alterations to your computer hardware should be done with care and precision, to avoid any unintended consequences.
Gently lift the GPU out of the slot
When it comes to upgrading or replacing your GPU, it’s important to know the proper steps to avoid damaging your hardware. The first step in removing your GPU is to gently lift it out of the slot. This may sound simple, but it’s important to do so with caution.
Make sure to remove any screws or cables that may be holding the GPU in place before attempting to remove it. Once you’ve removed any obstructions, use both hands to carefully lift the GPU straight up and out of the slot. Be sure not to use too much force or twist the GPU as you lift it out, as this can cause damage to the connectors on both the GPU and the motherboard.
Taking your time and handling your equipment delicately will ensure a smooth and safe removal of your GPU, allowing you to move forward with your upgrade or replacement with ease.
Final Steps
If you are looking for a way to upgrade or replace your GPU, you’ll need to know how to remove it from your motherboard. Don’t worry, it’s not as complicated as it sounds. Before you begin, make sure you have all the necessary tools and a safe and clear workspace.
First, shut down your computer and unplug it from the power source. Next, remove the case cover and locate the GPU on the motherboard. Depending on the model, it may be secured with screws, a latch, or a clip.
Once you have identified the locking mechanism, carefully release it and gently remove the GPU from the slot. Make sure you keep it safe and secure to avoid any damage. Congratulations, you have successfully removed your GPU from the motherboard.
Now, you can install a new or upgraded one and enjoy better graphics performance.
Inspect the GPU for any damage
As a final step in inspecting your GPU, you need to carefully check for any signs of damage. A damaged GPU may have physical deformities or cracks, as well as signs of corrosion or discoloration. You may also notice burnt or damaged components, which could indicate that the GPU has been exposed to extreme heat or electrical surges.
To check for damage, take a close look at all the components and compare them to reference images online. If you notice any issues, it may be time to replace your GPU or seek professional repairs. Remember, a damaged GPU can lead to poor performance, system crashes, and even permanent damage to your computer, so it’s essential to catch any issues early on.
Store the GPU in an antistatic bag or container
When it comes to storing your GPU, it’s important to take some precautions to avoid static electricity damage. One of the easiest ways to prevent this is by keeping your GPU in an antistatic bag or container. These bags or containers are specially designed to protect sensitive electronic components from static electricity.
They have a dissipative surface that helps prevent any charge buildup, which can damage your GPU. Additionally, they are made out of non-conductive materials which reduce the likelihood of any electrical discharge. This means your GPU will be safe from any electrostatic damage caused by humidity or other environmental factors.
So, if you’re planning on storing your GPU for any amount of time, make sure to invest in an antistatic bag or container. Your GPU will thank you for it.
Reassemble computer
Finally, it’s time to reassemble your computer! This can seem daunting at first, but it’s actually not too difficult once you have everything laid out in front of you. First, carefully place the motherboard back into the case and screw it in securely. Next, connect the power supply and disk drives to the motherboard with the appropriate cables.
Don’t forget to attach the fan and heatsink to the processor as well. Finally, insert any expansion cards and connect any other necessary peripherals, such as a keyboard and mouse. Double check all connections and components to make sure everything is secure before plugging in and powering up your computer.
Congratulations, you’ve successfully rebuilt your computer!
Conclusion
Congratulations, you have successfully navigated the labyrinthine world of computer hardware and removed your GPU from its rightful place on the motherboard. You may now bask in the satisfaction of a job well done, or perhaps go out and treat yourself to a well-deserved pint (just be sure to leave your GPU at home – it’s had enough excitement for one day). Remember, always handle your hardware with care, and don’t be afraid to ask for help if you need it.
Happy computing!”
FAQs
What tools do I need to remove a GPU from my motherboard?
You will need a screwdriver to remove the screws that hold the GPU in place and possibly an anti-static wristband to prevent damage to the hardware.
Is it safe to remove a GPU while the computer is still on?
No, it is not safe to remove a GPU while the computer is still on. Always shut down the computer and unplug it from the power source before attempting to remove any hardware.
How do I know if my GPU is compatible with my motherboard?
You can check the motherboard’s manual or website for a compatibility list, or you can use software such as Speccy to identify the motherboard and existing hardware, then compare that with the GPU’s requirements.
What steps should I take before removing the GPU from my motherboard?
Before removing the GPU, make sure to uninstall any drivers associated with it and power off the computer completely. It may also be helpful to take pictures or notes of the current setup.