Have you ever experienced the frustration of a computer that won’t start? It’s a common problem that can be caused by a variety of issues, including a dead motherboard. While replacing a motherboard can be costly and time-consuming, there is a way to jump-start it and potentially save yourself the hassle. In this ultimate guide, we’ll walk you through the steps to jump-start your motherboard so you can get your computer up and running again in no time.
Think of it like giving your computer a boost of energy, like how a defibrillator can jump-start a heart. With this guide, you’ll be equipped with the knowledge to tackle this problem head-on and get back to using your computer without a hitch. So, let’s dive in and jump-start that motherboard!
Preparation
Jump starting a motherboard can seem overwhelming, but with proper preparation, the process can be relatively smooth. Before beginning, ensure that you have the correct tools and components on hand, such as a power supply, motherboard manual, and a jumper cap. Make sure the power supply is unplugged and disconnected from the wall to avoid any potential electrical shocks.
Refer to the motherboard manual for specific instructions on where to place the jumper cap on the motherboard’s power pins. It’s important to ensure that the jumper cap is placed correctly; otherwise, the motherboard may not successfully jump-start. Once the jumper cap is in place, connect the power supply and turn it on.
If successful, the motherboard should go through a power-on self-test (POST) and start booting up. Remember to take your time with each step, double-checking your work to avoid any mistakes that may damage the motherboard. By following these steps and taking the necessary precautions, you can jump-start your motherboard successfully.
Gather Required Tools
Before starting any project, it is essential to gather all the required tools. This way, you won’t have to stop in the middle of the job to go to the store or search for a needed item. First, make a list of all the tools you will need, including their sizes and specifications.
Then, check to see if you already have some of the tools or if you need to purchase them. You can always borrow tools from friends or family if you don’t have them but don’t want to spend money. Next, purchase or rent the tools you need.
If you’re on a tight budget, check out second-hand stores or online marketplaces for discounted tools. Having all the necessary tools before you start will make the task quicker and less stressful. By doing this, you will have everything you need at your fingertips and can focus solely on completing the task.
Remember, preparation is key to ensure a successful outcome.
Identify the Motherboard Components
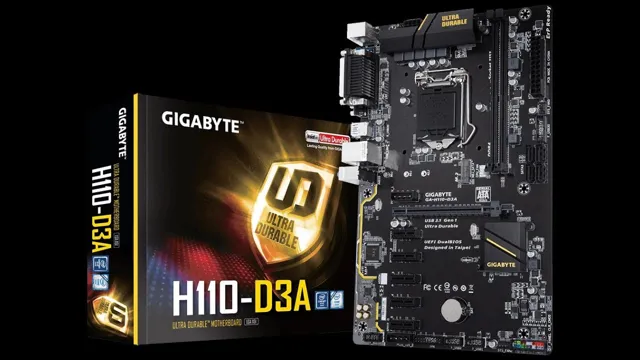
Before identifying the components of a motherboard, it’s important to have a basic understanding of its anatomy. A motherboard is the main printed circuit board in a computer that houses the central processing unit (CPU), random access memory (RAM), and other essential hardware components. To identify the motherboard components, you need to carefully inspect the board for different ports, slots, and chips.
Some of the essential components are easy to spot, such as the CPU socket, memory slots, and power connections. However, identifying the rest may require some expertise, research, and attention to detail. For instance, you can locate expansion slots for additional hardware, such as graphics cards and sound cards, near the bottom or middle of the board.
Similarly, you can find the integrated circuits (ICs) for audio, LAN, and USB controllers, often labeled near their locations. By taking the time to learn the important components of a motherboard, you can troubleshoot hardware issues and upgrade your computer with confidence.
Jump-Starting the Motherboard
If you’re having trouble getting your computer to start up, it might be time to consider jump-starting your motherboard. This can be a great way to troubleshoot issues and get your computer back up and running in no time. To jump-start your motherboard, you’ll first need to make sure that your power supply is disconnected and that your motherboard is properly grounded.
Once you’ve done this, you can use a small metal object, such as a screwdriver, to bridge the two power pins on your motherboard’s power switch header. This will simulate the action of pressing the power button and should cause your computer to start up. If this works, you’ve successfully jump-started your motherboard and can now begin diagnosing any issues that may be causing your computer to fail to start up normally.
Just be sure to take precautions when working with electronic components, and never touch anything inside your computer while it’s powered on.
Disconnect Power Cables & Remove Battery
If your computer won’t turn on, one of the first steps to try is jump-starting the motherboard. To do this, you’ll need to disconnect all power cables and remove the battery. This process can vary slightly depending on your computer’s make and model, so it’s important to refer to the owner’s manual or contact the manufacturer for specific instructions.
Once you’ve safely disconnected the power and removed the battery, you’ll need to locate the CMOS jumper on the motherboard. This is a small plastic clip that connects two pins on the motherboard. By moving the CMOS jumper from its default position to the “clear” position and then back to its default position, you can reset the BIOS settings and potentially fix any issues that are preventing your computer from booting up.
Jump-starting the motherboard can be a simple and effective way to troubleshoot hardware problems and get your computer back up and running again.
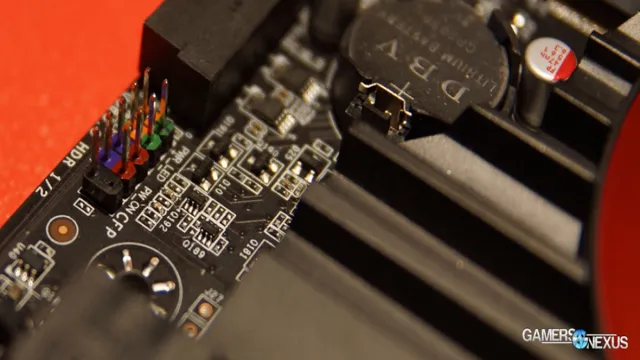
Locate & Short the Power Button Jumper
Jump-starting a motherboard can be a daunting task, but locating and shorting the power button jumper is a crucial step in the process. The power button jumper is typically located on the bottom right side of the motherboard, near the front panel connectors. It is a small set of pins that are used to turn the computer on and off.
To jump-start the motherboard, you will need to locate the power button jumper and use a jumper cap or a small piece of wire to short the pins together. This will simulate the action of pressing the power button and turn the computer on. It is important to note that you should only attempt this if you are experienced with computer hardware and understand the risks involved.
If done correctly, jump-starting the motherboard can save you time and money, as it can often fix issues without having to replace any parts.
Attach Power Cables & Battery
Jump-Starting the Motherboard Getting your motherboard up and running is an essential step in building your own PC. To do this, you’ll first need to attach power cables and a battery. The power cables usually come in two varieties: the large 20-pin ATX cable and the smaller 4-pin ATX12V cable.
Make sure to line up the pins and firmly attach them to their respective connectors. Next, insert the battery into the designated slot on the motherboard. This will provide a backup power source for the BIOS in case the primary power supply fails.
Once your power cables and battery are securely in place, you’re ready to jump-start the motherboard. This involves shorting two pins on the motherboard with a screwdriver or other metal object. Be sure to consult your motherboard manual for the correct pins to short.
Once you’ve successfully jump-started the motherboard, you’ll be ready to install the rest of your PC components and start powering up your system. With a properly functioning motherboard, you’ll be well on your way to a high-performance, custom-built PC that meets all your computing needs.
Testing the Jump-Started Motherboard
If you’ve recently built a PC or just need to test out your motherboard, jump-starting it is a crucial step in the process. You’ll want to start by unplugging everything and removing the battery from the motherboard. Then, locate the two pins labeled “power switch” or “power SW” on the motherboard and use a screwdriver or jumper cap to connect them for a few seconds.
This will simulate pressing the power button on the case and turn on the motherboard. If everything is working correctly, the fans and any lights on the motherboard should turn on. If not, double-check all connections and try again.
Keep in mind that jump-starting your motherboard doesn’t test the functionality of all components, such as the CPU and RAM, but it’s a good start to see if the basic components are working properly. So, now you know how to jump start the motherboard and can confidently move forward with your PC building or troubleshooting process.
Check for Power
When testing a jump-started motherboard, it’s important to check for power first. This means ensuring that your PSU (power supply unit) is connected and switched on, and that all necessary cables are properly plugged in. You can easily check for power by ‘jumping’ your motherboard – this involves briefly connecting the two pins that correspond to your motherboard’s power switch, using a screwdriver or other metal object.
If your motherboard powers on, you can move on to testing other components. But if there’s no power, it could mean that there’s an issue with your PSU, or with your motherboard’s power delivery system. In this case, it’s best to consult with a professional or to troubleshoot the issue further to isolate the problem and find a solution.
Remember, safety always comes first when dealing with electronic components, so make sure you take all necessary precautions before handling anything within your PC.
Boot Up the Computer
After jump-starting your motherboard, it’s time to see if it’s running okay. Begin by booting up your computer. This is done by pressing and holding the Power button on the computer tower until you hear a faint startup chime or see the manufacturer’s logo appear on the screen.
If nothing happens, turn off the computer and double-check all the connections and components. If everything seems fine, try again. Once you’re in, you’ll want to test the various components such as the hard drive, graphic card, and audio to make sure they’re working properly.
Make sure the BIOS (basic input/output system) settings are also correct and that they’re saved before moving forward. From here, you can start installing your necessary software and applications and put your computer to the test. Remember, jump-starting your motherboard was just the first step, and the real test begins when you power up your computer.
Conclusion
In conclusion, jumping a motherboard is a lot like jumping a car – only instead of a dead battery, you’ve got a dead BIOS. It’s not as difficult as it sounds. Just make sure to follow the steps carefully, double check your connections, and remember to remove your jumpers once your system starts up.
And just like any successful jump start, you’ll feel a rush of excitement and relief when your motherboard roars back to life. So, grab your cables, channel your inner mechanic, and get ready to jump start your way to a tech-savvy victory!”
FAQs
What does it mean to jump start a motherboard?
Jump starting a motherboard is the process of manually powering it on by using a jumper cable to connect two specific pins on the motherboard. This is usually done when there is an issue with the power button or the power supply.
Is it safe to jump start a motherboard?
Jump starting a motherboard can be safe if done correctly. However, it should only be done by someone who has experience working with computer hardware to avoid damaging the motherboard or other components.
How do I find the correct pins to jump start my motherboard?
The location of the pins to jump start a motherboard varies by model and manufacturer. Refer to the motherboard manual or a diagram online to locate the correct pins for your specific motherboard.
What should I do if jumping starting the motherboard doesn’t work?
If jumping starting the motherboard doesn’t work, check to make sure that all cables and components are properly connected and that the power supply is working. If the issue persists, it may be necessary to consult a professional or replace the motherboard.