If you’re looking to ramp up the security of your MSI motherboard, then enabling secure boot is a must. Secure boot ensures that your computer boots up using only trusted and approved software, which can significantly reduce the chances of malware and other threats posing a risk to your system. But how do you enable secure boot on an MSI motherboard? Have no fear, because in this blog, we’ll show you how to do just that.
Get ready to beef up your computer’s security and gain peace of mind while using your device.
Check Your Bios Version
If you’re looking to turn on secure boot on your MSI motherboard, the first thing you need to do is check your BIOS version. Secure boot requires UEFI firmware version
1c or later, so it’s important to make sure your BIOS is up-to-date before proceeding. To do this, simply restart your computer and press the Delete key (or whichever key your motherboard uses) to access the BIOS setup. From there, you should see your current BIOS version displayed in the main menu.
If it’s not up-to-date, you’ll need to download the latest firmware from the MSI website and follow the instructions carefully to install it. Once your BIOS is updated, you can then enable secure boot from the same menu and enjoy enhanced security and protection for your system. Keep in mind that secure boot may prevent unauthorized access to your system, but it also limits your ability to install certain software, so use it wisely.
Step 1: Enter the BIOS Setup Utility
When it comes to accessing BIOS and making changes, the first step is to enter the BIOS Setup Utility. However, before you do that, it’s essential to check your BIOS version. This step ensures that you have the latest firmware and that you are aware of any potential compatibility issues with the changes you want to make.
To check your BIOS version, you need to boot up your computer and hit the correct key to enter the BIOS. This key varies depending on your computer’s manufacturer, but it’s usually F2, F12, or DELETE. Once you’re in the BIOS, look for the BIOS version information, which is usually displayed on the main screen.
If your BIOS is outdated, you can download the latest version from your computer’s manufacturer website and update it before making any other changes. Optimizing BIOS can lead to faster boot times, improved stability, and better overall performance of your computer.
Step 2: Navigate to Boot Menu
Once you have accessed your BIOS settings, you can check your BIOS version before proceeding to the boot menu. It’s important to check your BIOS version to ensure compatibility with your system and to avoid any errors during the process. To check your BIOS version, you can navigate to the “System Information” menu in the BIOS.
From there, you should be able to see the current version of your BIOS. If you’re unsure about the version or have any questions, you can always refer to the manufacturer’s website and download any necessary updates. Once you’ve checked and confirmed the version, you can then move on to the next step and navigate to the boot menu.
Remember to save any changes made to the BIOS settings before exiting. Following these steps should ensure a successful boot process.
Step 3: Enable Secure Boot
Before enabling Secure Boot, it’s important to check the version of your BIOS. Your computer’s BIOS controls the interface between the operating system and the hardware components such as the motherboard, processor, and hard drives. You can access the BIOS settings by pressing a certain key while the computer boots up.
Depending on the manufacturer, the key can be F2, F10, or Del. Once you’re in the BIOS settings, navigate to the “System Information” or “Main” section to find your BIOS version. This step is important because the Secure Boot option may not be available in older versions of the BIOS.
Updating the BIOS to the latest version may be necessary to enable Secure Boot. However, it’s crucial to follow the manufacturer’s instructions carefully, as any mistake during the update process can cause serious damage to your computer. By ensuring that your BIOS is up to date, you can move on to enabling Secure Boot and enhance the security of your computer significantly.
Save Changes and Exit
If you’re wondering how to turn on secure boot on an MSI motherboard, it’s actually a pretty simple process. Secure boot can help protect your system from malware and unauthorized changes to the boot process, so it’s definitely worth enabling if your motherboard supports it. To get started, enter your motherboard’s BIOS by pressing the designated key during startup (usually F2 or Delete).
From there, navigate to the Settings menu and look for an option that says “Secure Boot”. Once you’ve found it, make sure it’s set to “Enabled”, then save your changes and exit the BIOS. It’s important to note that not all MSI motherboards support secure boot, so you may need to check your manual or contact MSI support if you’re having trouble finding this option.
But if your motherboard does support it, enabling secure boot is a quick and easy way to add an extra layer of protection to your system.
Step 1: Navigate to Exit
Saving changes and exiting a program or application is an essential part of ensuring smooth functionality and preventing data loss. The first step involved in this process is to navigate to the exit button or option, which can typically be found in the top-right corner of the screen. This can be a crucial step when working on a complex project or document, as it can ensure that any changes made are securely saved before the program is closed.
By following this simple step, you can minimize the risk of data loss and maximize productivity when using your favorite software and applications. So, always remember to take a moment to save your changes and exit properly to avoid losing your progress or data.
Step 2: Save Changes and Exit BIOS
After making changes to your computer’s BIOS settings, the next step is to save the changes and exit the BIOS. This is an important step, as failing to save the changes can result in them being lost, and your computer may not function properly. To save changes and exit the BIOS, you will need to look for the option to “Save and Exit” or “Exit and Save” in the BIOS menu.
Once you have located this option, select it, and then confirm your choice by selecting “Yes” or “OK.” Your computer will then save the changes you made to the BIOS and restart. It’s essential to ensure that the changes made in BIOS are successfully saved before exiting to prevent accidents.
It is quite remarkable how much changes can be made to a computer’s performance by tweaking the BIOS settings with the right knowledge. So, always be careful not to lose the changes because it may bring a significant difference to how your computer operates.
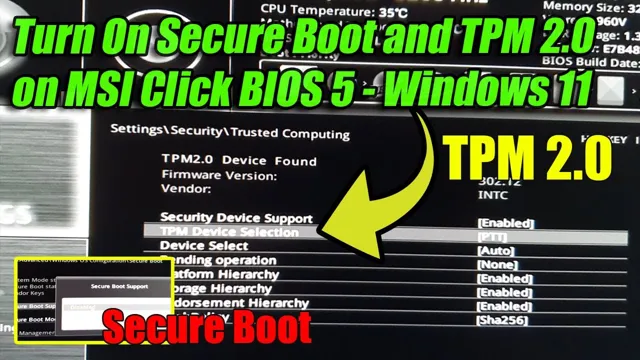
Verify Secure Boot is Enabled
Are you concerned about the security of your MSI motherboard? If so, you might want to turn on the Secure Boot feature. This will prevent unauthorized operating systems from running on your system, making it more secure. To turn on Secure Boot, you’ll need to access the BIOS settings.
This can usually be done by pressing the Delete key when your computer first turns on. Once in the BIOS, look for a setting called Secure Boot and enable it. Keep in mind that some older motherboards might not have this feature available.
So, if you’re using an older system, it might be time to consider upgrading to a more modern motherboard that supports Secure Boot. With this feature enabled, you can rest assured that your system is protected from potential threats.
Step 1: Enter the BIOS Setup Utility
To start with, if you want to enable Secure Boot on your computer, you’ll need to enter the BIOS Setup Utility. This can be achieved by pressing a specific key during the boot process, which varies depending on your computer manufacturer. Once you’re in the BIOS, the first thing you’ll want to do is to verify that Secure Boot is enabled.
Secure Boot is a feature that helps protect against malware and other security threats by ensuring that only trusted software can run when the system boots up. To enable it, you’ll need to navigate to the Secure Boot options, which may be located under the Security or Boot tabs, depending on your computer. From there, you can turn on Secure Boot and save your changes.
This will ensure that your system is better protected against potential security threats and give you greater peace of mind when using your computer.
Step 2: Verify Secure Boot is Enabled
To ensure the security of your computer’s boot process, it’s important to verify that Secure Boot is enabled. This feature relies on a system called UEFI (Unified Extensible Firmware Interface) which ensures that only trusted software is loaded during the boot process, preventing the system from being compromised by malware or other unauthorized software. To ensure that Secure Boot is enabled, you’ll need to access your computer’s BIOS or UEFI settings.
The exact process for doing this will vary depending on your computer’s manufacturer, but you can typically access these settings by pressing a specific key (such as F2 or Del) during the boot process. Once you’re in the settings, look for the Secure Boot option and make sure it’s enabled. If it’s not enabled, enable it and save your changes before exiting the settings.
By verifying that Secure Boot is enabled, you can help protect your computer from malicious software and ensure that your system is secure.
Troubleshooting Secure Boot Failure
If you’re experiencing issues with booting up your MSI motherboard, turning on Secure Boot is a key step in ensuring your computer’s safety. First, access your motherboard’s UEFI or BIOS settings by pressing the designated key during boot-up (usually F2 or Delete). From there, navigate to the Secure Boot option and make sure it’s enabled.
If you encounter any problems, such as the Secure Boot option being greyed out, it may be necessary to update your motherboard’s firmware or check that your hardware is compatible with Secure Boot. Remember that Secure Boot is designed to prevent unauthorized firmware or operating systems from running on your computer, so it’s crucial to troubleshoot any issues that may arise.
Conclusion
In conclusion, turning on secure boot is a necessary step in fortifying your MSI motherboard against malicious attacks. It may seem daunting at first, but with the right knowledge and guidance, you’ll be able to activate it and rest easy knowing your system is well-protected. So go ahead and take this important step towards securing your system, and let hackers know that they’re not welcome in your digital space!”
FAQs
What is Secure Boot and why is it important on an MSI motherboard?
Secure Boot is a feature that ensures that only trusted and authenticated software can run on a computer by checking the digital signature of the boot loader and operating system. It is important on an MSI motherboard as it protects the system from malware and other security threats.
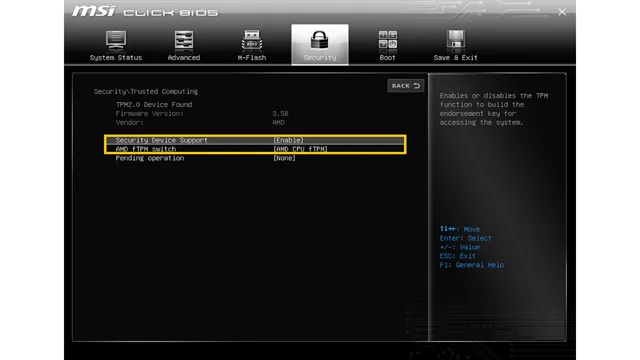
How do I enable Secure Boot on my MSI motherboard?
To enable Secure Boot on your MSI motherboard, you need to enter the BIOS setup utility and navigate to the Security tab. From there, select the Secure Boot option and enable it. You may also need to install a trusted operating system or boot loader to ensure that your system is secure.
What happens if Secure Boot is disabled on an MSI motherboard?
If Secure Boot is disabled on an MSI motherboard, the system will be vulnerable to attacks from malware and other security threats. This could lead to data loss, system crashes, and other issues. It is important to enable Secure Boot to ensure the safety and security of your system.
Can I disable Secure Boot on my MSI motherboard?
Yes, it is possible to disable Secure Boot on an MSI motherboard. However, it is not recommended as it could leave your system vulnerable to security threats. If you need to disable it for some reason, you should be aware of the risks involved and take appropriate steps to secure your system.