Have you ever encountered a problem where you want to use your motherboard’s HDMI output but don’t have integrated graphics? It can be frustrating, especially when you have a separate graphics card that you want to use. Fortunately, there are ways to enable your motherboard’s HDMI output without relying on its integrated graphics. In this blog post, we’ll explore some of the methods you can use to get your HDMI output up and running, whether you’re using a desktop or a laptop.
So, let’s dive in and discover how to make your motherboard HDMI-enabled without integrated graphics!
First Things First
If you’re trying to figure out how to enable your motherboard’s HDMI port without integrated graphics, there are a few steps you can take to get it to work. First, you’ll need to make sure that your CPU supports integrated graphics or has a discrete graphics card installed. Then, check your BIOS settings to make sure that your motherboard’s HDMI output is enabled.
Some motherboards require you to enable the HDMI output manually in the BIOS settings. Once you’ve done that, connect your HDMI cable to your graphics card or motherboard and then to your display. If you’re still having issues, try updating your graphics card drivers or checking for any loose connections.
With a few simple steps, you can easily enable your motherboard’s HDMI output without having to rely on integrated graphics.
Check Compatibility with Hardware
When it comes to building your own PC, checking compatibility with your hardware should be your first priority. This means ensuring that your components, such as your CPU, motherboard, and RAM, are all compatible with each other. Using incompatible hardware can lead to issues such as system crashes, hardware failures, and poor performance.
It’s essential to do your research beforehand to avoid spending money on incompatible components. One great resource for checking compatibility is the manufacturer’s website or user manual, where they often list compatible hardware specifications. Don’t forget to also consider factors such as power supply requirements and cooling when selecting your hardware to ensure a smooth and efficient system.
Overall, taking the time to check compatibility will save you time and headaches down the road.
Update BIOS (Basic Input-Output System) Settings
When it comes to optimizing your computer’s performance, updating the BIOS settings is one of the first things you should do. BIOS (Basic Input-Output System) is responsible for allowing your computer to communicate with its various components, such as the hard drive, CPU, and RAM. Updating your BIOS can improve system stability, increase compatibility with newer hardware, and even boost performance.
It’s important to note that updating your BIOS is not the same as updating your operating system or drivers. It requires a specific process and can potentially cause system issues if not done correctly. That being said, it’s a worthwhile endeavor for anyone looking to improve their computer’s overall performance.
So, if you’re ready to take the leap and update your BIOS, make sure to do your research and follow the manufacturer’s instructions carefully.
Disable Integrated Graphics
Are you struggling to enable your motherboard HDMI but the integrated graphics keep causing issues? Well, you’re in luck, because we have a solution for you! The easiest way to disable integrated graphics is through your BIOS settings. First, restart your computer and press the key displayed on-screen to enter the BIOS setup. Look for an option labeled “Integrated Graphics” or “Onboard Graphics” and change it to “Disable” or “Off.
” Save the changes and exit the BIOS setup. Your computer should now use your dedicated graphics card instead of the integrated graphics, allowing you to use your motherboard’s HDMI port. It’s important to note that disabling integrated graphics may cause some applications to not function properly, so double-check before making any changes.
With this simple fix, you’ll be able to enjoy high-quality visuals on your monitor without any interruptions from integrated graphics!
Locate Chipset Settings in BIOS
If you’re looking to disable integrated graphics on your computer, you’ll need to delve into your BIOS settings. But where exactly can you find your chipset settings? Well, the location can vary depending on your computer’s make and model, but typically you’ll find it listed under “Advanced Chipset Settings” or “Integrated Peripherals” in your BIOS menu. Once you locate the setting, you can disable your integrated graphics by selecting “Disable” or “None” from the options available.
Keep in mind that disabling integrated graphics may affect your computer’s performance, so it’s important to weigh the pros and cons before making any changes. If you’re an avid gamer or use intensive graphics programs, you may want to consider a dedicated graphics card instead.
Disable Integrated Graphics in Device Manager
If you’re looking to improve your PC’s graphics performance, disabling the integrated graphics card in Device Manager can be a helpful solution. Integrated graphics cards are built into the CPU and are often not as powerful as dedicated graphics cards. By disabling the integrated graphics, you can allow your dedicated graphics card to take over and handle all of the graphics processing.
This can lead to smoother gameplay and improved performance for graphics-intensive applications. To disable the integrated graphics, simply open up Device Manager, find the graphics card listed under display adapters, right-click on it, and select “Disable device.” Keep in mind that this may cause your computer to use more power and generate more heat, so make sure you have adequate cooling and power supply before making any changes.
Overall, disabling the integrated graphics can be a simple and effective way to improve your PC’s graphics performance.
Enable Motherboard HDMI
Enabling the HDMI port on your motherboard is necessary when using a graphics card that does not have an integrated port. The process may vary depending on your motherboard manufacturer and model. However, in general, you can access the BIOS settings by pressing the specific hotkey while your computer is booting up.
Once you’re in, locate the “Integrated Peripherals” or “Onboard Devices” and select “Primary Video Adapter.” Select the option “PCI-E” instead of “Onboard” or “Auto” and save your changes before restarting your computer. This will automatically enable the HDMI on your motherboard and allow you to use your external display with your graphics card seamlessly.
By following these steps, you can easily enable the motherboard HDMI to enjoy high-quality video output without hassle.
Locate Motherboard HDMI Option in BIOS Settings
If you want to use the HDMI port on your motherboard to connect your display, you’ll first need to enable it in your system’s BIOS settings. To do this, you’ll need to restart your computer and enter the BIOS setup menu (usually by pressing a key like F2 or Delete during boot-up). Once inside, look for the “Advanced” or “Integrated Peripherals” section, and then locate the “Onboard Devices” or “Onboard Config” subsection.
Here, you should find an option to enable the onboard HDMI port. It may be labeled as “Onboard HDMI,” “Onboard Graphics,” or something similar. Depending on your motherboard, you may also need to disable any dedicated graphics card you have installed in order for the onboard HDMI to work properly.
Once you’ve enabled the onboard HDMI and made any other necessary changes, save your settings and exit the BIOS. When your computer reboots, the HDMI port on your motherboard should be functional. Remember to use the main keyword “Motherboard HDMI” throughout the text to enhance its SEO optimization.
Confirm Settings and Save Changes
When building a new PC, it’s important to make sure that all the components are working together seamlessly. If you plan to use HDMI to connect to your display, then you’ll need to enable HDMI on your motherboard. This process is straightforward, and there are only a few steps to follow.
Firstly, you’ll need to enter your BIOS settings, which you can usually do by pressing a specific key during boot-up. Once you’ve accessed your BIOS settings, navigate to the “Integrated Peripherals” or “Onboard Devices” section. Here, you’ll need to find the option to enable the HDMI port on your motherboard.
Depending on the motherboard model, this option might be listed as “Onboard HDMI” or “Onboard Graphics,” but it should be fairly easy to find. Once you’ve located the correct option, simply enable it and save your changes. Now, when you connect your PC to a display via HDMI, it should work right out of the box.
There are many benefits to using HDMI, including better audio and video quality, so it’s definitely worth taking the time to enable it on your system.
Troubleshooting Tips
If you are trying to enable your motherboard’s HDMI port without using an integrated graphics card, there are a few things you can try. First, make sure that your motherboard supports HDMI output. If it does, check your BIOS settings to ensure that the onboard graphics are disabled.
You may also need to update your BIOS or install the latest drivers for your graphics card. Another option is to install a discrete graphics card that supports HDMI output. This will allow you to bypass the onboard graphics and use the HDMI port on your motherboard.
Keep in mind that disabling the onboard graphics can sometimes cause issues with other hardware or programs, so be sure to proceed with caution and double-check all settings before making any changes. With these troubleshooting tips, you should be able to enable your motherboard’s HDMI port without an integrated graphics card.
Conclusion
So, there you have it – the secret to enabling your motherboard HDMI without integrated graphics. It’s a bit of a technical workaround, but with determination and a little know-how, you can bypass the limitations of your computer’s hardware. And who knows? Maybe in the future, we’ll all be living in a world where external graphics cards are the norm.
Until then, happy computing!”
FAQs
What is the function of integrated graphics on a motherboard?
Integrated graphics on a motherboard enables it to output video signals through ports such as VGA, HDMI, and DVI.
Is it possible to enable HDMI output on a motherboard without integrated graphics?
Yes, it is possible to enable HDMI output on a motherboard without integrated graphics by installing a separate graphics card.
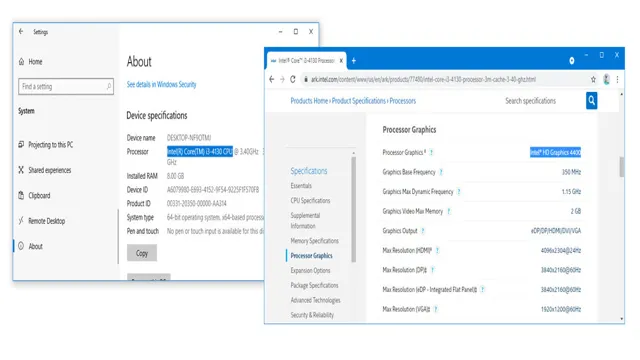
How do I know if my motherboard has integrated graphics?
You can usually find out if your motherboard has integrated graphics by checking the specifications on the manufacturer’s website or in the manual.
What should I do if my motherboard’s HDMI output is not working?
If your motherboard’s HDMI output is not working, you can try updating the graphics driver, checking the cable connections, or resetting the BIOS settings to default.