
Connecting a wifi antenna to a motherboard may seem like a daunting task, especially for those who are not tech-savvy. But fear not, it’s a lot easier than you may think! With just a few simple steps, you can improve the strength and stability of your computer’s wifi signal. Think of your wifi antenna as a radio antenna that receives signals from the radio.
The only difference is that instead of receiving radio signals, it receives wifi signals. Your computer’s wifi antenna is most likely attached to the motherboard via a small black connector. When connecting your wifi antenna to your motherboard, first locate the connector on the motherboard.
It’s usually located on the back panel of the computer tower, near the USB and Ethernet ports. Once you’ve located the connector, simply plug in the antenna’s connector into the corresponding connector on the motherboard. That’s it! By connecting your wifi antenna to your motherboard, you’ll notice an immediate improvement in your computer’s internet speed and stability.
You’ll be able to stream videos, play online games, and browse the web without the frustration of buffering and slow connections. Don’t let the fear of tech jargon or complex instructions deter you from improving your computer’s wifi signal. With just a few simple steps, you’ll be able to connect your wifi antenna to your motherboard and enjoy a more stable and fast internet connection.
Check Antenna Compatibility
Connecting a WiFi antenna to a motherboard can be a hassle, especially if you’re not entirely sure about the compatibility of the antenna with your motherboard. It’s essential to check if your motherboard supports the required frequency band of the antenna as some antennas only support 4 GHz while others work with both
4 GHz and 5 GHz frequencies. Once you’ve identified the antenna’s frequency band, you can check your motherboard’s specifications to determine if it has a matching frequency band. You also need to ensure that your motherboard has the necessary antenna connector, whether it’s an RP-SMA or U.
FL connector. Lastly, make sure that the antenna has the correct gain for your needs as antennas with higher gain require more power. When connecting the antenna, always follow the manufacturer’s instructions to avoid any potential damage to the motherboard or the antenna.
Once you’ve connected the antenna, you can test it by checking the signal strength in your network settings. If you’re still having trouble getting a decent signal strength, try moving the antenna to a better location as the signal can get obstructed by walls and other objects. With the correct compatibility and placement, a WiFi antenna can significantly improve your internet connectivity, providing you with faster and more stable internet speeds.
Determine the Wifi Antenna Type
When you’re upgrading your wifi system, it’s important to ensure that your new antenna is compatible with your existing setup. That’s where determining the wifi antenna type comes in. One useful way to do this is by identifying the connector type on your existing antenna.
If your current antenna has an RP-SMA connector, then you’ll need to ensure that your new antenna has an RP-SMA connector as well. Other types of connectors include SMA and N-type, so make sure you know which one you have before making any purchases. Knowing the antenna type is crucial to ensure a seamless and effective wifi upgrade.
Don’t make the mistake of assuming that any antenna will work with your wifi system – do your research and check compatibility to avoid any frustrations down the line.
Check the Motherboard for Wifi Compatibility
When it comes to setting up a new computer system, it is important to check whether your motherboard is compatible with wifi technology. One essential component of a wireless network is the antenna, which enables your device to communicate with the network. It is crucial to ensure that your antenna is compatible with your motherboard, as not all antennas will work with all motherboards.
Depending on the type of motherboard you have, you may need to buy an antenna separately or use the one that came with your wifi adapter. Some motherboards come with built-in wifi adapters and antennas, so you may not need to purchase anything additional. Checking your motherboard’s compatibility with wifi technology and antenna capacity will save you headaches and ensure that your device can connect to wireless networks seamlessly.
Locate the Antenna Connector on Motherboard
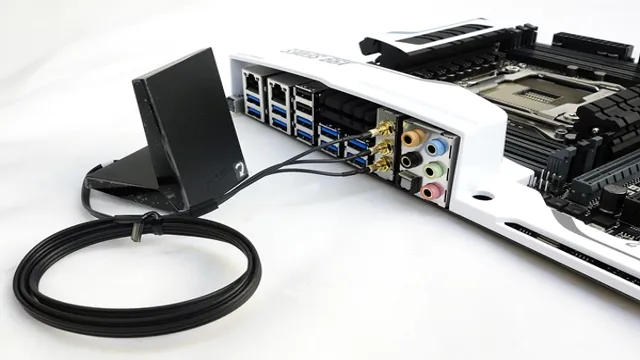
Connecting a Wi-Fi antenna to a motherboard can be an effective way to boost the signal strength and improve your internet connectivity. To begin with, you need to locate the antenna connector on your motherboard. Most modern motherboards have an integrated Wi-Fi module with an antenna connector on the rear I/O panel.
You can easily spot the small, gold-colored antenna jack by examining the metal backplate of your motherboard. In some cases, the antenna connector may be located closer to the PCIe slots or embedded within the Wi-Fi module itself. Once you locate the antenna connector, make sure that the Wi-Fi antenna cable is firmly plugged in and screwed on.
This ensures a solid connection between the motherboard and the antenna, which maximizes the signal reception and minimizes the interference. With the antenna connected properly, you should notice a significant improvement in your network speed and stability, allowing you to enjoy uninterrupted streaming, gaming and browsing on your device.
Check the Motherboard Manual
When building a computer, it’s important to know where to locate the antenna connector on your motherboard in order to ensure proper connectivity for wireless connections. The best way to identify this connector is by checking the motherboard manual, which will typically include a detailed diagram of all the components and connectors on the board. Once you have located the Antenna Connector on the board, simply plug in the Wi-Fi antenna, and you should be able to pick up wireless signals with ease.
Be sure to double-check that the antenna is securely attached, as a loose connection could cause connectivity issues down the line. By checking your motherboard manual and properly installing your Wi-Fi antenna, you can ensure a strong and stable wireless connection for your computer.
Locate Antenna Connector on Motherboard
If you’re looking to boost your Wi-Fi signal and are interested in installing an external antenna, the first step is to locate the antenna connector on your motherboard. This connector may be located in different places depending on your motherboard’s make and model, but it’s usually located near the rear of the board. Look for a small, round connector with a screw-able head that looks like it’s designed to accept an antenna.
Additionally, it’s important to make sure you’ve identified the correct connector before you begin installation. You wouldn’t want to end up damaging your motherboard by mistakenly connecting your antenna to the wrong connector. Once you’ve located the correct connector, connect the external antenna to it for a stronger Wi-Fi signal.
With a little bit of research and a cautious approach, you’ll be on your way to a more robust Wi-Fi connection in no time.
Connect the Antenna to the Motherboard
Are you building your own computer and need to know how to connect a wifi antenna to your motherboard? It’s a straightforward process that can greatly increase your internet connectivity. First, you’ll need to identify where your wifi antenna needs to be connected on your motherboard. This can vary depending on the design of your motherboard, but it’s typically located near the I/O shield on the back of the computer.
Next, carefully screw in the antenna into its designated port until it’s securely in place. Be sure not to apply too much force that might damage the antenna or the port. Once the antenna is connected, you can install any necessary drivers to access wifi.
Connecting a wifi antenna to your motherboard may seem daunting, but with a little bit of patience and care, you’ll be able to do it with ease and enjoy the benefits of reliable internet connectivity.
Insert the Antenna Connector Into the Motherboard Port
When it comes to building a PC, connecting the antenna to the motherboard can sometimes be overlooked. However, doing so can help ensure you get the best possible wireless signal. Before you begin, make sure you have the right type of antenna for your motherboard.
Once you have the correct one, locate the antenna connector on the motherboard. It may be labeled “Wi-Fi” or “ANT.” Plug the connector into the port, making sure it is securely fastened.
If you’re not sure where the port is, consult your motherboard’s manual. Once the antenna is connected, you’re ready to start using your PC’s Wi-Fi capabilities. It’s a simple step that can make a big difference in your online experience.
So, don’t forget to connect that antenna!
Fix the Antenna in Place
Now that you have successfully installed the Wi-Fi antenna in your computer, it’s time to fix it in place. The first step is to locate the antenna connector on the motherboard. Once you have identified this, carefully plug the antenna into the socket, making sure it fits snugly and securely.
It’s important not to force the connection, as this could cause damage to the socket or antenna. Once the antenna is connected, you can start to position it in the computer case. It’s best to choose a location that is free from interference, such as away from other internal components or metal objects.
A good spot is usually near the top or rear of the case. You can use adhesive pads or screws to secure the antenna in position, making sure it is held firmly in place and not moving around. By making sure the antenna is properly connected and securely fixed in place, you’ll be able to get the best signal strength possible and enjoy a fast and stable internet connection.
Test Wifi Connectivity
Connecting a wifi antenna to your motherboard can be a confusing task, but it’s not as complicated as it sounds. The first step is to identify the correct slot for the wifi antenna. Most motherboards have a designated slot for this purpose, which is typically labeled as “WIFI” or “WLAN.
” Once you’ve located the slot, carefully insert the wifi antenna into it, making sure it’s firmly in place. Next, you’ll need to download and install the necessary software drivers for the antenna to work properly. These drivers are usually available on the manufacturer’s website, and you can install them by following the instructions provided.
After downloading and installing the drivers, test your wifi connectivity to ensure it’s working correctly. You can do this by opening your web browser and visiting a webpage to see if it loads correctly. If everything works well, you’re good to go! Now you can enjoy a reliable and fast internet connection thanks to your newly connected wifi antenna.
Verify the Antenna is Connected Properly
When it comes to troubleshooting Wi-Fi connectivity issues, one of the most common causes is a faulty or disconnected antenna. That’s why it’s essential to check that your antenna is connected correctly to your Wi-Fi router or access point. Start by unplugging the antenna and giving both the connector and the port a quick clean with a dry, soft cloth.
Then, reconnect the antenna firmly and securely. Once you’ve verified that the antenna is correctly connected, check if your Wi-Fi signal has improved. A weak signal or poor connectivity can often be a result of a loose connection or a faulty antenna.
Regularly inspecting and maintaining your Wi-Fi antenna connection can help ensure that your network stays reliable and fast.
Check Wifi Signal Strength
If you’ve experienced buffering or slow internet speeds, it’s important to check your wifi signal strength. A weak wifi signal can result in spotty connectivity or even complete disconnection. Luckily, it’s easy to test your wifi signal strength.
You can do this by opening the settings on your device and selecting “wifi”. Once you’ve selected the wifi network you’re connected to, you should see a signal strength indicator. The indicator will show you how strong or weak your wifi signal is.
If you find that your signal is weak, try relocating closer to your router or investing in a wifi extender to boost your signal. A strong wifi signal is essential for fast and reliable internet, so it’s important to regularly check and optimize your connection.
Conclusion
Connecting a wifi antenna to a motherboard may seem intimidating, but with a little patience and knowledge of the right tools, anyone can do it. It’s like a game of connect the dots, where instead of dots, you’ll be attaching cables to ports. The end result? A stronger, more reliable internet connection that will have you surfing the web faster than ever before.
So put on your tech-savvy hat, grab your screwdriver, and get ready to connect like a pro!”
FAQs
What tools are needed to connect a Wi-Fi antenna to the motherboard?
The tools required to connect a Wi-Fi antenna to a motherboard include a screwdriver, pliers, and a thermal paste.
Is it possible to connect a Wi-Fi antenna to any motherboard?
Most modern motherboards are designed to accommodate Wi-Fi antennas. However, it is always recommended to check the specifications before attempting to connect a Wi-Fi antenna.
How do I identify the Wi-Fi antenna connectors on the motherboard?
The Wi-Fi antenna connectors on the motherboard are typically labeled “ANT,” “WIFI,” or labeled with an icon that resembles an antenna.
What is the best position to install the Wi-Fi antenna on the motherboard?
The ideal placement for a Wi-Fi antenna on the motherboard is in a vertical position, away from any obstacles that could obstruct the signal. It is best to position the antenna as far away as possible from other components that may cause interference.