Connecting the power switch to the motherboard may seem like a daunting task for those who are not familiar with the inner workings of a computer. However, with a bit of guidance, anyone can successfully connect the power switch to the motherboard. Think of it like connecting a key to the ignition of a car; it’s a crucial step to get the engine running, but it’s not something that requires an advanced degree in engineering.
So, if you’re ready to take the plunge and connect your power switch to the motherboard, let’s dive in and tackle this essential task together.
Locate Power Switch Pins on Motherboard
Wondering how to connect power switch to motherboard? Look no further! Finding the power switch pins on your motherboard can be a bit confusing, but it’s a crucial step in assembling your computer. Firstly, you’ll need to locate the power switch connector on your case which is usually a small cable with two pins. Once you’ve found it, turn your motherboard over and locate the section with small pins that stick out.
These are called the “front panel header pins.” The section should be labeled with abbreviations such as PWR_SW, RESET, PWR_LED, HDD_LED, and so on. The abbreviation you’re looking for is likely PWR_SW which stands for power switch.
Simply plug the connector into the corresponding pins and you’re all set! It’s worth noting that you should refer to your motherboard’s manual to ensure you connect everything correctly and avoid any mishaps. With this knowledge, you should now be able to easily locate and connect the power switch pins on your motherboard like a pro!
Check Motherboard Manual or Website for Pin Layout
When it comes to building a computer, one of the most important steps is ensuring you know where the power switch pins are located on the motherboard. To avoid confusion and accidental damage, it’s crucial to consult your motherboard manual or website for the correct pin layout. This information can vary between different motherboard brands and models, so taking the time to familiarize yourself with the proper positioning is essential.
Once you’ve located the power switch pins, it’s a matter of attaching the correct wires from the power switch in your computer’s case to the corresponding pins on the motherboard. By doing this step correctly, you’ll ensure that your computer powers on and off smoothly without experiencing any problems. So, before you start building your computer, make sure to check the manual or website and locate those power switch pins for a seamless and successful build.
Identify Pins for Power Switch, Ground, and Reset Switch
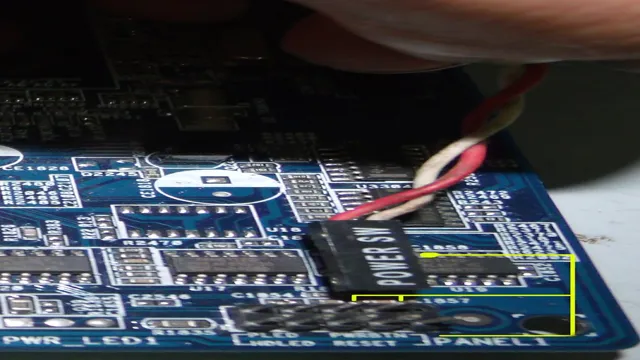
When building a PC, it’s important to identify the power switch, ground, and reset switch pins on the motherboard. To locate the power switch pins, look for a cluster of small metal prongs near the edge of the motherboard. They will typically be labeled as POWER SW or PWR SW.
These pins connect to the power button on the case and allow you to turn your computer on and off. The ground pin is usually located next to the power switch pins and is labeled as GND. This connection provides the power switch with a path to ground, ensuring that it functions properly.
Finally, the reset switch pins are usually located next to the power and ground pins and are labeled as RESET SW. These pins connect to the reset button on the case and allow you to reboot your computer if it becomes unresponsive. By correctly identifying and connecting these pins, you can ensure that your PC will function properly and be easy to use.
Connect Power Switch to Motherboard
Learning how to connect your power switch to your motherboard is a crucial part of assembling a computer. It’s also a relatively simple process that won’t require any specific expertise or knowledge. To start, locate the pins that are labeled for connecting the power switch on your motherboard.
They should be labeled as “power switch” or “pwrsw,” and can typically be found near the bottom of the motherboard. After you’ve found the pins, connect your power switch to them using the provided wires that came with your motherboard. Be sure to connect the positive (usually red or white) wire to the positive pin, and the negative (usually black or gray) wire to the negative pin.
Once your power switch is securely connected, test it out by turning on your computer to ensure that it is working properly. Overall, connecting your power switch to your motherboard is a simple task that will ultimately make a big difference in the functionality and usability of your computer.
Insert Pins into Corresponding Motherboard Slots
When building a PC, one crucial step is to insert the pins into the corresponding motherboard slots. This can be a bit confusing if you’re not familiar with the different types of pins and slots, but with a little patience and attention to detail, it can be easily done. The motherboard usually comes with a manual that includes instructions on which pins go where, so be sure to read it carefully before proceeding.
Once you’ve identified the correct slots, gently insert the pins, being careful not to force them in. A good rule of thumb is to use just enough pressure to make them click into place. Another important step in connecting the power switch to the motherboard.
This is usually done using a small two-pin connector found on the front panel of the PC case. This connector needs to be plugged into the corresponding pins on the motherboard, typically labeled as “PWR SW” or something similar. Again, refer to the motherboard manual to ensure you’re connecting it correctly.
Once you’ve connected the switch, you can test it by turning on your PC. If everything is connected properly, your PC should turn on without any issues. It’s essential to take your time and follow the instructions carefully when connecting pins and switches to your motherboard.
Rushing through the process can lead to mistakes that can damage your motherboard or other components, costing you time and money. Remember to double-check your connections and test everything before completing the build. With a little bit of patience and attention to detail, you can successfully connect all the necessary components and build a PC that’s ready to use.
Ensure Proper Orientation of Pins
Connecting the power switch to the motherboard is an essential step in building a computer. It might seem like a simple task, but it can be confusing, especially for beginners. It is crucial to ensure that the orientation of the pins matches the motherboard’s header.
This little detail can prevent serious damage to your computer. If the pins are not correctly aligned, you can short-circuit the motherboard and damage it beyond repair. Therefore, take your time and double-check that the pins are correctly placed before turning on your computer.
It might take some effort to align the pins, but it is better to be safe than sorry. So, take a deep breath, stay composed, and carefully connect the power switch to the motherboard. Remember, it’s the little details that matter the most.
Secure Pins with Retaining Clip or Locking Mechanism
When building a computer, one of the most critical steps is connecting the power switch to the motherboard. It might seem simple, but it’s a crucial component for powering on and off your computer. To ensure that everything runs smoothly, you need to secure the pins with a retaining clip or locking mechanism.
This will prevent the pins from accidentally coming loose and disrupting the connection, leading to malfunctions and damage to your components. Choosing the right retaining clip or locking mechanism depends on your motherboard’s design and the type of power switch you’re using. Some motherboards come with built-in locking mechanisms, while others require a separate clip.
It’s essential to read the instructions carefully, and if you need help, don’t hesitate to consult with an expert. Once you have the retaining clip or locking mechanism in place, it’s time to connect the power switch to the motherboard. Typically, this involves plugging one end of the switch’s cable into the motherboard’s power header, and the other end into the switch itself.
Make sure to check the polarity, as connecting it incorrectly could prevent the switch from working or even damage your components. Overall, securing the pins with a retaining clip or locking mechanism and properly connecting the power switch to the motherboard are crucial steps in building a reliable and stable computer. Remember to take your time, follow the instructions, and seek help if needed.
With the right components and careful installation, your computer will be up and running smoothly in no time.
Test Power Switch Connection
Connecting the power switch to the motherboard might seem tricky at first, but it’s actually a relatively straightforward process. The power switch is what allows you to turn your computer on and off, so making sure it’s connected properly is essential. To do this, you’ll need to check your motherboard manual to identify the location of the power switch pins.
Once you’ve found them, you’ll need to connect the wires from your power switch to the corresponding pins on the motherboard. The most common configuration is two pins, which you can connect using a small jumper or connector. Make sure to connect these wires carefully and ensure that they’re firmly secured, as a loose connection could cause your computer to fail to power on.
With this simple step, you’ll be able to have full control over your computer’s power and restart it when you need to. And that’s how you connect the power switch to your motherboard!
Power On Computer and Observe Functionality
One of the essential components of a computer is the power switch connection that allows you to turn it on and off. Testing this connection is crucial to ensure that your computer functions properly. To do this, simply press the power button and observe the computer’s response.
If your computer starts up without any issues, then the power switch connection is most likely working correctly. However, if it fails to start or makes strange noises, you may have a problem with the power switch connection that requires further investigation. Think of the power switch connection as the ignition key to your car.
Just like a faulty key could prevent your car from starting, a faulty power switch connection could prevent your computer from turning on. So, make sure to perform this simple test to ensure the smooth operation of your computer.
Troubleshoot Connection if Necessary
When you’re troubleshooting your electronic devices and devices that require power switches, it’s important to test the power switch connection before taking any further steps. This can be especially important if your device isn’t turning on or you’re experiencing other issues with its performance. To start, you’ll need to unplug your device and open up its casing to access the power switch.
From there, you can check to make sure that the power switch is securely connected to the main board and that there are no loose wires or other issues in the connection. If everything looks good, you can try cleaning the connection with a bit of rubbing alcohol or repositioning the power switch to see if that helps. If you’re still experiencing issues after testing the power switch connection, you may need to seek additional assistance to identify and resolve the problem.
By taking the time to troubleshoot your device and test its power switch connection, you can often avoid costly repairs or replacements and keep your device running smoothly for years to come.
Conclusion: Successfully Connecting Power Switch to Motherboard
In conclusion, connecting the power switch to the motherboard may seem like a daunting task, but fear not! With the right instructions and a little bit of patience, you can navigate your way through the maze of wires and find the perfect spot to plug in your trusty power switch. So, roll up your sleeves, grab your screwdriver, and get ready to take on this epic battle of man vs machine. May the force be with you!”
FAQs
What is the purpose of a power switch on a motherboard?
The power switch on a motherboard is used to turn the computer on or off.
Can any power switch be used with any motherboard?
No, not all power switches are compatible with all motherboards. It is best to refer to the motherboard manual for the correct specifications.
How do you connect a power switch to a motherboard?
The power switch is usually connected to the motherboard through a set of pins known as the “front panel connectors.” Refer to the motherboard manual for the correct pins to connect the power switch.
What should you do if the power switch does not work after connecting it to the motherboard?
Double-check the connection to make sure it is correct and secure. If that does not work, try using a different power switch or contacting the manufacturer for further assistance.