Do you need to access the BIOS on your ASUS motherboard, but not sure how to do it? Don’t worry, it’s easier than you might think. The BIOS, or Basic Input/Output System, is a crucial component of any computer system, allowing the hardware to communicate with the software and ensuring everything runs smoothly. On an ASUS motherboard, entering the BIOS is a straightforward process that can be done in just a few simple steps.
In this blog post, we’ll walk you through the process, so you can access your ASUS motherboard’s BIOS with ease. Whether you’re an experienced PC user or a beginner, we’ve got you covered. So, sit back, relax, and get ready to learn how to enter BIOS on an ASUS motherboard!
Step 1: Restart Your Computer
If you are looking to enter the BIOS on your ASUS motherboard, the first step is to restart your computer. Once your computer has restarted, press the key that is stated on your screen to enter the BIOS setup. This key varies depending on the ASUS motherboard model.
Common keys include F2, F8, Delete, or Esc. If you are unsure of the key, refer to the user manual or Asus’s official website. Once you have entered the BIOS setup, you will have access to various settings, including the boot order, system clock, and CPU configuration.
Be cautious when making changes to the BIOS, as incorrect settings could cause irreversible damage to your motherboard. It is recommended to only modify settings if you are comfortable and experienced enough to do so. Entering the BIOS is an essential step in ensuring your computer runs at optimal performance, and with a little bit of research, it is easy to accomplish with your ASUS motherboard.
Press the ‘Restart’ button in your Windows menu.
Restarting your computer might seem like a simple task, but it can solve a lot of problems and help boost your computer’s performance. To start, press the ‘Restart’ button located in your Windows menu and wait for your computer to shut down and reboot. Why should you restart your computer? Well, it clears the RAM (Random Access Memory), removes any unwanted programs or services that might be running in the background, and refreshes the system.
Additionally, restarting your computer can fix any software or hardware issues, such as frozen programs, slow speed, or internet connection problems. It’s essential to perform a restart regularly, at least once a week, to keep your computer functioning optimally. Don’t wait until there’s a problem with your computer; make it a habit to press the ‘Restart’ button regularly.
It only takes a minute and can make a world of difference for your computer’s performance and longevity. So go ahead and give it a try!
Step 2: Enter BIOS During Boot-Up
Are you wondering how to enter BIOS on your ASUS motherboard? It’s actually quite simple! All you have to do is restart your computer and press the key that corresponds to your BIOS key during the boot-up process. The BIOS key for ASUS motherboards is typically F2, but it may vary depending on the model and version of your ASUS motherboard. If you’re not sure which key to press, you can check your motherboard manual or do a quick online search for your specific model.
Once you press the correct key, you will enter the BIOS menu where you can make changes to your computer’s hardware and settings. Remember to be cautious when making changes in the BIOS as it can affect your computer’s stability and performance. Now that you know how to get into the BIOS on your ASUS motherboard, you can customize your computer’s settings to your liking.
Press ‘Delete’ or ‘F2’ repeatedly as your computer boots up.
Entering the BIOS during boot-up can seem like a daunting task, but it’s actually quite simple. One of the ways to do this is by pressing the ‘Delete’ or ‘F2’ key repeatedly as your computer boots up. Once you press this key, you’ll be prompted to enter the BIOS menu where you can adjust various settings like boot order, hardware configuration, and system date and time.
However, it’s important to note that the key to enter the BIOS may vary depending on your computer’s make and model. Some computers may require you to press the ‘Escape’ key or the ‘F1’ key instead. If you’re unsure which key to press, you can refer to your computer’s manual or do a quick search online.
Once you’ve successfully entered the BIOS menu, take your time and make sure to only adjust settings that you’re familiar with to avoid any potential issues.
Step 3: Navigate BIOS Menu
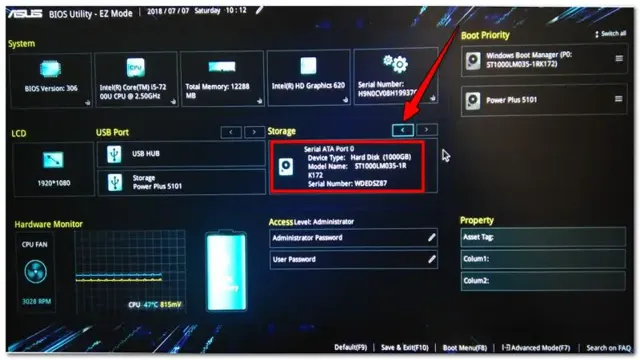
To enter the BIOS on an ASUS motherboard, you’ll first need to restart your computer and press the appropriate key during startup. Generally speaking, the key you’ll need to press varies depending on the model of your motherboard, but it’s typically either the Del, F2, or F10 key. Once you’ve successfully entered the BIOS menu, you’ll be able to configure various system settings such as boot order, CPU frequency, and RAM timings.
It’s important to note that entering the BIOS can be a bit confusing at first, so don’t be afraid to consult your motherboard’s manual or look up a guide online if you’re having trouble. By mastering the BIOS, you’ll be able to get the most out of your hardware and ensure that your computer is running at peak performance.
Use arrow keys to navigate through the menu.
When entering BIOS, it’s essential to know how to navigate through the menu. The easiest way to do that is by using the arrow keys on your keyboard. Once you’re inside the BIOS, you can use the arrows to move through different submenus and select different settings.
Depending on the type of BIOS you have, there may be different options available. It’s important to take your time and carefully navigate through each submenu to ensure you don’t miss any critical settings. Remember to refer to your motherboard manual if you run into any issues or aren’t sure what a particular option does.
By using the arrow keys to navigate, you can easily access and adjust the crucial settings that ensure your system runs smoothly.
Press ‘Enter’ to select options and settings.
When navigating the BIOS menu, it’s important to be familiar with how to choose and adjust the different settings available. One important thing to keep in mind is that pressing “Enter” is often the way to select an option or change a setting. This can sometimes be a bit confusing, especially if you’re used to other menus or interfaces.
However, as you explore the BIOS menu more, you’ll start to get the hang of it. Just remember that “Enter” is like a doorway into the various options and settings you can adjust in order to customize your computer’s performance. It’s like having a map that can take you on a journey of discovery, unlocking new possibilities and features along the way.
So the next time you find yourself navigating a BIOS menu, don’t be afraid to hit that “Enter” key and see where it takes you.
Step 4: Save and Exit BIOS
Once you have made the necessary changes in the BIOS of your ASUS motherboard, it’s time to save them and exit the BIOS setup utility. To do this, simply look for the “Save changes and exit” or “Exit” option in the menu, usually located in the bottom right corner of the screen. Use the arrow keys on your keyboard to highlight the option and press the Enter key to confirm.
You may also be prompted to confirm your decision with a “Yes” or “No” prompt, so be sure to select “Yes” to save your changes. The BIOS will then exit and your computer will restart, applying your changes to the hardware and software. Congratulations, you have successfully entered and made changes in the BIOS on your ASUS motherboard!
Press ‘F10’ to save changes and exit BIOS.
If you have made changes to your computer’s BIOS settings, it’s important to save those changes before exiting the BIOS menu. By pressing the ‘F10’ key on your keyboard, you can save the changes made and exit the BIOS menu. Don’t forget to save changes as all of the updates and adjustments you made in the BIOS will be lost when you reboot your system if you don’t save them.
Saving the settings you have customized is important to ensure your PC runs smoothly and efficiently. Changing BIOS settings can have a significant impact on your system’s performance and saving these changes means that your computer will remember them every time you start it up. Therefore, pressing ‘F10’ to save changes before you exit BIOS is a crucial step in making any changes to your PC’s BIOS settings.
Conclusion
Congratulations! You’ve successfully unlocked the secret door to your Asus motherboard’s BIOS. Now go forth and explore all the options and settings that lie within, and may your computer run smoother and faster than ever before. Remember, the BIOS is the brain of your computer, so treat it with the respect it deserves.
And if you ever find yourself lost in the vast sea of menus and options, just remember the golden rule of tech: when in doubt, Google it!”
Knowing how to enter BIOS is important for troubleshooting and optimizing your ASUS motherboard.
When you’re done adjusting the settings in BIOS, it’s time to save and exit. To do this, go to the Exit tab, and you’ll see the option to Save changes and Exit Setup. Hit Enter, and your changes will be saved.
You’ll then be asked if you want to reset or shutdown your computer. If you want to reboot, choose the Reset option. If you’re done for the day, select Shutdown.
It’s important to remember that if you don’t save your changes, they won’t take effect, and you’ll have to start all over again. So, be sure to save before leaving BIOS. By mastering the art of entering and saving BIOS settings, you’ll be better equipped to troubleshoot and optimize your ASUS motherboard.
FAQs
What is the purpose of entering BIOS on an ASUS motherboard?
Entering the BIOS allows you to configure hardware settings, overclock your system, and perform other system-level tweaks.
How do I access the BIOS on my ASUS motherboard?
To enter the BIOS, restart your computer and press the appropriate key (usually F2 or Delete) during the boot-up process. Consult your motherboard manual for specific instructions.
What should I do if I am unable to access the BIOS on my ASUS motherboard?
Make sure you are pressing the correct key during boot-up, and try resetting the CMOS by removing the battery or using a jumper on the motherboard. If you are still having trouble, contact ASUS support for assistance.
Can I damage my ASUS motherboard by entering the BIOS?
It is unlikely that you will cause any damage to your motherboard by entering the BIOS. However, be cautious when making changes to hardware settings or overclocking your system, as this can potentially lead to instability or damage. Always proceed with caution and consult your motherboard manual or online resources for guidance.