Changing the toner in a Brother printer can sound like a daunting task, but it’s actually quite simple once you know how. It’s an essential routine maintenance task that can ensure your printer continues to function optimally and produces quality prints consistently. In this guide, we’ll show you the step-by-step process of changing your Brother printer’s toner cartridge.
You’ll learn about the different types of toner cartridges, how to properly remove the old one, insert a new one, and reset the printer’s toner counter. With this knowledge, you’ll be able to confidently change the toner and keep your Brother printer running smoothly.
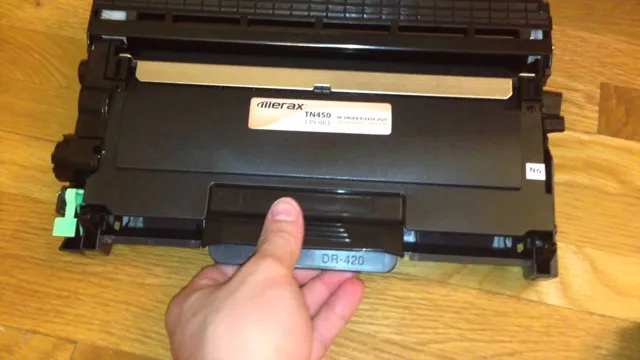
Step One: Locate the Toner Cartridge
If you need to change the toner in your Brother printer, the first step is to locate the toner cartridge. This might seem like a no-brainer, but the location of the toner cartridge can vary depending on the model of your printer. In most cases, you can find the toner cartridge by opening the front or side panel of the printer.
Once you have located the toner cartridge, make sure to handle it carefully to avoid spilling toner. Depending on the model of printer, the toner cartridge may need to be twisted or lifted out of the printer. Before removing the old cartridge, take note of how it is installed so you can easily insert the new cartridge.
Now that you have located the toner cartridge, you’re ready to move on to the next step in replacing your Brother printer’s toner.
Heading Three
When it comes to replacing the toner cartridge in your printer, the first step is to locate it. Depending on the make and model of your printer, the location of the toner cartridge may vary. Typically, you can find it by opening the front or side panel of the printer.
Once you locate the cartridge, make sure to turn off the printer and unplug it before removing the old cartridge. This will prevent any accidents or damage to the printer. It’s also important to handle the cartridge carefully and avoid touching the drum to prevent any smudging or damage to the print quality.
By taking these precautions and properly locating the toner cartridge, you’ll be well on your way to a successful toner replacement.
Heading Three
Heading Three: Step One: Locate the Toner Cartridge If you’re new to printer maintenance, it can be tough to know where to start when it comes to replacing the toner cartridge. The toner cartridge houses the powdered toner that creates the text and images on your pages. Before you can replace it, you’ll need to locate it.
The location of the cartridge varies depending on your printer model but it’s typically found behind a panel on the front of the machine or inside the printer itself. Check your manual for specific instructions or look for online tutorials. Once you locate the cartridge, it’s important to handle it with care.
Toner powder can be messy, so be sure to wear gloves, and avoid touching the drum or tipping the cartridge. By following these simple steps, you’ll be on your way to successfully replacing your toner cartridge.
Step Two: Remove Old Toner Cartridge
To change the toner in a Brother printer, the next step after opening the printer is to remove the old toner cartridge. Firstly, make sure that the printer is turned off and unplugged from the power source. Open up the printer cover and locate the toner cartridge that you wish to replace.
Gently push down on the cartridge and slide it out of its slot. Be careful not to shake or tilt the cartridge too much to avoid spilling any toner. Place the old toner cartridge in a safe and appropriate place for disposal.
Make sure to follow your local regulations for the disposal of toner cartridges. With the old cartridge removed, you can now proceed to install the new toner cartridge into the empty slot. Follow the instructions provided by the manufacturer to ensure proper installation, and don’t forget to close the printer cover after you have finished.
Your Brother printer should now be ready to print with its new toner cartridge. By regularly changing the toner cartridge, you can maintain the efficiency of your printer, ensuring the highest quality prints for longer.
Heading Three
When it comes to replacing your toner cartridge, the first step is to remove the old one. This may seem like a daunting task, but it’s actually quite simple. First, turn off your printer and unplug it from the power source.
Next, locate the toner cartridge compartment and open it up. Depending on your printer model, the compartment may be on the front or back of the printer. Once you’ve located it, carefully remove the toner cartridge by pulling it straight out.
Be sure to hold onto it firmly and avoid shaking it, as this can cause toner to spill out and create a mess. Once you have the old cartridge removed, you can dispose of it properly and move on to installing the new one. This process may vary slightly depending on the printer model, so be sure to consult your printer manual or manufacturer’s website for specific instructions.
With a little patience and care, you’ll have your new toner cartridge installed and your printer back up and running in no time.
Heading Three
If you’re looking to replace your old toner cartridge, your first step is to remove the old one from your printer. This step may sound easy, but it can be a bit tricky if you’re not familiar with your printer model. First, make sure your printer is turned off and unplugged before you begin.
Next, locate the toner compartment, which is usually found on the front or side of the printer. Open this compartment and carefully remove the old cartridge by gripping it firmly and pulling it straight out. Be sure to handle the cartridge by its plastic casing and avoid touching the drum or any exposed parts.
Once you’ve removed the old cartridge, place it in a bag or wrap it in paper to dispose of it properly. With the old cartridge out of the way, you’re ready to move onto the next step, which is installing the new toner cartridge. By following these simple steps, you’ll be able to replace your toner cartridge in no time and get back to printing high-quality documents.
Heading Three
As you prepare to replace your old toner cartridge, step two involves removing the old cartridge. This is an important step because it allows you to properly dispose of the old cartridge and make way for the new one. Start by turning off your printer to avoid any electrical mishaps.
Then, open the printer’s cover to get access to the toner cartridge. Find the release lever that holds the cartridge in place and carefully press it down. This will free up the old cartridge so you can properly remove it.
With gloved hands, gently pull the old cartridge out of the printer and set it aside in a plastic bag for later disposal. You want to be careful not to damage the printer or the cartridge during this step. Once the old cartridge has been removed, you can move on to step three of the process.
Remember, taking your time and proceeding with caution will ensure a successful replacement of your toner cartridge.
Step Three: Clean Inside of Printer
So, you’ve successfully changed the toner in your Brother printer! Congratulations! But, before you start printing away, it’s important to clean the inside of the printer. Over time, dust, debris, and toner particles can build up, which can negatively impact the print quality and even damage the printer. To clean the inside of your Brother printer, start by turning it off and unplugging it from the power source.
Next, open the printer cover and use a clean, soft cloth or a can of compressed air to carefully clean the inside of the printer. Pay special attention to the toner cartridge area and the paper rollers. And don’t forget to also clean the outside of the printer, as dust can accumulate there too.
Once you’re done, close the printer cover and plug it back in. Now, you’re ready to print with your freshly changed toner cartridge!
Heading Three
When it comes to maintaining printers, cleaning the interior is just as important as cleaning the exterior. Over time, dust and debris can accumulate inside, leading to poor print quality, jams, and even hardware failure. To clean inside your printer, start by turning it off and unplugging it from the power source.
Next, open up the printer cover and remove any loose debris you see with a soft brush or cloth. For hard-to-reach areas, use a can of compressed air to blow out any lingering dust. If your printer has ink cartridges, be sure to remove them before cleaning to avoid any ink spills.
Once you’ve finished cleaning, reassemble your printer and test it out to make sure everything is working properly. Remember, regular maintenance like this can extend the life of your printer and save you money in the long run. So, don’t neglect the inside of your printer – give it a good cleaning today!
Heading Three
Once you’ve removed all the dust and debris from the outside of your printer, it’s time to move on to the inside. This step is crucial in keeping your printer in good working condition. First, make sure the printer is turned off and unplugged.
You don’t want to risk any electrical mishaps while you’re cleaning. Next, remove any paper from the trays and open up the printer cover. Look for any visible signs of dust or debris, and use a soft brush or cloth to gently wipe away any buildup.
You can also use compressed air to blow away any stubborn particles. Pay close attention to the feed rollers, as these can often accumulate paper dust and cause paper jams. Once you’ve finished cleaning, replace the paper and close the cover.
Your printer is now ready for use again. By keeping the inside of your printer clean, you’ll ensure it continues to function properly for years to come.
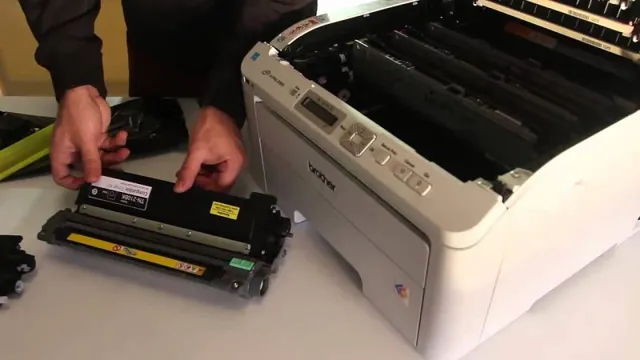
Step Four: Install New Toner Cartridge
Changing the toner in your Brother printer is a straightforward process that can be done in a few simple steps. Once you’ve removed the old toner cartridge, it’s time to install the new one. First, take the new toner cartridge out of its packaging and give it a gentle shake to distribute the toner evenly.
Then, remove the protective tape from the cartridge. Next, locate the drum unit assembly inside your printer and insert the new toner cartridge into it. Push the cartridge down firmly until you hear it click into place.
Be sure to dispose of the old toner cartridge according to your local regulations. Finally, close the front cover of your printer and run a test print to make sure the new toner cartridge is installed correctly. Remember to keep a spare toner cartridge on hand so that you can replace it quickly when your printer runs low.
Changing the toner cartridge in your Brother printer is an easy task that you can do in just a few minutes, ensuring that your printer keeps producing high-quality prints.
Heading Three
If you want your printer to keep producing high-quality prints, it’s important to know how to install a new toner cartridge. Here’s a step-by-step guide on how to do it. First, make sure your printer is powered off and unplugged from the wall outlet.
Locate the old toner cartridge and remove it carefully, following the instructions provided in your printer manual. Next, open the package containing the new toner cartridge and give it a gentle shake to distribute the toner evenly. Then, remove the protective tape from the cartridge and insert it into the printer, making sure it clicks into place.
Finally, close the printer cover and plug it back in. Your printer is now ready to go! Remember, it’s important to always use genuine toner cartridges to avoid damaging your printer. By following these simple steps, you’ll be able to keep your printer running smoothly and producing high-quality prints every time.
Heading Three
Installing a new toner cartridge is a crucial step in the upkeep of your printer. Once you have identified that your printer needs a new toner cartridge, the next step is to replace it. The first thing to do is to identify the slot where the toner cartridge goes.
Most printers have an easily removable toner cartridge compartment. Once you find it, remove the old toner cartridge and check the manual for instructions on how to dispose of it in an environmentally friendly way. It’s essential to handle the new toner cartridge carefully to avoid damaging it.
Before inserting the new cartridge, check for any protective tapes or stickers that need to be removed from it. Slowly and carefully, insert the new toner cartridge into the printer slot, make sure it clicks into place properly, and close the compartment. Finally, run a test print to ensure that everything is set up correctly.
Regularly replacing toner cartridges will help your printer perform better and improve the quality of the prints.
Conclusion
In the world of printing, changing a toner cartridge may seem like a daunting task, but fear not! With a Brother printer, it’s as easy as pie. Just be sure to follow the instructions provided by the manufacturer, and voila! You’ll have a fresh, crisp output that’s sure to impress. So don’t let a low-toner warning get you down – embrace the change, and keep on printing!”
FAQs
How often should I change the toner in my Brother printer?
It is recommended to change the toner in your Brother printer when the “Toner Low” or “Replace Toner” message appears on the display panel.
How can I check the toner level in my Brother printer?
To check the toner level in your Brother printer, press the “GO” button on the printer and a toner status page will be printed. This will give you an estimated remaining toner level.
Can I use compatible toner cartridges in my Brother printer?
Yes, you can use compatible toner cartridges in your Brother printer. However, it is important to ensure that the compatible cartridge is specifically designed for your Brother printer model.
Can I change the toner cartridge while the printer is still running?
Yes, you can change the toner cartridge while the printer is still running. However, it is recommended that you turn off the printer and wait for it to cool down before changing the cartridge to avoid any accidents.