
Are you struggling to replace the toner in your Brother printer? Don’t worry, we’ve got you covered! Replacing toner in a printer can be quite tricky, especially if you’re not familiar with the process. But fear not, as we will guide you through the steps to replace the toner cartridge in your Brother printer. Like any other printer, Brother printers also require toner replacement when they run out.
The toner cartridge typically lasts for several thousand pages, depending on your printing requirements. However, keep in mind that the toner cartridge needs to be replaced if you notice any fading in the printouts or if the printer prompts you to replace the cartridge. Replacing the toner cartridge in a Brother printer is a quick and straightforward process.
All you need to do is remove the old toner cartridge, replace it with a new one, and voila! You’re ready to print again. But before you jump right into the process, it’s essential to understand the different types of toner cartridges available and which one is compatible with your Brother printer model. In conclusion, replacing toner in a Brother printer may seem complicated at first sight, but it is a simple process that can be handled easily.
All you need is a little bit of patience and following the correct steps. Now, let’s dive into the process of replacing toner in a Brother printer and get you set up for your next printing task!
Step 1: Identify the Model
If you want to learn how to replace the toner in a Brother printer, the first step is to identify the model of your printer. This is important because the process of replacing the toner can vary depending on the model. Most Brother printers have the model number printed on the front or the top of the device, but if you can’t find the model number on the printer, you can try looking for the documentation that came with the device or searching online for the model using the serial number.
Once you have identified the specific model of your Brother printer, you can move on to the next step of replacing the toner cartridge.
Check printer documentation or label for the model number
If you’re looking to identify your printer model number, the first step is to check the printer documentation or label. This information can typically be found on the bottom or back of the printer. It’s important to know your printer model number as it helps you to identify the correct ink cartridges, toner, and paper required for your printer.
Plus, it makes troubleshooting easier if you ever encounter any issues with your printer. So take a moment to locate your printer documentation or label and jot down the model number. It may seem like a small detail, but it can save you a lot of time and hassle in the long run.
Step 2: Open the Printer Cover
One of the essential steps to replacing the toner in a Brother printer is to open the printer cover. This step is crucial because it allows you to access the toner and other internal components of the printer. To open the printer cover, you must first turn off the printer and unplug it from the power source for safety purposes.
Once you have done that, locate the printer cover and gently lift it upward until it locks in place. Depending on the model of your Brother printer, the cover may be located on top or the front of the printer. Make sure to read your printer manual if you are unsure about where to find it.
Opening the printer cover gives you access to the old toner cartridge, which you can then remove and replace with a new one. Remember to follow the manufacturer’s instructions carefully when replacing the toner to avoid damaging the printer or wasting toner.
Gently lift the printer cover to reveal the toner cartridges
When it’s time to change your toner cartridges, the first step is to open the printer cover. This may sound like a simple task, but it’s important to do it gently to avoid damaging the printer. Once you locate the cover, use both hands to lift it up slowly until it opens fully.
You’ll then see the toner cartridges inside. These cartridges contain the toner powder that is used to create the text and images on your printed documents. Remember to handle the cartridges carefully, as they can be delicate and prone to damage.
By following these steps, you’ll be one step closer to replacing your toner cartridges quickly, safely, and effectively.
Step 3: Remove the Old Toner Cartridge
Replacing the toner cartridge in your Brother printer is a simple and straightforward task, and removing the old cartridge is the next step to replace it with a new one. Firstly, power off the printer and disconnect it from the power supply. Then, open the front cover of the printer and locate the toner cartridge that needs replacing.
Gently pull the handle of the old toner cartridge to release it from its slot. It’s essential to be careful not to damage the printer or any other components while removing the old cartridge. If it feels stuck, avoid using excessive force and double-check that no other latches or devices are holding it in place.
Carefully remove the old toner and place it in an appropriate container for recycling. Once you’ve done this, you’re ready to move onto the next stage of replacing the toner in your Brother printer.
Press the release button and pull the cartridge out
Now that you are ready to remove your old toner cartridge, you need to locate the release button on the printer. This button is usually found on the side of the printer, near the cartridge. Once you locate it, press it firmly, and gently pull out the old toner cartridge.
You might need to wiggle it a bit to get it out, but be careful not to force it. If you feel resistance, double-check that you have pressed the release button fully. It’s crucial to remove the old toner cartridge before opening the new one to prevent any accidental spills or leaks.
Once you have removed the old toner, you can dispose of it properly or recycle it. Don’t forget to refer to your printer user manual for specific instructions on how to dispose of the old toner cartridge. That’s it! You have completed the third step of replacing your toner cartridge in a few easy steps.
Now you are one step closer to printing high-quality documents with your freshly loaded cartridge!
Step 4: Unpack the New Toner Cartridge
To continue with the process of how to replace the toner in a Brother printer, we move on to step four which is to unpack the new toner cartridge. Before you start this process, remember to have a trash can nearby to discard the packaging materials right away. Firstly, remove the cartridge from its packaging and take off all the protective tapes.
This includes the tape seal on the top of the cartridge and adhesive tape covering the drum unit. Do not touch the drum unit, it must remain clean to prevent poor print quality. Next, give the cartridge a gentle shake to distribute the toner evenly inside.
Now, we are ready to install the new cartridge into the printer. This step is crucial for the smooth functioning of your printer, so take extra care and follow the instructions carefully to avoid jamming or spilling of toner.
Remove packaging and shake cartridge to distribute toner
When it comes to replacing an old toner cartridge with a new one, it’s essential to follow the necessary steps carefully. Step 4 involves unpacking the new toner cartridge and preparing it for installation. The first thing you want to do is remove all the packaging materials, such as the plastic wrap, tape, and cardboard.
Once the cartridge is unpacked, give it a gentle shake to distribute the toner evenly inside the cartridge. This helps to prevent any clumping or settling of the toner, ensuring that the maximum amount of toner is used and producing excellent prints. Remember not to shake the cartridge too hard, as this can cause toner to spill out and create a mess.
By carefully unpacking and shaking the cartridge before installation, you’ll be taking the right steps towards getting optimal performance from your printer and producing high-quality prints.
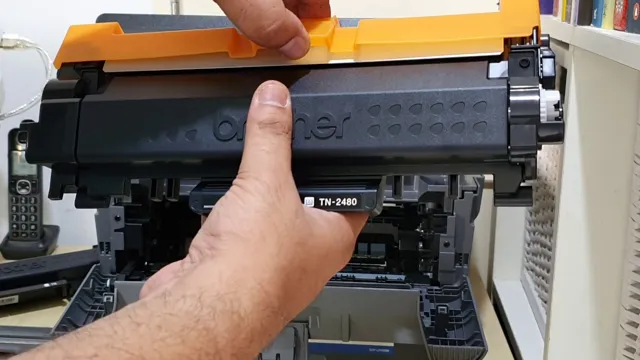
Step 5: Install the New Toner Cartridge
Now that you’ve removed the old toner cartridge, it’s time to install the new one in your Brother printer. First things first, make sure that the new cartridge is compatible with your printer model. Next, take the new cartridge out of its packaging and give it a gentle shake to distribute the toner evenly.
Then, remove the protective tape from the cartridge by pulling the tab and pulling it straight out. Be careful not to touch the roller surface or the electrical contacts. Now, carefully slide the new cartridge into the printer, making sure it clicks into place.
Finally, close the front cover of the printer and admire your newly installed toner cartridge. You’re now ready to print to your heart’s content! Remember, proper care of your toner cartridges will ensure that your printer runs smoothly and prints high-quality documents every time.
Slide the new cartridge into the correct slot and click it into place
Installing a new toner cartridge doesn’t have to be a daunting task. In fact, it’s quite simple with the right knowledge. Once you’ve removed the old cartridge, it’s time to install the new one.
Start by finding the correct slot and gently sliding the cartridge into place. Make sure it is firmly in position before clicking it into place. This will ensure that it is properly connected to your printer.
It’s important to note that each printer model may have a slightly different installation process, so be sure to consult the instruction manual for specific details. Once the new cartridge is securely in place, you’re ready to resume printing. With just a few simple steps, you can replace a toner cartridge and get back to your work in a snap.
Don’t let a low toner warning slow you down – take control of the situation with a quick and easy cartridge swap.
Step 6: Close the Printer Cover
After you have successfully replaced the toner cartridge, the next step is to close the printer cover. Make sure that the cover is firmly closed and locked in place. This step is vital, as leaving the cover open can cause dust and debris to enter the printer and possibly damage its sensitive components over time.
Once the cover is securely closed, you can now turn the printer on and start printing again. Remember, always follow the manufacturer’s instructions when replacing toner cartridges to ensure the longevity and optimal performance of your Brother printer. With these quick and easy steps, you can save money by replacing your toner cartridge yourself, and you’ll have your printer working like new again in no time.
Gently push down on the printer cover until it clicks into place
Closing the printer cover is a crucial step when using a printer. Without it, the printer won’t function properly, and you might encounter issues like paper jams or ink smudging. If you’ve just replaced the ink cartridges or cleared a paper jam, you need to make sure to close the printer cover properly.
Gently push the cover down until you hear a click sound. That’s when you’ll know that the cover is securely in place, and the printer is ready to use. It’s essential to press down gently because applying too much force can cause damage to the printer cover and the internal mechanisms.
Once the printer cover is closed, you can turn on the printer and start printing your documents with ease. Always keep in mind that properly maintaining your printer is essential for optimal functionality of the device, and it starts with closing the printer cover.
Step 7: Dispose of the Old Toner Cartridge Responsibly
After successfully replacing the toner cartridge in your Brother printer, it’s crucial to dispose of the old one properly. Old cartridges can be harmful to the environment if not disposed of responsibly. Recycling is the best way to dispose of used toner cartridges.
Many office supply stores offer recycling programs for toner cartridges, including Brother’s own cartridge collection program. You can also check with your local recycling center or municipal waste disposal facility for their recycling guidelines. Take care when handling the old cartridge, as toner powder can easily spill out and create a mess.
Always wear gloves and follow the manufacturer’s instructions for handling and disposal. By disposing of your old toner cartridge responsibly, you’re not only doing your part to protect the environment but also ensuring the longevity of your printer.
Conclusion
Replacing the toner in a Brother printer is as easy as changing a light bulb, but with less chance of electrocution. With a few simple steps, you can have your printer back up and running in no time, and be ready to tackle any printing tasks that come your way. So don’t let a low toner level bring you down – take charge and swap that sucker out like a pro!”
FAQs
What is the process to replace the toner in a Brother printer?
The process to replace the toner in a Brother printer varies slightly depending on the model. However, in general, you need to open the printer’s front cover and pull out the toner/drum assembly. Then, you must remove the old toner cartridge from the drum unit and replace it with a new one. Finally, you need to slide the toner/drum assembly back into the printer and close the front cover.
Can I replace the toner in my Brother printer without professional help?
Yes, you can replace the toner in your Brother printer without professional help. Most Brother printers are designed to make toner replacement a simple process that can be carried out by the user. However, if you are not comfortable doing it yourself, you can always seek help from a professional.
How often should I replace the toner in my Brother printer?
The frequency at which you need to replace the toner in your Brother printer depends on various factors such as the model of the printer, the type of documents you print, and the frequency of printing. In general, you should replace the toner when your printer prompts you to do so or when you notice a decrease in print quality.
What should I do if the toner cartridge in my Brother printer runs out before expected?
If the toner cartridge in your Brother printer runs out before expected, there might be a few reasons for this. Firstly, you might have been printing more than usual, which leads to quicker depletion of toner. Secondly, you might have been printing high-resolution documents or images, which can use more toner. Lastly, you might have a faulty cartridge. In any case, you should replace the cartridge with a new one or seek help from a professional.