If you’re new to building your own PC, (or maybe you’re a seasoned pro but haven’t given this much thought), you might be wondering about the HDMI port on your motherboard. Can you use it? Is it better than using a dedicated graphics card? What are the pros and cons? Don’t worry, we’ve got you covered! In this guide, we’ll be taking a deep dive into using the HDMI port on your motherboard, explaining what it is, how it works, and whether it’s the right choice for you. By the end of this article, you’ll have a much better understanding of everything you need to know about using motherboard HDMI!
Check your connections
If you want to use the HDMI port on your motherboard, the first thing you need to do is check your connections. Make sure that your monitor or TV is connected to the HDMI port on your motherboard and that your graphics drivers are up to date. You can usually find the latest drivers on the manufacturer’s website.
If you’re still having trouble getting your HDMI connection to work, try disabling your onboard graphics in your BIOS and then trying again. Some motherboards require you to do this, as they won’t display the image through the HDMI port without first disabling the onboard graphics. If none of these solutions work, it may be time to consider purchasing a separate graphics card for your system.
By following these simple steps, you should be able to use your motherboard’s HDMI port with ease.
Ensure your computer is turned off
When it comes to checking your computer connections, the first thing you want to do is ensure that your computer is turned off. This not only protects you from electrical shock, but it also allows you to see the connections more clearly without any distractions. Once your computer is off, take a look at the back and sides of your system unit.
You’ll see a variety of ports, including USB, Ethernet, HDMI, VGA, and audio jacks. Make sure that each connection is secure, as loose connections can cause a variety of issues, including dropped signals and incomplete data transfer. If you notice any frayed wires or damage to the connectors, it’s best to replace them immediately.
By taking the time to check your connections, you’ll be able to avoid a lot of headaches down the line and keep your computer running smoothly.
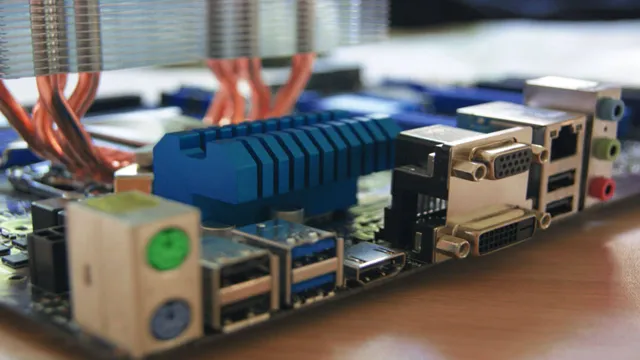
Locate your motherboard HDMI port
If you’re having trouble connecting your computer to an external display, one thing to check is your motherboard’s HDMI port. This port is typically on the back of your computer, near the other ports like USB and ethernet. However, not all motherboards have an HDMI port, so it’s important to check your specific model.
If you do have an HDMI port on your motherboard and you’re still having issues, make sure that it’s actually connected to your graphics card. Some motherboards have built-in graphics, but if you have a dedicated graphics card, you’ll want to make sure that your HDMI cable is plugged into the card and not the motherboard. This can be a common mistake for those who are building their own PC for the first time.
So, if you’re having trouble with your display, double-check your connections and make sure you’re connected to the right port.
Plug in your HDMI Cable
If you’re having trouble getting your HDMI connection working, the first thing to check is your connections. Make sure your HDMI cable is plugged in securely to both your device and your TV or monitor. It may seem obvious, but sometimes a loose connection can cause frustrating issues.
You might also want to make sure you’re using the correct HDMI port on your TV or monitor – some devices have several ports, so double-checking can save you some time and headache. Once you’ve verified your connections, try turning everything off and back on again. This can often resolve pesky technical problems.
If you’re still having trouble, it might be time to consult a professional or refer to the user manual for further troubleshooting advice. Remember, taking a few extra minutes to ensure your connections are solid can save you from a lot of frustration down the line!
Configure your display settings
If you’re looking to use the HDMI port on your motherboard, you’ll need to configure your display settings first. Start by connecting your display device to the HDMI port on the motherboard. Once you’ve done that, turn on your computer and wait for it to boot up.
Depending on your computer’s settings, you may need to enter the BIOS or UEFI interface. Look for the option to enable the onboard graphics and select the HDMI port as your primary display device. If your computer is running Windows, you’ll also need to configure your display settings from the Control Panel.
Go to Display Settings and select your display device. Make sure that the resolution and refresh rate are set correctly for your display. By following these simple steps, you can easily use the HDMI port on your motherboard and enjoy high-quality video and audio on your display device.
Enter your system setup
When it comes to setting up a new system, configuring the display settings is an important step to ensure the best visual experience. To start, it’s important to determine the ideal screen resolution for your monitor. Your monitor’s native resolution is often the best option, as it’s designed to display at that specific resolution.
However, if you’re finding the text or icons too small, you can lower the resolution to make everything appear larger. On the other hand, if you want a clearer, crisper image, you can try increasing the resolution. Additionally, adjusting the screen refresh rate can also enhance your viewing experience.
A higher refresh rate can prevent screen tearing and provide smoother motion, especially when playing games or watching videos. Overall, taking the time to properly configure your display settings can make a significant difference in your overall computing experience.
Select your motherboard’s integrated graphics as your primary display output
When setting up your computer, it’s essential to configure your display settings correctly. One crucial aspect you should consider is selecting your motherboard’s integrated graphics as your primary display output. This means that the display will run through your motherboard’s graphics card instead of any other additional graphics card you might have installed.
Doing this can help lower your computer’s power consumption and ensure optimal performance. To choose your integrated graphics card as your primary display output, you need to access your computer’s BIOS settings and look for the display settings or hardware settings menu. Once you locate the menu, select the integrated graphics card as the primary display adapter and save your changes.
By doing this, you will avoid any unnecessary confusion and ensure you get the best performance from your computer’s graphics card. So, whether you’re a gamer, graphic designer, or video editor, selecting your motherboard’s integrated graphics card as your primary display adapter is an essential step in optimizing your computer’s performance.
Save your changes and exit the system setup
When it comes to configuring your display settings, it’s essential to save your changes and exit the system setup properly. There’s nothing worse than spending all that time adjusting your settings only to have them disappear the next time you power on your device. To ensure that your changes are saved correctly, make sure you follow the instructions carefully and don’t rush through the process.
Once you’ve made the necessary adjustments, double-check your work and hit the save button. If everything is in order, you can safely exit the system setup and enjoy your newly configured settings. Remember, even the slightest mishap can cause your work to vanish, so take your time and be thorough.
Overall, configuring your display settings can be a bit overwhelming, but it’s entirely doable with a little patience and attention to detail. Don’t be afraid to experiment with different settings until you find the perfect configuration that works for you. Whether you’re a gamer, graphic designer, or casual user, getting your display settings right can make a huge difference in your overall experience.
So don’t give up if it seems challenging at first. With a little practice and persistence, you’ll soon be a pro at configuring your display settings in no time.
Troubleshooting tips
Are you having trouble using your motherboard HDMI? Fear not, as there are a few troubleshooting tips that can help you solve this issue. First, make sure that your BIOS settings are configured correctly. This means that you need to enable the onboard graphics card on your motherboard, as well as select it as the primary display adapter.
If the BIOS settings are correct, then you should check your HDMI cable and make sure that it’s working properly. Try connecting the cable to a different screen or device, and see if the issue persists. It’s also worth checking your graphics card drivers to ensure they are updated and installed correctly.
Lastly, if none of these tips work, it might be worth consulting with a professional to help diagnose and solve the issue. With these tips, you should be able to get your motherboard HDMI working in no time!
Check your HDMI cable
If you’re experiencing issues with your TV not displaying anything when you connect it to a device via HDMI cable, the first thing to check is your cable. HDMI cables are notorious for going bad, especially if they are older or have been exposed to physical damage. When a cable goes bad, it can cause poor or even no video output, so it’s crucial to ensure that the cable is in good working condition.
You can try swapping the cable for a new one to see if that resolves the issue. And, if this doesn’t work, there may be another underlying problem. Don’t hesitate to seek further troubleshooting assistance if you need it.
Update your graphics drivers
Updating your graphics drivers is an essential task for any computer user and gamer alike. This process involves updating the software that controls your computer’s graphics card to ensure that it is running as smoothly as possible. When your graphics drivers are out of date, your computer can experience issues such as low FPS, screen tearing, and other malfunctioning problems.
To update your graphics drivers, you need to ensure that your graphics card supports the latest version of software, visit the official website of the graphics card manufacturer and download the latest drivers. Updating your graphics drivers fixes the bugs in the software, which in turn increases the overall performance of your computer. In addition to fixing issues, updating your graphics drivers also lets you use the latest features of hardware accelerating software programs.
So if you’re experiencing any graphics related issues or want to use the latest features on your computer, updating your graphics drivers is a vital step.
Conclusion
In conclusion, using the HDMI port on your motherboard is as easy as pie (or as easy as ordering pizza online). Simply plug in your cable, click your heels together three times and voila! Okay, maybe not the last part, but you get the idea. With a little patience and a lot of common sense, you can easily connect your computer to your TV or monitor using the HDMI port.
So, whether you’re binge-watching your favorite show or giving a presentation at work, don’t be afraid to use that handy-dandy little port on your motherboard. It’s there for a reason, after all!”
FAQs
Can I use the HDMI port on my motherboard instead of my graphics card?
Yes, if your motherboard has an HDMI port, you can use it to connect your monitor to your computer. However, the quality of the display may be lower compared to using a dedicated graphics card.
How do I enable HDMI output on my motherboard?
You can usually enable HDMI output on your motherboard by accessing the BIOS settings and selecting the display device. Instructions for accessing the BIOS vary depending on the manufacturer, so consult your manual or the manufacturer’s website for guidance.
Why is there no sound coming from my motherboard’s HDMI port?
Sometimes the audio output for the HDMI port needs to be manually enabled in the sound settings of your operating system. Alternatively, there may be an issue with your computer’s audio drivers. Try updating your drivers or consult your manual for further troubleshooting steps.
Can I connect multiple monitors to my motherboard via HDMI?
This depends on the specifications of your motherboard. Some motherboards support multiple displays, while others may only support one. Check your manual or the manufacturer’s website for information on the maximum number of displays supported.