Secure Boot is a crucial feature that helps protect your computer from unauthorized access and malware attacks. It helps prevent unauthorized software from running during the boot process, making it an essential security feature for modern-day computers. However, enabling Secure Boot is not always straightforward, and some users may struggle with the process, especially if they have an MSI motherboard.
But fear not! In this blog post, we will discuss how to enable Secure Boot on MSI motherboards and ensure that your computer is protected from threats. We’ll take a step-by-step approach, explaining each process in detail to make it easy for you to follow along. So, grab your MSI motherboard, get comfortable, and let’s dive into the world of Secure Boot together!
Check BIOS Compatibility
If you’re wondering how to turn on secure boot on your MSI motherboard, the first step is to check its BIOS compatibility. Secure Boot is a feature that ensures your computer only boots from trusted bootloaders and operating system kernels. To enable this feature, you need to go into your motherboard’s BIOS settings and navigate to the Secure Boot option.
However, not all motherboards support this feature, so it’s important to check beforehand to avoid any disappointment. To check your BIOS compatibility, you can consult your motherboard’s manual or check the manufacturer’s website. If your motherboard supports Secure Boot, you can follow the manufacturer’s instructions to activate it and enjoy the added security benefits it provides.
Access BIOS Menu
If you’re planning to upgrade your computer with new hardware, it’s crucial to first check your BIOS compatibility. BIOS (Basic Input/Output System) is a type of firmware that is stored on a small chip on your motherboard, and it controls the communication between your computer system and its hardware components. Checking your BIOS compatibility before upgrading is necessary to ensure that the new hardware is compatible with your existing BIOS and won’t cause any errors or malfunctions.
To access the BIOS menu, restart your computer and immediately press the key specified on the boot screen (usually F2 or Del). Once you’re in the BIOS menu, you can check the version of your BIOS and see if there are any updates available. Generally, newer hardware requires a newer version of the BIOS, so updating your BIOS can help ensure compatibility.
It’s also important to note that upgrading your BIOS is not without risks. If something goes wrong during the process, it could potentially damage your hardware or render your computer unusable. That’s why it’s recommended to follow the instructions carefully and make sure you have a backup of your important data before proceeding.
In conclusion, checking your BIOS compatibility before upgrading your hardware is an essential step to avoid potential issues and ensure a smooth upgrade. By accessing the BIOS menu and checking for updates, you can make informed decisions about your computer’s hardware and minimize the risk of any errors.
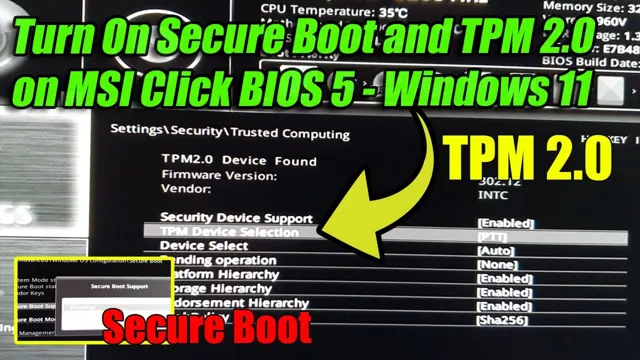
Locate Secure Boot Option
When it comes to securing your computer, one of the most important steps you can take is enabling Secure Boot. This feature ensures that only trusted software can boot up on your system, protecting you from malware and other security threats. But before you can enable Secure Boot, you need to check if your computer’s BIOS is compatible with this feature.
To do this, you’ll need to enter the BIOS menu by pressing a specific key during startup (usually F2 or Delete). Once you’re in the BIOS, navigate to the Security or Boot tab and locate the Secure Boot option. If you don’t see this option, it may be because your BIOS is not compatible with Secure Boot or because it needs to be updated.
In either case, it’s important to make sure that your BIOS is up to date to ensure the best possible security for your computer.
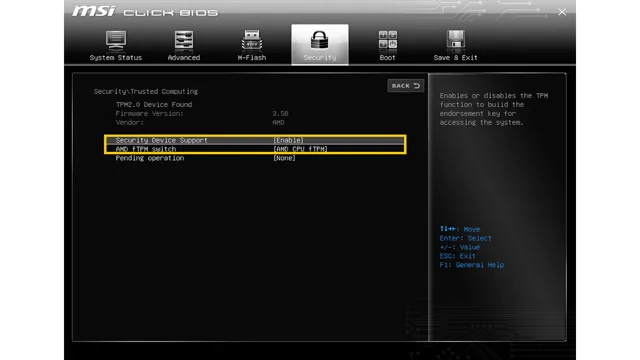
Enable Secure Boot
If you have an MSI motherboard, you may want to turn on secure boot to enhance the security of your system. Secure boot works by only allowing trusted software to run during the boot process, protecting your computer from malware and other types of attacks. Here’s how to turn on secure boot on your MSI motherboard.
First, you need to access the BIOS or UEFI firmware of your MSI motherboard. Restart your computer and press the key indicated to access the firmware. In most cases, the key is F2 or Del, but it may vary depending on your motherboard model.
Once you’re in the firmware settings, look for the option to enable secure boot. It may be located under the “Boot” or “Security” menu, depending on your firmware version. Select the option and set it to “Enabled.
” You may also need to specify the type of secure boot, such as “Windows UEFI mode” or “Other OS.” After you’ve enabled secure boot, save the changes and exit the firmware settings. Your computer will now only boot into trusted software, ensuring a more secure computing experience.
Keep in mind that some older operating systems or hardware may not be compatible with secure boot, so make sure to do some research before turning it on. By enabling secure boot on your MSI motherboard, you’ll be taking an important step towards protecting your computer from unwanted intrusions.
Save Settings and Exit BIOS
Once you’ve made changes to your computer’s BIOS settings, it’s important to save those changes before exiting the BIOS. This ensures that all of your adjustments are applied and that your computer will run properly. One setting you may want to consider enabling is Secure Boot.
Secure Boot is a feature that helps prevent unauthorized software and operating systems from loading during the boot process. When Secure Boot is enabled, your computer will only boot from trusted, digitally-signed operating systems and software. This can help protect your computer from malware and other security threats.
To enable Secure Boot, simply navigate to the Security menu in your BIOS settings and select the option to turn it on. Once you’ve made all your changes, be sure to save your settings and exit the BIOS. This will ensure that your settings are applied and your computer will run smoothly.
Restart Your Computer
Restart Your Computer Enabling Secure Boot is a crucial step in ensuring your system’s security. But before you proceed with the process, it’s important to restart your computer. Restarting clears any temporary files that may be interfering with Secure Boot’s proper functioning.
It also gives you a fresh start and allows your system to implement any updates that may have been installed. Once the computer has rebooted, you can enter the BIOS or UEFI firmware settings and enable Secure Boot. This way, you can ensure that only authorized software is loaded during the boot process, thus minimizing the risk of malware attacks.
So, before enabling Secure Boot, remember to restart your computer to ensure its smooth functioning and optimum security.
Troubleshooting Tips for Secure Boot Issues
Are you having trouble turning on the secure boot feature on your MSI motherboard? Don’t worry, you’re not alone. Secure boot is an essential security feature that prevents unauthorized access to your system during boot-up. Here are some troubleshooting tips that can help you enable secure boot on your MSI motherboard.
First, make sure that your motherboard’s BIOS is up to date. Check the MSI website for any available updates or patches that may fix any issues you’re having. Next, navigate to the BIOS settings and locate the secure boot option.
Enable it, save your changes and reboot your system. Sometimes, secure boot may be incompatible with certain devices such as graphics cards or network cards. In this case, you may need to disable the incompatible devices or install updated drivers.
By following these troubleshooting tips, you should be able to turn on the secure boot feature on your MSI motherboard and keep your system safe from potential security breaches.
Update BIOS Firmware
If you are having issues with Secure Boot on your computer, one potential fix is to update your BIOS firmware. The BIOS (Basic Input/Output System) is responsible for controlling the boot process and initializing hardware components. Updating the firmware can ensure that it is up-to-date and functioning properly.
To update your BIOS, you will need to first identify the motherboard model and version. Once you have this information, you can download the appropriate firmware from the manufacturer’s website and follow their instructions for installation. It is important to note that updating the BIOS can be risky and should be done carefully to avoid damaging your computer.
Make sure to follow all instructions closely and create a backup of your current BIOS before proceeding. By updating your BIOS firmware, you may be able to resolve issues with Secure Boot and improve overall system stability.
Check Boot Mode Settings
If you’re struggling with Secure Boot issues on your PC, one of the first things you should do is check your Boot Mode settings. Secure Boot is a security protocol that prevents unauthorized bootloaders from running on your system, ensuring that only trusted software is allowed to execute during the boot process. However, if your Boot Mode is set to Legacy or CSM (Compatibility Support Module), Secure Boot won’t work correctly, and you may encounter errors or warnings during boot-up.
To fix this, enter your BIOS settings and select UEFI Boot Mode to enable Secure Boot. This will ensure that your system only loads trusted operating system components and drivers during startup, keeping your PC safe from malware and other security threats. Overall, taking a few minutes to check your Boot Mode settings can make a big difference in maintaining the security and stability of your system.
Conclusion
In the end, turning on Secure Boot on your MSI motherboard is like putting a lock on your front door. It provides an additional layer of protection and ensures that only trusted software is running on your system. So, don’t leave your computer vulnerable to unwanted visitors – take the necessary steps to enable Secure Boot and keep your digital life secure!”
FAQs
What is the purpose of secure boot on MSI motherboards?
The purpose of secure boot on MSI motherboards is to ensure that only trusted software is able to run during the boot process. This helps prevent malware and other unauthorized software from getting onto the system.
How do I enable secure boot on my MSI motherboard?
To enable secure boot on MSI motherboards, you need to access the BIOS setup utility. From there, you can find the secure boot option and enable it. Instructions for accessing the BIOS setup utility vary by motherboard model, but can often be done by pressing a specific key during bootup.
What happens if I disable secure boot on my MSI motherboard?
If you disable secure boot on your MSI motherboard, the system will no longer check that only trusted software is being loaded during the boot process. This can make the system more vulnerable to malware and other security threats.
What should I do if I cannot enable secure boot on my MSI motherboard?
If you are unable to enable secure boot on your MSI motherboard, you may need to update the motherboard’s BIOS to a newer version that supports secure boot. Alternatively, there may be a setting in the BIOS that needs to be changed before you can enable secure boot. Check the motherboard’s manual or online documentation for more information.