Are you struggling to turn on your motherboard because you don’t have a case yet? Fret not, for there’s a way to make it work without needing to purchase a case right away. Whether you’re building a new PC or revamping an old one, turning on the motherboard without a case may sound challenging, but it’s possible with a bit of guidance and a few tools. In this blog, we’ll be discussing the different methods you can use to power up your motherboard without a case and the things you need to keep in mind.
So, let’s dive in and explore this problem-solving technique together.
Check motherboard specs
If you’re building a PC from scratch, you might want to know how to turn on your motherboard without a case. Luckily, it’s possible to do this by following a few simple steps. First, check the specs of your motherboard to make sure it has the power button pins.
Then, locate those pins and short them with a screwdriver or jumper cap to turn on the motherboard. Keep in mind that this method only turns on the motherboard, so you won’t be able to interact with the PC until you connect all the necessary components. Additionally, make sure to ground yourself before attempting this and be cautious not to damage any components.
By checking your motherboard specs and following these steps carefully, you can turn on your motherboard without a case.
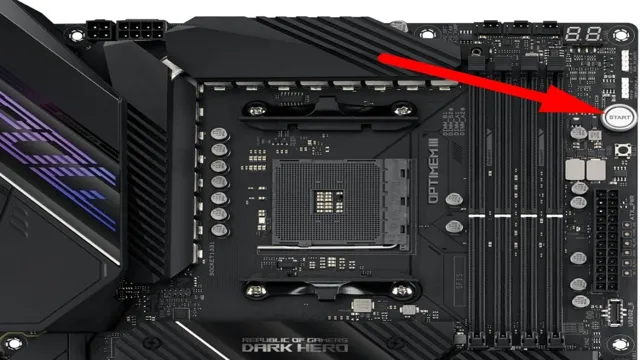
Verify if it has power button onboard
If you’re building a new computer, one key component you need to consider is the motherboard. When choosing a motherboard, it’s important to check the specs to see if it has a power button onboard. This can be a convenient feature as it allows you to turn your computer on and off without having to reach for the power supply or press the power button on the case.
To check if a motherboard has a power button onboard, look for the specifications sheet online or in the manual. Most manufacturers will list the features of the motherboard, including whether it has a power button or not. If you’re having trouble finding the information, you can also try searching for the model of your motherboard online to see if other users have mentioned the presence of a power button.
By verifying whether your motherboard has this feature, you can ensure that your computer building process goes smoothly and that you have easy access to power control.
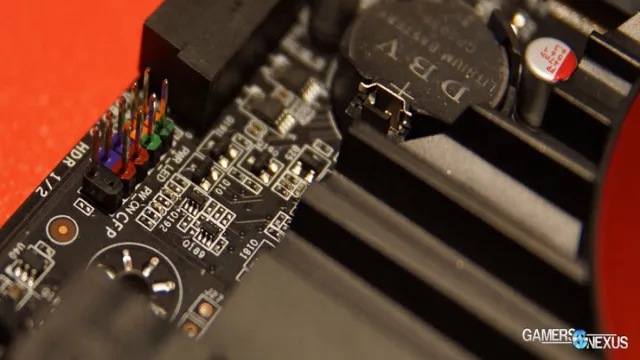
Locate and identify power pins
When building a computer, it’s important to locate and identify the power pins on your motherboard. To do this, you should first check the specifications of your motherboard. These specs will give you information on where the power pins are located and what type of connectors are required.
Most motherboards have a 24-pin ATX power connector that supplies power to the motherboard and its components, as well as a 4-pin or 8-pin CPU power connector that provides power to the processor. Additionally, some motherboards may have other power connectors for specific components such as the graphics card or storage devices. Identifying these pins is crucial to ensuring that your computer has a stable power supply, which is crucial for proper system function.
In short, make sure to check your motherboard specifications to locate and identify the power pins so you can properly connect all the necessary power cables when building your computer.
Using a screwdriver
If you don’t have a case for your motherboard or your case has a faulty power button, there are still ways to turn on your motherboard without a case. All you need is a screwdriver. First, locate the two power pins on the motherboard where the case’s power button was originally connected.
Then, take your screwdriver and touch the two pins together. This should initiate the power supply and start up your motherboard. However, be aware that without a case, your motherboard will be exposed and potentially vulnerable to damage.
It’s recommended that you quickly install a case for optimal protection and performance. Overall, with just a screwdriver and a bit of carefulness, you can turn on your motherboard without a case and get back to using your computer.
Use a flathead screwdriver to short the power pins
If you’re ever in a situation where you need to turn off your computer or restart it without using the power button, you can use a flathead screwdriver to short the power pins on your motherboard. This technique is useful if your computer is frozen, the power button is broken, or you need to troubleshoot your computer. To do this, first, you need to locate the power pins on your motherboard.
These pins are usually located on the bottom right corner near the front panel connectors. Once you find them, take a flathead screwdriver and bridge the two pins by touching both of them at the same time. This will complete the circuit and turn off your computer.
If you want to restart it, just repeat the process and release the screwdriver after a few seconds. It’s important to note that this method should only be used as a last resort, and you should always ensure your computer is properly shut down before performing this action. By using this technique, you can effectively turn off or restart your computer without using the power button, which can be a lifesaver in certain situations.
Ensure screwdriver only touches power pins
When performing maintenance on electronic devices, it’s important to use a screwdriver that only touches the power pins. This means making sure the metal part of the screwdriver only comes into contact with the pins directly connected to the power supply. Failure to do so can result in a short circuit, damaging the device or even causing injury to the person working on it.
To ensure the screwdriver only touches the power pins, take a close look at the pins before inserting the screwdriver. The power pins usually have a slightly thicker diameter than other pins, and may also be labeled on the circuit board. When inserting the screwdriver, aim for the power pins only and avoid touching any surrounding components.
By taking these precautions, you can safely perform maintenance on electronic devices without the risk of damage or harm.
Power on by completing the circuit
“Completing the Circuit” Have you ever been faced with a power outage and wondered how to turn the power back on? One way to power on is by completing the circuit with a screwdriver. The circuit breaker is the main switch that controls all the power supply in your home. In the event of a power outage, the circuit breaker may trip, cutting off the power supply.
To turn the power back on, you need to access the circuit breaker and find the tripped switch. Once you’ve located the tripped switch, use a screwdriver to firmly switch it back on. This completes the circuit and restores power to your home.
It’s important to note that if the same circuit trips repeatedly, it’s a sign of an underlying problem, and you should consult a qualified electrician to assess and address the issue. With this knowledge, you can confidently restore power to your home in the event of a power outage.
Using wires
If you want to turn on your motherboard without using a case, you can do so by using wires. Simply locate the power switch pins on the motherboard and use a jumper wire to connect them. This will simulate the power switch being pressed and turn on the motherboard.
It’s important to remember that when working with wires, you must take caution not to touch them with bare hands or while the motherboard is plugged in. The wires used for this process must be carefully selected and the right size for the pins. Make sure to properly ground yourself before attempting this to prevent any static interference.
Once the jumper wire is connected, the motherboard should power on and begin the boot process. This method is useful for testing components or troubleshooting issues with the case. Remember to be careful when handling wires and connecting them to the motherboard.
By using this method, you can turn on your motherboard without a case.
Connect wires to power pins
Connecting wires to power pins is a crucial step in setting up any electrical device. Wires are an essential component in any circuit as they are responsible for carrying electricity between different components. When it comes to connecting wires to power pins, it is essential to ensure that you are using the right type of wire and connecting it securely.
One example of a suitable wire is the stranded wire, which consists of multiple strands of wire that are twisted together. The twisting makes the wire more flexible, allowing it to bend and flex without breaking. This type of wire is ideal for connecting to power pins that may need to be arranged in awkward positions.
When connecting wires to power pins, it’s also essential to ensure that the connection is secure. This can be achieved using a soldering iron, which heats the wire and the power pin, fusing them together. Another way to secure the connection is by crimping the wire to the power pin using pliers.
This method involves applying pressure to the wire and the pin, creating a tight and secure connection. It’s important to remember that different devices may have different power pins, and it’s crucial to understand the specific requirements of your project. Some power pins may require larger or smaller wires or specific tools to make a secure connection.
Taking the time to understand the requirements of your project and using the appropriate wires and tools will ensure that your device functions correctly and is safe to use. In conclusion, connecting wires to power pins is a critical step in setting up any electrical device. By using the right type of wire and ensuring a secure connection, you’ll be able to create a circuit that is functional and safe.
Don’t be afraid to ask for help or advice if you’re unsure about any part of the process. It’s better to take the time to understand the requirements of your project and make sure everything is done correctly than to rush and risk damaging your device.
Touch the ends of the wire together
If you want to create an electrical circuit using wires, the first step is to connect the ends of the wire together. This essentially closes the loop of the circuit, providing a path for electricity to flow. It’s important to ensure that the wires are properly secured together, either by twisting them or using connectors, to prevent them from coming apart and breaking the circuit.
If the circuit is not closed properly, electricity won’t be able to flow through it and nothing will happen. It’s a bit like trying to water your plants without a hose – the water will just sit in the watering can and won’t reach the plants. Once the wires are securely connected, you are ready to move on to the next step in building your circuit.
Remember, safety always comes first when working with electricity, so be sure to turn off the power source before connecting any wires.
Precautions
If you need to turn on your motherboard without a case, there are a few precautions you need to keep in mind. First, make sure to discharge any static electricity from your body by wearing an anti-static wrist strap or touching a grounded object. Next, be very careful when handling the motherboard outside of the case as even a small bump or accidental drop could cause damage.
It’s also a good idea to use an insulated surface such as a cardboard box or foam pad to place the motherboard on while you work on it. One easy way to turn on the motherboard without a case is to use a screwdriver to short-circuit the two power switch pins on the motherboard header. Just be sure to check your motherboard manual to locate these pins before attempting to do so.
Overall, with a little caution and attention to detail, turning on a motherboard without a case can be done safely and efficiently.
Avoid contact with other pins
When it comes to working with pins, it’s important to keep in mind that they can easily make contact with other pins, potentially causing damage or even a short circuit. To avoid this, it’s important to take proper precautions when handling pins. One such precaution is to use a non-conductive tool, such as a plastic tweezer or a wooden stick, when handling pins.
This can help prevent accidental contact with other pins and reduce the risk of damage. Additionally, it’s important to be mindful of your surroundings and avoid placing pins on conductive surfaces, such as metal, which can increase the likelihood of contact with other pins. By taking these precautions, you can help ensure the safety of yourself and your equipment while working with pins.
It’s also important to note that these precautions should be taken regardless of the type of pin being used, whether it’s a simple jumper or a complex integrated circuit. So, be sure to always keep these precautions in mind and avoid contact with other pins to keep your equipment running smoothly.
Disconnect PSU and ground yourself
When it comes to working with a power supply unit (PSU), it’s important to take certain precautions to ensure your safety and the safety of your components. One of the first things you should do before opening up your computer or other device is to disconnect the PSU from its power source. This will prevent any electrical current from flowing through the unit while you’re working on it.
Additionally, it’s a good idea to ground yourself by touching a metal object before handling any sensitive components. This helps to discharge any static electricity that may have built up on your body and could potentially damage the components. Taking these simple precautions can help prevent accidents and ensure that your components remain in good working order.
So, remember to always disconnect your PSU and ground yourself before working on any electronics.
Return to using case after troubleshooting
When it comes to troubleshooting a problem with a product or service, it’s easy to become frustrated and give up quickly. However, it’s important to take precautions and not skip steps in the process. One of those precautions is to return to using the product or service in question after troubleshooting.
Often, small issues can be resolved through troubleshooting alone, but if the problem persists even after trying different solutions, it’s best to return to using the product to ensure that the issue can be properly diagnosed. This will also give you a chance to see if there are any other issues that need to be addressed. By taking these precautions, you can avoid making assumptions about the problem and improve the chances of finding a successful resolution.
Conclusion
In conclusion, if you’ve ever found yourself staring at a bare motherboard with no case in sight, fear not! All you need is a trusty screwdriver and a steady hand. By simply completing the circuit between the power switch pins, you’ll be able to power up your motherboard and get back to building your dream machine. It’s like casting a spell – with a little bit of technical knowledge and the right tools, you can conquer any electronics challenge.
Happy building!”
FAQs
What are the steps to turn on a motherboard without a case?
To turn on a motherboard without a case, you need to first connect the power supply to the motherboard, then short-circuit the power switch pins on the motherboard with a metal object such as a screwdriver or paper clip.
Why would someone want to turn on a motherboard without a case?
Some people might want to turn on a motherboard without a case to test it for functionality before installing it in a case, or to troubleshoot issues with their primary case.
Is it safe to turn on a motherboard without a case?
As long as you take proper precautions such as handling the components with care, keeping yourself grounded, and not touching any exposed conductive parts, it is generally safe to turn on a motherboard without a case.
Can turning on a motherboard without a case cause damage to the components?
It is possible that turning on a motherboard without a case could cause damage to the components if proper precautions are not taken. For example, if you touch a conductive part or accidentally short-circuit the wrong pins on the motherboard, it could cause a short-circuit and damage the components.