
Are you ready to upgrade your graphics card, but not sure how to remove your current GPU from the motherboard? Don’t worry, we’ve got you covered. In this blog post, we will walk you through the easy steps to safely remove your GPU from your motherboard without causing any damage to either component. After all, swapping out your GPU can be a simple and cost-effective way to improve the performance of your gaming system.
So, let’s get started!
Gather the Necessary Tools
When it comes to removing a GPU from your motherboard, it’s essential to have the right tools on hand. One of the main tools you’ll need is a screwdriver. Depending on the type of GPU you have, you may need a Phillips head or flathead screwdriver to remove the screws holding it in place.
You’ll also need an anti-static wristband to prevent any static electricity from damaging your GPU or other components. Additionally, it’s a good idea to have some thermal paste and a clean cloth or alcohol wipes to clean any residue from the GPU and motherboard after removal. When gathering your tools, make sure to handle them carefully and store them in a safe place to avoid damage or misplacement.
With the right tools ready, you’ll be better prepared to safely and successfully remove your GPU from your motherboard.
Tools Required
When it comes to any task that requires tools, having the right ones on hand is crucial for success. The same goes for any DIY project. Before beginning your next project, be sure to gather all of the necessary tools.
This not only saves time, but it also ensures that the job is done properly and safely. Some commonly used tools in DIY projects include a drill, hammer, saw, measuring tape, level, screwdrivers, pliers, and wrenches. Depending on the project, there may be more specialized tools needed, such as a soldering iron or angle grinder.
It’s important to have all the tools you need before starting, as running to the store in the middle of a project can be frustrating and possibly cause you to lose focus. So, take the time to ensure you have all of the necessary tools and equipment you need for the job ahead.
Disable Power to the Motherboard
If you’re looking to remove a GPU from your motherboard, the first step is to completely disable power to the motherboard. This includes unplugging the power cord from the wall if your PC is plugged in, and turning off the power supply unit switch. Once power is disabled, you can begin removing the GPU.
It’s important to handle the GPU with care – gently push down on the release latch located on the PCI-e slot, and slide the GPU out of the slot. If the GPU is secured with screws, unfasten them before attempting to remove it. Keep in mind that different motherboards may have slightly different procedures for removing a GPU, so it’s always a good idea to consult your motherboard manual or the manufacturer’s website for specific instructions.
With a little patience and caution, removing a GPU can be a straightforward process that allows you to upgrade or replace it as needed.
Shut Down and Unplug the Computer
When it comes to shutting down and unplugging your computer, there are a few important steps to follow to avoid any potential damage to your devices. The first step is to properly shut down your computer, making sure all programs and applications are closed before selecting the shutdown option. Once your computer is off, it is important to unplug it from the power source to prevent any electrical surges or potential hazards.
However, simply unplugging your computer is not enough – you must also disable power to the motherboard. This can be done by pressing and holding the power button for a few seconds until the internal lights turn off. Disabling power to the motherboard ensures that all components in your computer are powered down and safe from any sudden power surges.
By following these simple steps, you can safely shut down and unplug your computer, and protect your devices from potential damage.
Remove the Computer Case
If you’re looking to upgrade your graphics card or just replace a faulty one, you’ll need to know how to remove it from the motherboard. The first step to do this is to remove your computer’s case. Depending on your case, this may require unscrewing a few screws or pushing a latch to release the side panel.
Once the case is off, you’ll be able to see your motherboard and the graphics card (GPU) that is plugged into it. Make sure your computer is unplugged and turned off before proceeding to remove the GPU. You’ll need to locate the PCIe slot that the GPU is plugged into and release the tab or latch that is holding the card in place.
This may require a bit of force, but be gentle to avoid damaging the card or the slot. Once the GPU is released, gently lift it up and out of the PCIe slot. And voila, you’ve successfully removed the GPU from your motherboard!
Locate and Remove the GPU Screws
When it comes to upgrading or cleaning your computer’s GPU, the first step is to remove the computer case. This will give you easy access to the internal components, including the GPU screws. Before you begin, make sure you unplug your computer and any connected peripherals, and ground yourself to avoid static discharge.
Once you have removed the case, locate the GPU screws on the back panel of the computer. These are often located near the bottom of the case and may be secured with small screws or thumb screws. Once you have located the screws, gently remove them with a screwdriver, being careful not to damage any of the surrounding components.
Once the screws have been removed, you can begin to gently remove the GPU from its slot, taking care not to damage any of the delicate components. By following these steps, you will be able to safely and effectively remove your GPU screws and access the internal components of your computer.
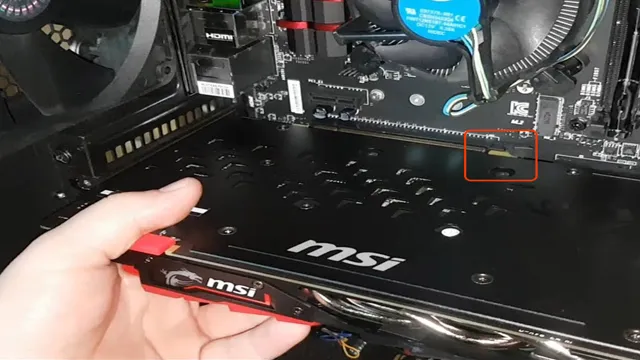
Release the Locking Mechanism on the PCIe Slot
Removing a GPU from your motherboard may seem daunting at first, but it’s a fairly simple process once you know what you’re doing. The first step in this process is to release the locking mechanism on the PCIe slot. This is usually done by pressing down on a latch or lever located on the motherboard near the slot.
Be sure to check your motherboard’s manual for specific instructions on how to release the locking mechanism, as it may vary depending on the model. Once the locking mechanism is released, gently and carefully remove the GPU from the PCIe slot by pulling it straight out. It’s important to handle the GPU with care during this process, as it’s a delicate component that can be easily damaged.
By following these steps, you’ll be able to safely remove your GPU from your motherboard without causing any damage or unnecessary stress.
Push Down the Locking Mechanism and Pull the GPU Out
If you’re feeling intimidated by the idea of removing your GPU from your PC, don’t worry – it’s a lot easier than you might think! To release the locking mechanism on the PCIe slot, you’ll need to start by locating it on your motherboard. It’s usually towards the center of the board and will have a small metal lever or latch holding the GPU in place. Push down on the locking mechanism while gently pulling the GPU away from the PCIe slot.
As you do this, be sure to keep an eye on the delicate fan blades and other components on the card to avoid damaging them. With a little bit of finesse, you should be able to remove the GPU with ease. Remember – if you’re ever unsure about a step or don’t feel confident in your abilities, it’s always best to seek out the help of a professional or experienced friend.
Clean the GPU and PCIe Slot
Removing a GPU from a motherboard can be a daunting task, but with a few simple steps, it can be a breeze. Firstly, make sure to shut off your computer completely and unplug it from the power source. Next, locate the latch or screw that holds the GPU in place and remove it.
Gently push down on the latch or push the release button, then carefully pull the GPU out of the PCIe slot. Once the GPU is removed, it is essential to clean both the GPU and the PCIe slot thoroughly. Use a can of compressed air to blow out any dust or debris from the slot, and then use a soft-bristled brush to remove any remaining dirt.
Wipe down the GPU with a microfiber cloth and be sure to remove any dust or debris that may have accumulated on the surface. Finally, re-insert the GPU into the slot and reattach the latch or screw. By following these steps, you can safely remove and clean your GPU without damaging any components, ensuring optimal performance for your PC.
Remove Dust and Debris with Compressed Air
One of the most crucial parts of maintaining optimal GPU performance is by keeping it clean and free from dust and debris. One effective way to accomplish this is by using compressed air to blow away any particles that have accumulated on the surface or inside the PCIe slot. It’s best to turn off and unplug the computer before beginning the process.
Avoid touching the pins or other sensitive parts to prevent damage. There are various compressed air cans available in the market that come with a thin straw attachment for better precision and control. Hold the can upright and use short bursts of air to blow the dust and debris away.
Check the GPU and PCIe slot for remaining dust or debris, and repeat the process if necessary. Keeping the GPU clean can extend its lifespan and improve overall performance.
Reassembly
Removing a GPU from a motherboard can be a bit intimidating for those who are unfamiliar with the process, but with the right tools and a little patience, it can be done quickly and safely. The first step is to power off your computer and unplug it from the wall. Then, grab a screwdriver and remove the screws holding the GPU in place.
Note that some GPUs may have a latch or clip that needs to be released before removing it. Once the GPU is free, gently pull it out of the PCIe slot and set it aside. If you plan on replacing the GPU with a new one, be sure to clean the PCIe slot and any fans or heatsinks before installing the new GPU.
Overall, with a steady hand and clear instructions, removing a GPU from a motherboard is a relatively simple task that anyone can do with a little bit of practice.
Install the GPU in a PCIe Slot and Tighten the Screws
GPU Installation Now that you have opened up your computer case and located the PCIe slot, it’s time to install the GPU. For the installation process, you need to align the GPU with the PCIe slot. Make sure it is inserted properly.
Once you have aligned it properly, gently push the GPU inside the PCI slot. Don’t worry; you will hear a click sound signaling that it is properly inserted. After that, secure the GPU by tightening the screws provided.
Ensure that all screws are properly tightened but avoid overtightening as it may damage the PCIe slot or the GPU. With that, you now have your GPU installed, and it’s time to close your computer case. Make sure all the cables are connected, and everything is in place before turning on your computer.
Congratulations, you have now successfully installed your GPU, and you are now ready to enjoy advanced graphics performance and gaming experience.
Reattach the Computer Case and Power Up the Computer
Once you’ve completed all the necessary upgrades, it’s time to reattach the computer case and power up the computer. This may seem like a straightforward task, but it’s essential to ensure that everything is properly aligned and secured to prevent any damage or malfunction. Start by sliding the case back into place and securing it with the screws or clips provided.
Make sure that everything clicks into place and that the power and data cables are properly connected. Finally, power up the computer and listen for any unusual sounds or issues. If everything is working correctly, you’re ready to enjoy your upgraded computer.
Remember, taking your time and ensuring everything is properly reassembled is crucial to prevent any issues down the line. The importance of reattaching the computer case and powering up the computer correctly cannot be overstated. It’s like putting a puzzle back together to work harmoniously.
A poorly attached computer case may result in unnecessary noise, external damage to the machine and, most importantly, internal damage to certain components of the machine. Securing the case will improve the overall stability of the machine. The idea of a loose computer case sitting around won’t sit well with anyone, so ensuring it’s properly secured is crucial.
Proper precautions and attention to detail are always necessary while performing delicate upgrades to a device as crucial as a computer. A fully functioning computer can be enjoyed for years to come with just a little bit of effort, so don’t rush the final steps – take your time and ensure the job is done right.
Conclusion
And there you have it! Removing a GPU from a motherboard may seem daunting, but with a few simple steps and a bit of patience, it’s as easy as pie. Just remember to disconnect all cables, gently lift the locking mechanism, and gently remove the GPU from its slot. Now you can bid farewell to your old GPU and make way for a shiny new one.
Happy upgrading!”
FAQs
What tools do I need to remove a GPU from a motherboard?
You will need a screwdriver and antistatic wrist strap to safely remove the GPU from the motherboard.
How do I safely disconnect the power connector from the GPU?
Gently pull the power connector away from the GPU, but do not pull it straight out. Instead, wiggle it from side to side until it comes loose.
Should I remove the GPU while the computer is turned on or off?
It is best to turn off the computer and unplug it from the wall before removing the GPU to avoid any potential risk of electric shock.
Do I need to uninstall the drivers before removing the GPU?
It is recommended to uninstall the drivers before removing the GPU to prevent any potential conflicts when installing a new GPU. However, it is not strictly necessary.