If you own a GE refrigerator, you already know how important it is to keep it running smoothly. It keeps your food fresh and prevents spoilage, which can be costly and wasteful. But what happens when your GE refrigerator motherboard goes haywire? Fortunately, resetting your GE refrigerator motherboard is a simple process that you can do yourself, without calling in a professional.
With a few quick steps, you can reset your refrigerator motherboard and get your fridge back to working properly. In this blog, we will walk you through the steps you need to take to reset your GE refrigerator motherboard, saving you time and money in the long run. So, let’s dive in and explore this simple process together!
Importance of Resetting Motherboard
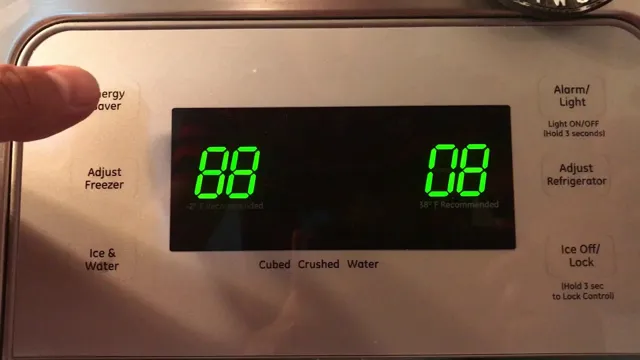
If you’re experiencing issues with your GE refrigerator, resetting the motherboard might be the solution you’ve been looking for. Resetting the motherboard is an important maintenance task that can solve many problems, such as temperature fluctuations, error codes, and ice maker malfunctions. To reset the GE refrigerator motherboard, you can unplug the fridge from the power outlet and wait for 5-10 minutes before plugging it back in.
This process will allow the motherboard to restart, refreshing its memory and setting it back to its default settings. However, before resetting, make sure to transfer your food items to another fridge and turn off the ice maker to prevent any leaks. Resetting the motherboard is a simple but essential step that will improve the overall performance and lifespan of your GE refrigerator.
Avoid Costly Repairs
If you’re looking to avoid costly repairs on your computer, one important step is resetting the motherboard. But what exactly does that mean? The motherboard is the central hub of your computer, connecting all the different components together. However, over time, the settings on the motherboard can become corrupted or outdated, leading to slow performance or even system crashes.
By resetting the motherboard, you can clear out these outdated settings and start fresh. It’s like wiping the slate clean and giving your computer a fresh start. This can help improve overall performance and prevent future issues that could lead to costly repairs.
So, don’t overlook the importance of resetting your motherboard as a maintenance task for your computer. It could save you a lot of money in the long run.
Fixing Errors and Glitches
Resetting the motherboard can be an essential step in fixing errors and glitches that may occur with your computer. It essentially clears the temporary memory and settings held by the motherboard, allowing a fresh start for the device. This can be particularly useful if you are experiencing issues such as frozen screens, hardware malfunctions, or software crashes.
In addition, resetting the motherboard may also improve the speed and performance of the computer, making it more efficient overall. Think of it like hitting the reset button on your phone or tablet- it can provide a quick fix for common issues and can be done easily without the need for professional assistance. If you are experiencing problems with your computer, it might be worth trying to reset the motherboard before seeking further help.
Steps for Resetting the Motherboard
If you’re experiencing problems with your GE refrigerator, resetting the motherboard might be the solution you need. It’s a simple process that involves unplugging the fridge and waiting a few minutes before plugging it back in. Here are the steps for resetting the motherboard:
Unplug the refrigerator from the power source. Wait for 5-10 minutes before plugging it back in.
Turn the refrigerator ON and check if the problem persists. By doing this, the motherboard is reset, and any errors or glitches should be resolved.
If the problem persists and you’re unsure what to do, it might be time to call in a professional. Resetting the motherboard is a quick and easy way to troubleshoot your GE refrigerator, so give it a try before spending money on repairs or replacement parts.
Step 1: Unplug the Refrigerator
If you’re experiencing issues with your refrigerator, resetting the motherboard can serve as an effective troubleshooting technique. However, it’s important to follow the proper steps to avoid causing additional damage. Step 1 is to unplug the refrigerator.
This is a crucial step to ensure your safety while working with electrical components. To reset the motherboard, locate the main circuit board and press and hold the reset button for 5-10 seconds. If your refrigerator does not have a reset button, turn off the unit and wait for about 5 minutes before turning it back on.
This should effectively reset the motherboard and address any issues you were experiencing. Just remember to be patient when working with electronics and always prioritize safety.
Step 2: Locate the Motherboard
Resetting the motherboard can be a daunting task if you don’t know where to start. The first step is to locate the motherboard, which can be found inside your computer tower. Once you have located the motherboard, you need to identify the CMOS battery, which is a small, circular battery that powers the BIOS settings.
Next, make sure you unplug your computer from the electrical outlet and discharge any static electricity by touching a metal object before proceeding. To reset the motherboard, simply remove the CMOS battery for a few seconds and then reinsert it back in its slot. This will reset the BIOS settings to their default values, and any changes you had made previously will be erased.
Remember to carefully reattach any cables that you may have removed during the process and check that everything is properly installed. By following these simple steps, you can reset the motherboard and get your computer up and running again.
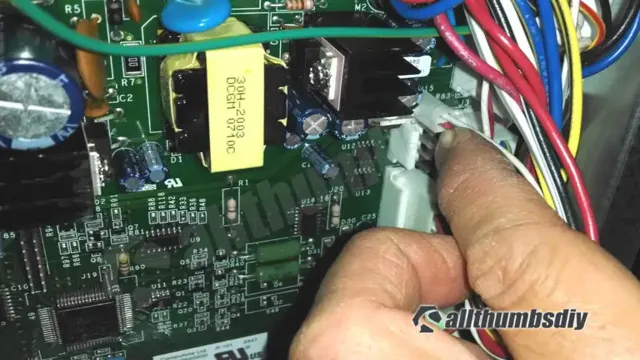
Step 3: Remove J2 Jumper Plug
“Resetting the Motherboard” To reset the motherboard, there are a few steps you need to follow. After turning off your computer, the first step is to remove the power cable from the power supply unit. The second step involves opening the computer case to access the motherboard.
Once you have access to the motherboard, the third step requires you to remove the J2 jumper plug. This jumper connects two pins on the motherboard and helps to maintain the settings stored on the CMOS memory. Removing the jumper plug will reset the CMOS memory to its default settings, which can help resolve any issues related to the motherboard.
Resetting the motherboard can often help with issues such as a computer not booting up, faulty hardware or software, or system crashes. However, it is important to note that resetting the CMOS memory will restore all settings to default, so you may need to reconfigure some settings afterward. If you are not comfortable with resetting the motherboard yourself, consider getting assistance from a professional to avoid any damage to the hardware.
By following these simple steps for resetting the motherboard, you can quickly resolve any issues and get your computer back up and running smoothly.
Step 4: Wait for 5 Minutes
After unplugging the motherboard and removing the CMOS battery, it’s time to wait for five minutes. This is an essential step in the resetting process, as it gives enough time for the motherboard’s internal components to discharge completely. Keeping the motherboard unplugged and removing the battery are not all that is needed; it is crucial to give enough time for everything to settle.
Some people might feel like five minutes is a long wait, but it is crucial not to rush the process. Rushing might lead to the motherboard not being reset correctly, requiring another attempt. Think of it like brewing a cup of tea; you can’t rush the process if you want the perfect cup.
Allow adequate time for the motherboard to discharge all power, and you’ll be that much closer to success.
Step 5: Reinsert J2 Jumper Plug
“To complete the motherboard reset process, don’t forget to reinsert the J2 jumper plug. This tiny piece can be easily overlooked, but it’s essential to restore the motherboard to its default settings. Look for the location of the J2 jumper plug, which can vary depending on your motherboard’s model and manufacturer.
It’s usually found near the CMOS battery, which you must have already removed in the previous step. Make sure to insert the jumper plug into the correct set of pins, following the motherboard’s manual instructions. Once you’re done, reassemble your computer and turn it on.
Hopefully, this simple process has fixed any issues you were experiencing before. If not, you may need further diagnostics to identify the root cause of the problem.”
Step 6: Plug in the Refrigerator
If you’ve properly followed the previous steps and you’re now on the final step of resetting the motherboard by plugging in the refrigerator, you’re almost done! But before you do so, ensure that all loose cables and wires are tucked in to prevent any accidental disconnections. Once you’ve done that, gently plug the refrigerator into the power source. You might be wondering why connecting your refrigerator is part of resetting the motherboard.
Well, this is because modern refrigerators rely on temperature control circuit boards that operate similarly to the motherboard of a computer. It’s important to reset the motherboard to ensure that the refrigerator is functioning correctly and efficiently. Once you plug in the refrigerator, wait a few moments before checking the fridge’s temperature and making sure it’s working correctly.
If everything seems to be in order, then congratulations! You’ve successfully reset your motherboard and restored your refrigerator’s functionality.
Alternative Method for Resetting
If you’re having issues with your GE refrigerator due to a malfunctioning motherboard, you may need to reset it. While the conventional method involves unplugging the fridge, waiting for a few minutes, and then plugging it back in, there is an alternative method you can try. First, locate the motherboard and remove the plastic cover to reveal the three wiring clusters.
Then, unplug the white wiring cluster and wait for 15-20 seconds before plugging it back in and replacing the cover. This should reset the motherboard and hopefully resolve any issues you were experiencing with your fridge. Remember, it’s important to ensure the power is switched off before attempting any repairs or maintenance on your fridge.
By following the above steps, you can potentially save yourself the hassle and expense of having to call in a professional repair service.
Using the Control Panel
If you’re having trouble resetting your device using the traditional methods, the control panel can provide you with an alternative solution. This method allows you to restore your device to its factory settings by following a few simple steps. First, you need to access the control panel by clicking on the Windows start menu and searching for “Control Panel.
” Once you’re in the control panel, navigate to the “System and Security” section and select “Backup and Restore.” From there, select “Recover system settings or your computer” and follow the on-screen instructions to reset your device. This method can be particularly helpful if you’re unable to access the settings on your device due to technical issues.
By utilizing the control panel, you’ll be able to quickly and easily restore your device to its original state and fix any problems you may be experiencing.
Selecting the Reset Option
When it comes to resetting your device, there are multiple options available, including the traditional reset option. However, if you’re looking for an alternative method for resetting your device, there are other solutions available. One option is a hard reset, which involves wiping all data from your device and restoring it to its original settings.
Another option is a soft reset, which is much simpler and only requires you to power off your device and turn it back on again. Regardless of the method you choose, it’s always a good idea to back up your data before resetting your device. This way, in case anything goes wrong during the process, you won’t lose any important information.
By following these steps, you can easily select the reset option that works best for you and get your device back to optimal performance.
Conclusion
In conclusion, resetting a GE refrigerator motherboard is as easy as counting to three, but first, make sure your refrigerator isn’t running away. Simply unplug the refrigerator from the wall, count to ten, and then plug it back in. Voila! Your motherboard is reset and your refrigerator is ready to serve you cold drinks and fresh food once again.
Just remember, resetting the motherboard won’t make your fridge smarter, but it might make you feel smarter for knowing how to do it.”
FAQs
What is the process to reset the motherboard of a GE refrigerator?
To reset the motherboard of a GE refrigerator, unplug the unit from the power source and wait for at least 30 seconds before plugging it back in.
Why would someone need to reset the motherboard of their GE refrigerator?
If the refrigerator is experiencing issues such as not cooling properly or malfunctioning controls, resetting the motherboard can troubleshoot the problem and potentially fix it.
Can resetting the motherboard of a GE refrigerator erase saved data or settings?
Yes, resetting the motherboard may erase any saved settings or data, so it’s important to keep a record of any necessary information before proceeding with the reset.
How often is it recommended to reset the motherboard of a GE refrigerator?
It’s typically not necessary to reset the motherboard of a GE refrigerator regularly. It should only be done if there are issues with the appliance that require troubleshooting.