Straightening motherboard pins can be a daunting task, especially for those who are not tech-savvy or experienced in handling delicate electronic components. Whether you accidentally dropped or mishandled your motherboard, or if you’re experiencing issues with your computer’s performance, you may need to straighten its pins. A bent or broken pin on your motherboard can cause your system to malfunction or fail to operate altogether.
However, before you panic and decide to throw your motherboard away, there is hope. With a few simple tools and a steady hand, you can straighten your motherboard pins and save your computer system. In this blog post, we’ll guide you through a step-by-step process to straighten your motherboard pins and get your computer up and running again.
Assessing the Damage
If you’re an avid computer builder or just a regular PC user, you know that motherboard pins are essential to the functionality of your device. However, accidents may happen where the pins get bent or out of shape, causing severe damage. Assessing the damage is the first step you need to take before proceeding with any repair attempts.
Gently inspect the pins with a magnifying glass or a camera to locate the extent of the damage. Look for any bent, missing, or broken pins and make sure that none are touching each other. Once you’ve identified the affected pins, assess the severity of the damage by determining whether the pins are only slightly bent or completely mangled.
This will help you decide if you can fix the pins yourself or seek professional help. Remember that safety should be a top priority, and any damage to the motherboard can have severe consequences. With patience, attention to detail, and a steady hand, you can straighten the pins and get your computer back up and running in no time.
Inspecting the Motherboard
When it comes to computer repair and troubleshooting, one of the most important steps is assessing the damage on the motherboard. This component acts as the central hub for all the hardware components, so any issues with it can cause significant problems. To begin inspecting the motherboard, the first step is to look for obvious signs of physical damage, such as cracks or burn marks.
However, visual inspection may not always reveal the extent of the damage. In some cases, you may need to use a multimeter or other diagnostic tools to check for electrical continuity and voltage levels. It’s also important to check for any loose connections or damaged pins, which can cause issues with data transfer and other functions.
Ultimately, a thorough assessment of the motherboard is essential to pinpoint the root cause of any computer issues and determine the best course of action.
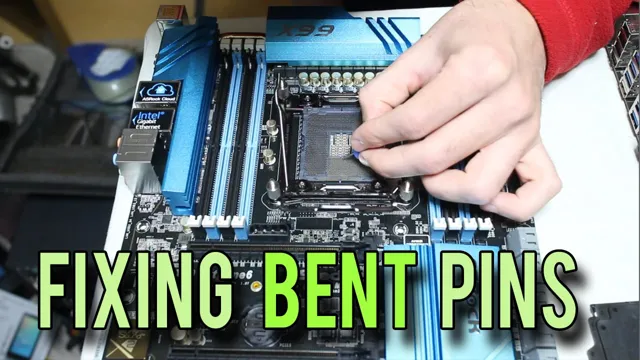
Identifying the Bent Pins
If you’re experiencing trouble with your computer or laptop, one possible culprit could be bent pins. Modern processors use LGA (Land Grid Array) sockets, which utilize hundreds of pins to connect the processor to the motherboard. Unfortunately, it’s not uncommon for these pins to become bent, making a proper connection impossible.
Identifying bent pins can be a challenge, but with a little patience and careful inspection, you can assess the damage and determine if the pins are salvageable. Look closely at the LGA socket for any obvious signs of damage, such as visibly bent pins. You can also use a magnifying glass to inspect the socket more closely.
If you spot a bent pin, try using a thin object such as a mechanical pencil to carefully straighten it back into place. However, keep in mind that some damage may be irreparable, and it may be necessary to replace your processor or motherboard entirely.
Straightening the Pins
Accidentally bending the pins on your motherboard can be frustrating, but don’t give up hope just yet! With a few simple tools and techniques, you can straighten those pesky pins and get your motherboard back in working order. The first step is to identify which pins are bent and in what direction they’re bent. Use a magnifying glass and a bright light to get a good view of the pins.
Once you’ve identified the bent pins, you can use a toothpick or a small pair of pliers to gently bend them back into place. Be careful not to apply too much pressure or force on the pins, as they are delicate and can easily break off. After straightening the pins, check each one again to ensure they are all in their proper position.
With a little patience and attention to detail, you’ll be able to straighten your motherboard pins and get back to enjoying your computer in no time!
Using a Mechanical Pencil
Using a mechanical pencil can be highly convenient, allowing you to write without the need of sharpening it often. However, one problem that often arises is when the pins of the pencil get bent, making it difficult to use it. This is where straightening the pins comes into play.
To do so, you will need to gently remove the blunt end with a pair of pliers. Then, take a new lead and insert it into the pencil, making sure that it is aligned correctly. After that, replace the eraser and test the pencil to ensure it is working correctly.
By following these simple steps, you can easily fix bent pins in your mechanical pencil and get back to using it without any trouble.
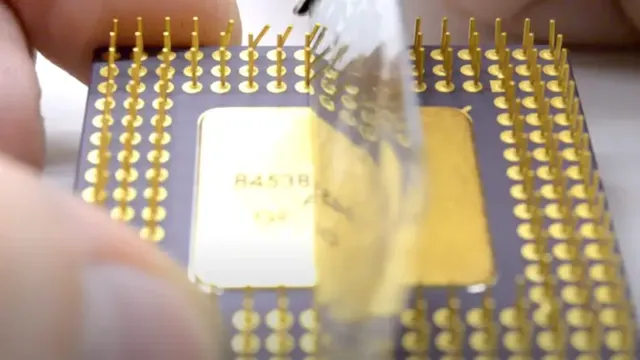
Using a Credit Card or Guitar Pick
Straightening the pins on electronic components can seem like an intimidating task, but with a little knowledge and the right tools, anyone can do it. One common method is to use a credit card or guitar pick to slide between the rows of pins and gently push them back into place. It’s crucial to be gentle and avoid applying too much pressure or bending the pins further out of shape.
Alternatively, a specialized tool called a pin straightening tool is designed specifically for this task and can make the job even easier. Remember, properly straightening the pins can help prevent damage to the component and ensure that it functions correctly.
Using a Magnifying Glass
If you’re trying to straighten out the pins on a small electronic device, like a digital camera or computer motherboard, using a magnifying glass can help you see exactly what you’re doing. First, make sure you have a steady hand and a good grip on the device. Then, hold the magnifying glass close to the pins to get a clear view of them.
Use a small, flat tool, like a toothpick or a needle, to gently nudge the pins into the correct position. Be very careful not to bend or break any of the pins, as this can cause permanent damage to the device. With patience and a steady hand, you can straighten out the pins and get your device back up and running in no time.
So, grab your magnifying glass and get to work!
Testing the Motherboard
If you’re experiencing issues with your computer, the motherboard could be the culprit. Sometimes, the motherboard pins can become bent or misaligned, causing problems with connectivity and function. Luckily, you may be able to straighten these pins and save yourself the cost of a new motherboard.
To begin, you’ll need a magnifying glass and some fine-tipped tweezers. Gently inspect the pins and determine which ones are bent. Then, use the tweezers to carefully straighten them out one by one.
It’s important to be delicate and patient during this process, as further damage can result in irreparable harm to the motherboard. Once you’ve straightened all of the pins, turn on your computer and test the motherboard to see if the issue has been resolved. Remember, if you’re unsure or uncomfortable with attempting this operation on your own, it’s always best to seek professional help.
By following these steps, you may be able to fix your computer’s motherboard without incurring the cost of a costly replacement.
Powering On the System
When it comes to building your own computer, testing the motherboard is a crucial part of the process. After assembling all the components, it’s time to power on the system and make sure everything is working properly. The first step in testing the motherboard is to connect the power supply and turn on the computer.
You’ll want to listen for beeps or other sounds that could indicate a problem. If you don’t hear anything and the system appears to start up normally, you can move on to checking the BIOS settings and making sure all the hardware is recognized by the motherboard. It’s important to take your time and go through each step carefully to ensure that everything is functioning as it should.
By testing the motherboard properly, you can ensure that your computer will work smoothly and reliably for years to come.
Checking for Any Issues
When it comes to building a PC, testing the motherboard is a crucial step. Before you even think about powering up your computer, it’s important to ensure that your motherboard is working correctly. One of the first things you’ll want to check for is any physical damage to the board.
Look for any bent or broken pins, as these can cause serious issues later on. Once you’ve visually inspected the board, it’s time to run some tests. Start by checking the power connections to ensure that they’re properly seated and that you’re getting a steady flow of power.
You’ll also want to run memory tests to make sure that your RAM is functioning correctly and isn’t causing any errors. Additionally, you’ll want to check the BIOS settings to ensure that everything is set up correctly. Overall, taking the time to test your motherboard before powering up your computer can save you a lot of headaches down the road.
Preventing Future Damage
Straightening motherboard pins may seem like a daunting task, but with a few simple steps, you can prevent future damage and save yourself the cost of buying a new motherboard. Firstly, you’ll need a magnifying glass or a good light source to help you identify any bent or misaligned pins. Once you have located the affected pins, use a small pair of pliers to gently straighten them out.
Be careful not to apply too much pressure as this could cause the pins to break off. Once you have straightened all the pins, it’s essential to check for any remaining damage before replacing the motherboard back into your computer. Remember to take your time and be patient as this process can be time-consuming but worthwhile in the end.
So, with these simple steps, you can straighten your motherboard pins and prevent any further damage, making sure your computer is fully functional and running like new again.
Conclusion
In the world of tech, a bent motherboard pin can feel like a death sentence for your beloved device. But fear not, for straightening those rogue pins is not a task for the faint of heart or the amateur technician. You’ll need patience, precision, and a good pair of tweezers.
Remember to go slow and steady, and use a magnifying glass to get a closer look. And if all else fails, don’t be afraid to ask for help – sometimes, two pairs of hands are better than one. In the end, you’ll emerge from this experience with your motherboard pins standing tall and straight, and a newfound sense of confidence in your tech skills.
So go forth, brave troubleshooter, and tackle those bent pins head-on!”
FAQs
What are the common reasons for bent or straightened motherboard pins?
The most common reasons for bent or straightened motherboard pins include mishandling of the CPU during installation, accidental drops or impacts, and manufacturing defects.
How can I check if my motherboard pins are bent?
You can inspect the pins with a magnifying glass and look for any abnormalities, or you can use a CPU socket tester to check the connectivity of the pins.
Can I straighten bent motherboard pins myself?
Yes, you can straighten most bent motherboard pins with a pair of fine-tipped tweezers or a mechanical pencil. However, extreme caution and a steady hand are required to avoid causing further damage.
What should I do if I cannot straighten the bent motherboard pins myself?
If you cannot straighten the bent motherboard pins yourself, it is recommended to seek professional help from a certified technician or computer repair center to avoid causing further damage to the motherboard.