If you’re looking to upgrade or replace your SSD, you may be wondering how to remove it from your motherboard without causing any damage. Removing an SSD is a delicate process that requires attention to detail and careful handling. Luckily, the process is fairly straightforward once you know what you’re doing.
In this blog, we’ll explore the steps you need to take to remove your SSD from your motherboard, including the tools you’ll need and the precautions you should take to ensure you don’t accidentally damage your computer. So, let’s dive in and find out how to safely remove your SSD!
Prepare for removal
If you’re thinking about replacing or upgrading your SSD, you’ll need to know how to remove it from your motherboard without damaging anything. First, make sure your computer is turned off and unplugged from the power source. Then, open up your computer case and locate the SSD that you want to remove.
Carefully remove any screws or brackets that are holding it in place, and gently lift the SSD from its socket. Be sure to handle the SSD with care, as it is a delicate piece of technology. Once the SSD is removed, be sure to store it in a safe place to avoid any damage or loss.
Finally, if you plan to replace the SSD with a new one, make sure to properly install the new one in its place following the manufacturer’s instructions. By following these steps, you can safely and easily remove your SSD from your motherboard and continue with your desired upgrades or replacements.
Shut down computer and unplug cables
Preparing your computer for removal is an essential step to ensure its safety and longevity. To start, make sure to shut down your computer and unplug all the cables. This way, you can prevent any accidents that may occur while removing your computer.
After all, you don’t want to risk any electrical damage or data loss by hastily pulling out cables. Once your computer is completely shut down, wrap it with a protective sleeve or bubble wrap to keep it safe from scratches or damage. Remember, just like any fragile item, your computer needs to be handled with care.
Properly shutting down your computer and unplugging the cables is the first step in preparing your device for removal. This process ensures that your computer is ready for transportation, without any chance of data loss or damage. By wrapping it with protective coverings, you can further enhance its safety during transportation and make sure that it arrives at its destination in the same condition as when you packed it.
It’s essential to remember that your computer is not just a device, but a hub of your work, education, and entertainment, and it should be treated with respect. So, take the time to prepare it correctly before removal, and safeguard your investment.
Ground yourself to prevent static electricity
When preparing for the removal of electronics, it’s essential to ground yourself to prevent static electricity from damaging your devices. Static electricity buildup occurs easily and can cause serious damage to sensitive electronics components, such as hard drives, motherboards, and processors. To prevent this, start by turning off and unplugging all electronics.
Once this is done, ground yourself by touching a metal object that’s connected to the ground, such as a radiator or a metal desk leg. Alternatively, you can use an anti-static wrist strap, which can be purchased at most electronic stores. By taking these simple precautions, you can prevent static electricity from damaging your devices and ensure that your electronics are safely removed and relocated to their new location.
Locate the SSD and disconnect cables
If you’re looking to remove an SSD from your motherboard, the first step is to locate the SSD. Depending on your computer case and motherboard layout, it may be easier or more difficult to find. Generally, you’ll need to remove the side panel of your case and look for the hard drive bays.
The SSD will likely be connected to the motherboard using a SATA cable and a power cable. Once you’ve located the SSD, the next step is to disconnect these cables from the SSD. Make sure to gently pull the cables straight out to avoid damaging the connectors.
Once the cables are disconnected, you should be able to remove the SSD from the bay. If your SSD is screwed in place, you’ll need to remove the screws before removing the SSD. By following these steps, you should be able to quickly and easily remove an SSD from your motherboard.
Open up computer case
If you’re planning to upgrade or replace your SSD, the first step is to open up your computer case. Once you’ve done that, it’s time to locate the SSD. It’ll typically be located near other storage devices such as your hard drive or optical drive.
Before you begin disconnecting cables, make sure you unplug your computer from the power source and ground yourself to avoid any damage caused by static electricity. Once you’re ready, locate the SATA cables that connect your SSD to the motherboard and gently remove them. If your SSD uses power cables, remove those as well.
Once all cables have been removed, you can safely detach the SSD from your computer. Remember to keep all cables and screws together in a safe place for reinstallation later. Overall, disconnecting your SSD cables is relatively simple, just be sure to proceed with caution to avoid any damage to your computer components.
Locate the SSD
When it comes to upgrading or replacing the SSD in your computer, the first step is to locate the existing storage drive. This isn’t always as simple as it sounds, especially for those who aren’t familiar with the inner workings of their computer. To begin, turn off and unplug your computer, then open up the case.
The SSD will typically be located near the edge of the motherboard and connected to it with a data cable and power cable. Take note of which cables are connected to the SSD and carefully disconnect them, being sure not to damage the cables or the drive itself. Once you have disconnected the cables, you can now remove the SSD from its bracket or slot.
Remember to label the cables so you can reconnect them to the new SSD later. With patience and care, locating and disconnecting your SSD should be a breeze.
Disconnect SATA and power cables
When upgrading or replacing your solid-state drive (SSD), it’s important to first disconnect the SATA and power cables. These cables connect your SSD to the motherboard and power supply, respectively, and need to be removed before accessing the drive. To locate the SSD, you can consult your computer’s documentation or do a quick online search for your specific model.
Once you’ve identified its location, shut down your computer and unplug it from the wall before opening the case. Then, ground yourself by touching a metal object to discharge any static electricity and locate the SATA and power cables connected to the SSD. Gently disconnect them by pulling out the clips or squeezing the connectors and pulling them out.
Double-check that you have disconnected all cables before moving on to remove the SSD itself. By taking these steps, you can safely upgrade or replace your SSD without causing damage to your computer or components.
Remove the SSD from the motherboard
If you’re looking to remove an SSD from your motherboard, there are a few easy steps to follow. First, make sure your computer is turned off and unplugged from any power source. Locate the SSD on your motherboard – it should be a small, rectangular device connected to the motherboard via a SATA cable.
Gently pull the SATA cable away from the SSD, and then remove any screws or brackets holding the SSD in place. Once you’ve done this, you should be able to easily lift the SSD out of its bay. If you’re having trouble, don’t force anything – double-check that you’ve removed all screws or brackets, and try gently wiggling the SSD back and forth until it comes loose.
Overall, removing an SSD from your motherboard is a fairly simple process, and should only take a few minutes.
Unscrew any mounting brackets or screws
Removing an SSD from your computer’s motherboard can seem like a daunting task, but with the right tools and a few handy tips, the process can be quick and easy. The first step is to unscrew any mounting brackets or screws that are holding the SSD in place. Be sure to keep track of these screws, as they will be necessary when reassembling your computer.
Once the brackets are removed, carefully remove the SSD from its slot on the motherboard. Depending on the design of your computer, this may require a bit of finagling, but be patient and gentle to avoid any damage to the SSD or motherboard. Once the SSD is out, you can either replace it with a new one or store it safely away.
With these steps, you can confidently remove an SSD from your computer’s motherboard and either upgrade your storage or safely store your old storage device.
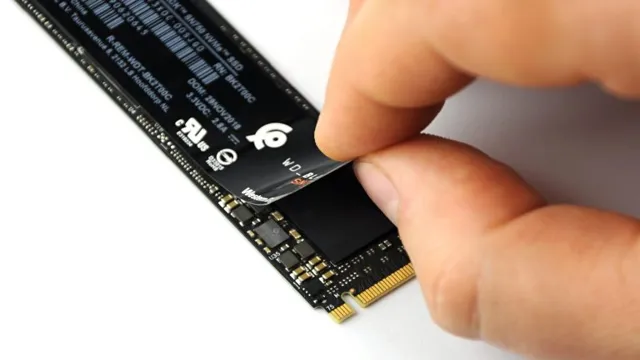
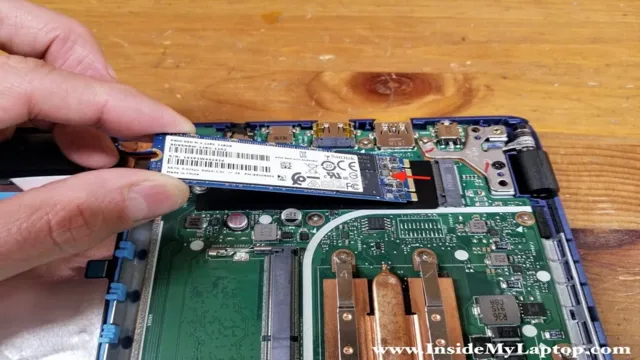
Slide out the SSD from the slot
When it comes to upgrading or replacing your SSD, knowing how to remove it safely from your motherboard is crucial. Start by powering off your computer and unplugging it from the wall. Open your computer casing and locate the SSD slot on the motherboard.
The SSD will be connected to the slot with a small clip or screw, so ensure you carefully release this attachment by gently pushing or lifting the clip or removing the screw. Once the SSD is fully detached from the slot, carefully slide it out of the motherboard. It’s important not to force anything when removing the SSD as this can cause damage to both the SSD and the motherboard.
Always handle the SSD with care, preferably with an anti-static wristband, to avoid electrostatic discharge damage. Once the SSD is removed, you can replace it with a new or upgraded SSD and reconnect it to the motherboard. With these simple steps, you can safely remove and replace your SSD, ensuring smooth and efficient operation of your computer.
Securely store the SSD
Removing an SSD from a motherboard can be a bit intimidating, but with the right steps, it can be easy to do. Before beginning, it is important to first make sure you power down your computer and unplug it. Once the computer is safely unplugged, locate the SSD on the motherboard.
It should be easy to spot, as it is typically a small rectangular chip. Most motherboards will have a clip or screw that holds the SSD in place. Make sure to remove the clip or screw and gently slide the SSD out of its slot.
Once removed, be sure to handle the SSD with care as they are delicate pieces of hardware. If you plan on storing the SSD for future use, it is important to store it in a secure and dry environment to avoid any damage or corruption. Following these steps will allow you to safely and easily remove your SSD from the motherboard.
Place the SSD in a protective anti-static bag
When it comes to storing your SSD, it’s crucial to take proper precautions to ensure its longevity and functionality. One of the best practices is placing the SSD in a protective anti-static bag. Anti-static bags prevent the buildup of static electricity, which can damage the sensitive electronic components of your SSD over time.
By securely storing your SSD in an anti-static bag, you can keep it safe from dust, moisture, and other potential hazards that could harm your device. It’s also a good idea to keep the SSD in a cool, dry place, away from direct sunlight and extreme temperatures. By taking these simple steps to properly store your SSD, you can ensure it remains in top-notch condition for all your data storage needs.
Store in a cool, dry place away from magnets
When it comes to storing your SSD, secure placement is key. It’s important to keep it in a cool, dry area, far away from any magnets or any other devices that may cause interference. SSDs are delicate pieces of technology, and the smallest disruption can cause serious damage.
Proper storage helps prevent any unintended errors, from data corruption to complete device failure. Think of it like storing your favorite recipe book. You want to make sure it’s kept safe in a place where it won’t be ruined or damaged.
The same goes for your SSD. Find a safe spot away from any potential dangers, and you’ll be able to enjoy it for much longer. So, keep your SSD secure, and you’ll get to enjoy your stored data for years to come!
Conclusion
Removing an SSD from a motherboard may seem like a daunting task, but fear not! With a few simple steps, you can pop that drive out like a Jenga block and be on your way to upgrading or replacing it. Just remember to power off your system and disconnect any cables before getting your hands dirty. And don’t forget to hold on tight – those little SSDs can be slippery! With these tips and tricks, you’ll have that SSD out of there faster than a cat can knock a glass off a table.
“
FAQs
What precautions should I take before removing my SSD from the motherboard?
Before removing the SSD from the motherboard, make sure your computer is completely turned off and unplugged to avoid any electrical discharge. Also, ensure that you have an anti-static wrist strap on to prevent any static damage to the components.
How do I physically remove an SSD from the motherboard?
To remove an SSD, first locate it on the motherboard. Then, press down on the clip securing the SSD in place and gently but firmly pull the SSD out of the slot. Avoid any pulling that twists the drive or forces it out of the slot.
Can I remove an SSD without losing data?
Yes, you can remove an SSD without losing data if the data is backed up somewhere else before the removal. Otherwise, the data may be lost or inaccessible.
Do I need to reinstall my OS after removing the SSD from the motherboard?
It depends on whether your operating system is installed on the removed SSD or not. If it is installed on the removed SSD, you will need to reinstall the OS on the new drive or connect the old drive back to use the OS.