Do you want to upgrade your computer’s hardware or have encountered some issues with your motherboard? Removing the motherboard from your computer may sound intimidating and complex, but it is a task that you can accomplish with the right tools and guidance. The motherboard is the backbone of your computer, and its removal requires utmost care and precision. In this blog post, we will guide you on how to remove the motherboard from your computer step by step, and help you make this process as straightforward as possible.
Whether you’re a newbie or a seasoned techie, this blog post will help you remove your motherboard effortlessly. So, let’s get started and explore the process of safely removing your motherboard from your computer!
Safety First: Unplugging and Disconnecting
When it comes to removing a motherboard from your computer, safety should always be your top priority. Before beginning, make sure to unplug the computer from the mains and disconnect any cables, such as the power supply unit and data cables, to prevent any electrical shocks or damage to your components. It’s also essential to wear an anti-static wrist strap, which helps to prevent static electricity from damaging the sensitive components on your motherboard.
Once you’re ready to remove the motherboard, begin by identifying the screws or connectors that are holding it in place and removing them carefully. Make sure to pay attention to the location of any standoffs, which help to hold the motherboard off the case, and remove them first to prevent accidental damage. With the motherboard free from any screws or standoffs, gently lift it out of the case and place it somewhere safe.
By following these precautions, not only will you avoid causing any damage to your components but also ensure that you can remove your motherboard safely and efficiently.
Power off and unplug all cables
When it’s time to disconnect or unplug your electronic devices, it’s important to remember to always put safety first. Before getting started, it’s best to power off your devices and make sure they are completely unplugged from any power sources. This can help prevent any potential electrical shocks or accidents when handling cables or other components.
It’s also advisable to wear rubber-soled shoes or gloves as an extra precaution. Once you’ve disconnected everything, it’s important to take care not to damage any of your cables or ports. Always gently remove cables from their ports and avoid yanking or pulling on them too hard.
By taking the time to properly unplug and disconnect your devices, you can avoid potential accidents and ensure that all of your equipment stays in good working order without creating any unnecessary safety hazards.
Remove the cover of the PC case
Before getting started on removing the cover of your PC case, it’s essential to prioritize safety by unplugging and disconnecting all necessary components. This means powering down your computer and unplugging it from the wall, as well as disconnecting any additional cables or accessories. This step is critical to ensure that you don’t accidentally damage any parts of your PC or risk electric shock.
Once everything is unplugged and disconnected, you can begin removing the cover of your PC case. The cover generally slides open or removes using screws, depending on the type of case you have. Take your time, stay focused, and ensure that you are removing the cover correctly to avoid damage to your PC.
By following these safety precautions, you can safely remove the cover of your PC case and proceed with any upgrades or maintenance needed.
Removing the Motherboard
If you want to upgrade your computer hardware or diagnose an issue with your motherboard, you may need to remove the motherboard from your computer case. Here’s how to remove the motherboard from your computer: First, turn off your computer and unplug it from the power source. Next, remove the side panel from your computer case and identify the screws that hold the motherboard in place.
These screws are usually located near the edges of the motherboard. Carefully unscrew the motherboard and gently lift it out of the case. You may need to disconnect any cables or connectors that are attached to the motherboard, such as the cables that connect the power supply and front panel buttons.
It’s important to be careful when removing the motherboard, as any damage to the motherboard or its components can be costly to repair or replace. By following these steps, you can remove your motherboard safely and easily for troubleshooting, upgrading, or replacing.
Disconnect all cables attached to the motherboard
When it’s time to upgrade your computer’s hardware or make repairs, the first step is to disconnect all cables attached to the motherboard. This includes the power cable, SATA cables, USB cables, and anything else that may be connected. Once you’ve done this, it’s time to remove the motherboard itself.
To do this, you’ll need to locate the screws that are holding the motherboard in place. These will typically be located on the back of the computer case, but may also be located on the sides or bottom of the motherboard. Once you’ve located the screws, use a screwdriver to remove them.
Be sure to keep track of the screws as you remove them, as you’ll need them to reattach the motherboard later. Once all of the screws are removed, gently lift the motherboard out of the case, taking care not to damage any of the components. Removing the motherboard can be a bit daunting, but if you take your time and follow these steps, it should be a relatively straightforward process.
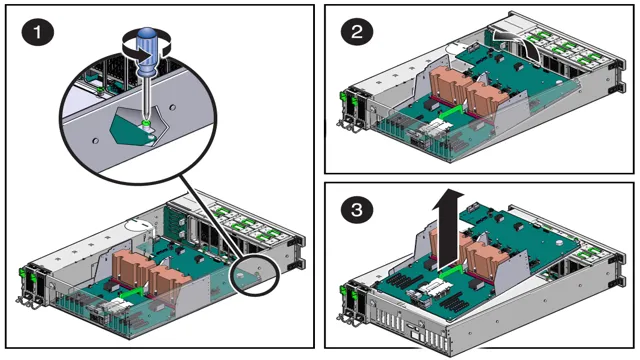
Remove all screws securing the motherboard
Removing the motherboard can seem like a daunting task, but it’s a necessary step in upgrading or repairing your computer. One of the key steps in this process is to remove all screws securing the motherboard. These screws are typically located around the perimeter of the motherboard, and can sometimes be hidden under plastic clips or covers.
It’s important to keep track of each screw you remove, and to make note of which ones go where, as this will make reassembly much easier. Once all of the screws are removed, you can gently lift the motherboard out of the case. Be sure to disconnect any cables or wires that are still attached to the motherboard before fully removing it.
Taking your time and being careful during this process will ensure that you don’t accidentally damage any of the components on the motherboard. Remember, the motherboard is the heart of your computer, so treat it with care!
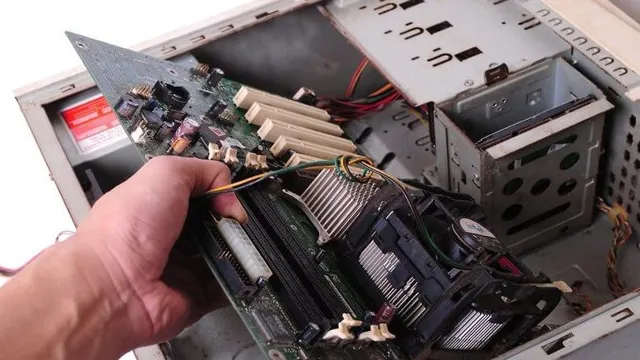
Gently lift the motherboard out of the case
To remove a motherboard safely, gently lift it out of the case. This step requires a bit of care and caution, as motherboards are essential components of your computer, and any damage to them could cause major issues. Before lifting the motherboard, ensure that all cables and screws are detached from it.
It is also best practice to remove the CPU first before taking out the motherboard. Once you have cleared the motherboard and detached all the other components, gently grip it by the edges and lift it out of the case, ensuring that you do not drop it or apply too much pressure. Remember to put the motherboard in an anti-static bag to prevent any electrical damage during transit.
Overall, a motherboard is a delicate component, and you should handle it with care when removing and transporting it.
After Removal
Now that you’ve successfully removed the motherboard from your computer, what’s next? Well, it depends on why you removed it in the first place. If you were upgrading or replacing it, you’ll need to install the new motherboard. Be sure to double-check that it’s compatible with your other components.
You’ll also need to reattach any cables or connectors that you removed during the removal process. If you removed the motherboard to clean it or replace a faulty component, now is the time to do so. Inspect the motherboard and any components for damage or signs of wear and tear.
Clean any dust or debris from the motherboard and its components using compressed air or a soft brush. Before you reinstall the motherboard, it’s a good idea to test it outside of the case. This will allow you to troubleshoot any issues without having to take everything apart again.
Place the motherboard on a non-conductive surface and connect only the essentials, such as the power supply, CPU, and RAM. Turn on the power supply and see if everything boots up properly. If it does, you can proceed with installing the motherboard back into the case.
Remember to take your time during the reinstallation process and ensure that everything is properly secured and connected. Once you’ve installed the motherboard back into the case, you can begin reconnecting any other components, such as your storage drives and graphics card. And there you have it – your motherboard has been successfully removed and reinstalled!
Clean the motherboard (optional)
After removing the motherboard, you may want to consider cleaning it before reinstalling it. Although optional, cleaning the motherboard can help ensure proper functioning and prevent any potential damage from dust or debris. Start by gently blowing off any dust with an air compressor or compressed air can.
If there are more stubborn spots or grime, use a soft-bristled brush to carefully scrub the affected areas. Be sure to avoid using any liquids on the motherboard, as this can cause damage. Additionally, make sure to only handle the motherboard by its edges to prevent any accidental static discharge.
By taking the time to clean the motherboard, you can help extend its lifespan and prevent potential issues down the line.
Replacing the Motherboard (optional)
Now that the motherboard has been successfully removed from the computer, it’s time to start thinking about a potential replacement. There are several factors to consider when selecting a new motherboard, including compatibility with the CPU and memory, as well as the various ports and connectors required for your specific needs. It’s important to do your research and ensure that the new motherboard meets all of your requirements.
Once you have selected a replacement, carefully install it into the computer, being sure to securely screw it in place and connect all necessary cables. Now that you have a brand new motherboard, you can start enjoying an optimized performance and a faster, more efficient computer.
Conclusion
In conclusion, removing a motherboard is a delicate dance. It requires patience, precision, and a steady hand. It’s like performing a surgical operation, but instead of saving a life, you’re upgrading your PC.
If you’re up for the challenge, follow the steps carefully and don’t forget to ground yourself. You don’t want to fry your motherboard or yourself. And remember, once you’ve successfully removed the motherboard, give yourself a pat on the back and scream, “I am the master of the motherboard!” Or, you know, just quietly bask in your accomplishment.
Good luck, tech warriors!”
FAQs
What tools do I need to remove a motherboard?
To remove a motherboard, you will need a screwdriver, anti-static wrist strap, and a pair of pliers (optional).
How do I disconnect all the cables and components from the motherboard before removing it?
Carefully unplug all cables and components from the motherboard, including power supply cables, data cables, and any expansion cards. Remember to discharge any static electricity from your body by touching a grounded metal object before handling any components.
How do I remove the motherboard from the case after disconnecting all the cables?
First, locate and remove all screws securing the motherboard to the case. Then, gently lift the motherboard out of the case, being careful not to apply too much force or damage any fragile components.
What should I do after removing the motherboard from the case?
After removing the motherboard, check for any signs of physical damage such as cracks or bent pins. If the motherboard appears to be in good condition, store it in an anti-static bag to prevent any damage from static electricity.