So, you’re finally ready to upgrade your graphics card? Well, before you jump the gun and make a costly mistake, there are a few things you need to know. One of the most crucial steps in upgrading your graphics card is removing the old one from your motherboard. While this may sound simple enough, it can quickly become daunting if you’re not familiar with the process.
But don’t worry, we’ve got you covered! In this blog post, we’ll take you through everything you need to know to safely remove your graphics card from your motherboard. From the tools you’ll need to step-by-step instructions, we’ll make sure you’re fully equipped to tackle this task like a pro. So, if you’re ready to take the first step towards upgrading your graphics card, let’s get started!
Preparation
Removing a graphics card from a motherboard may seem like a daunting task, but with proper preparation, it can be a smooth and hassle-free process. First, make sure your computer is turned off and unplugged to avoid any potential electric shock. Be sure to properly ground yourself to prevent static electricity from damaging your hardware.
Next, locate your graphics card and carefully remove any screws or retaining clips holding it in place. Gently push down on the release latch located on the side of your graphics card and pull it straight out of the slot. It’s important to handle the card delicately to avoid any damage.
Once removed, you can replace the card or clean it as needed. With a little preparation, successfully removing and replacing your graphics card is within reach.
Shut down Computer
If you want to shut down your computer, it’s important to prepare properly. First, make sure you’ve saved any unsaved work and closed all the necessary programs. This will ensure that you don’t lose any important documents or damage any open files.
Once you’re certain everything is safely saved and closed, you can move on to shutting down the computer. Keyword here is “shut down computer”. One common way to do this is to use the Start Menu.
Simply click on the Windows icon in the bottom left corner of your screen and select “Shut down” from the list of options. Alternatively, you can press the Windows key + X on your keyboard and then select “Shut down or sign out” from the resulting menu. This will bring up a new menu with several options, including “Shut down”, “Restart”, and “Sleep”.
Select “Shut down” and wait for your computer to power off completely. It’s important to note that abruptly turning off your computer can damage the operating system or cause other problems. That’s why it’s essential to shut down your computer properly to avoid any complications in the future.
By following these steps and using the appropriate menu options, you can safely and easily shut down your computer without worrying about causing harm to your system.
Unplug Computer and other Devices
Preparation is key when it comes to unplugging computers and other devices. Before disconnecting any wires or cables, it’s important to make sure that everything is turned off and fully shut down. This can prevent any potential damage or loss of data.
Once everything is powered down, it’s time to unplug all of the devices from the wall socket. This includes the computer, monitor, printer, speakers, and any other peripherals. It’s also important to unplug any surge protectors or power strips that these devices may be plugged into.
This will prevent any electrical surges from damaging the devices or causing a fire hazard. By taking the time to properly prepare and unplug all devices from their power source, you can ensure the safety and longevity of your electronic equipment.
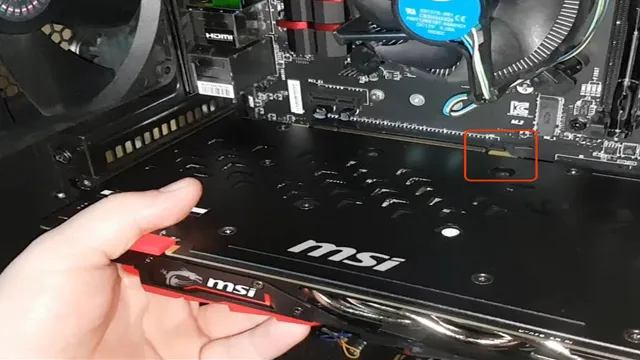
Removing the Graphics Card
If you need to upgrade or replace your graphics card, it’s important to know how to safely remove it from your motherboard. First, shut down your computer and unplug it from the power source. Next, locate your graphics card on the motherboard and carefully disconnect any cables or power connectors.
Then, release the retention clip or lever that holds the graphics card in place and gently pull it out of the PCIe slot. It may require some wiggling to loosen it from the slot, but be gentle. Once the card is out, store it in an anti-static bag to prevent damage from static electricity.
Remember to handle your graphics card with care and avoid touching any of the delicate components. With these steps, you can successfully remove your graphics card and safely install a new one to enhance your computer’s performance.
Locating the Graphics Card
When it comes to upgrading or replacing your computer’s graphics card, the first step is to locate the card itself. In most cases, the graphics card will be located in the PCI Express slot on your motherboard, which is typically positioned towards the bottom of your computer case. Once you’ve found the graphics card, the next step is to remove it.
Start by disconnecting any power cables or other connections that are attached to the graphics card. You may need to unscrew the card from the case or release any locking mechanisms that are holding it in place. Carefully lift the graphics card out of the PCI Express slot and set it aside.
Be sure to handle the card gently and avoid touching any of the delicate components on the back of the card. With the graphics card removed, you’re ready to install your new card and enjoy better graphics performance!
Removing the Power Connector
When it comes to removing the graphics card from your computer, disconnecting the power connector is often necessary. To do so, start by shutting down your computer and unplugging it from the wall. Then, locate the power connector on your graphics card, which is usually located at the edge of the card closest to the motherboard.
Gently press down on the clip holding the connector in place, and carefully pull the connector away from the card. Be sure to avoid tugging or pulling on the wires, as this can cause damage to both the connector and the graphics card. Removing the power connector is an important step in safely removing the graphics card, and it is essential to take your time and exercise patience to ensure that you do not cause any accidental harm to your computer’s hardware.
Unlocking the Graphics Card
Removing the graphics card is a crucial step in unlocking its full potential. Before you begin, make sure your computer is turned off and unplugged. Open up the computer case and locate the graphics card on the motherboard.
Carefully remove any screws or locking mechanisms holding the card in place. Gently wiggle the graphics card out of its slot, being careful not to damage any of the components around it. Once the card is removed, you can now clean it or replace it with a newer, more powerful one.
Removing the graphics card may seem daunting, but it’s a simple process that can make a big difference in your computer’s performance.
Removing the Graphics Card
When it comes to removing your graphics card, the first step is to locate the PCIe slot on your motherboard. You’ll need to remove the screws or clips that are holding the GPU in place, and gently lift it out of the slot. However, before you do this, make sure to shut down your computer and unplug all cables to avoid any damage or electrostatic shock.
It’s also a good idea to wear an anti-static wrist strap to ground yourself before handling any components. After removing the graphics card, you can either replace it with a new one or clean it thoroughly to remove any dust buildup. Remember to handle your components with care, as any damage can be costly to repair.
By following these steps, you’ll be able to remove your graphics card safely and efficiently.
Post-Removal Steps
Removing a graphics card from your motherboard may seem like a daunting task, but it’s actually quite simple. Once you have the card out, there are still a few post-removal steps you’ll need to take to ensure everything is safe and secure. Firstly, make sure to ground yourself before handling any components to prevent static electricity from damaging your hardware.
Next, dust and clean the area around the PCIe slot where the graphics card was installed before inserting a new one. If you’re not replacing the card, make sure to cover the PCIe slot with a blank panel to prevent dust and debris from entering. Finally, double-check all the connections on your motherboard to ensure everything is plugged in correctly before powering on your computer.
By following these post-removal steps, you can rest easy knowing your graphics card and other components are safe and secure.
Cleaning the Graphics Card
Cleaning your graphics card is an essential task that should be done periodically to ensure its longevity and performance. Once you have removed the card from your computer, it’s time to give it a thorough cleaning. Start by using an antistatic brush or a can of compressed air to remove any dust, debris, or hair from the heatsink and fan.
Next, use a microfiber cloth to wipe down the card’s surface, paying special attention to the gold contacts and the PCIe connector. You can use a small amount of isopropyl alcohol on the cloth to clean off any stubborn stains or build-up. Once you have finished cleaning, allow the card to dry completely before reinstalling it.
Remember to handle the graphics card with care and avoid using any abrasive materials. By following these simple post-removal steps, you can ensure that your graphics card remains in top condition for years to come.
Installing a New Graphics Card
If you’ve successfully removed your old graphics card, congratulations! The post-removal steps are fairly straightforward. First, ensure that all remnants of the old graphics card are gone. Use compressed air to blow out any dust or debris in the PCI slot before installing the new card.
Make sure the new graphics card is properly lined up with the PCI slot before pushing it down firmly into place. Finally, secure the card in place with the screw you removed earlier. This step is important, as a loose graphics card can damage the motherboard or cause other problems.
With these steps complete, you’re ready to connect any necessary power cables and drivers and enjoy your new graphics card.
Conclusion
Removing a graphics card from a motherboard can feel like a daunting task, but fear not! With the right tools and know-how, it’s a breeze. Remember to power down your system and take precautions to avoid static electricity, then simply locate the release lever, give it a firm push and pull, and voila! Your graphics card is now free to roam and explore the world of computer hardware. Just be sure to handle it with care, like a precious gemstone, and store it in a safe place until its next adventure.
Happy removing!”
FAQs
What tools do I need to remove a graphics card from a motherboard?
You will need a screwdriver and an anti-static wristband to remove a graphics card from a motherboard safely.
How do I disconnect the power cables from my graphics card before removing it from the motherboard?
Gently press down on the clip that is holding the power cable in place, then pull the cable out of the graphics card.
Can I remove a graphics card without turning off my computer?
It is not recommended to remove a graphics card without turning off your computer as it may cause damage to the motherboard and other components.
How do I properly handle a graphics card after removing it from a motherboard?
Place the graphics card onto an anti-static bag to prevent any damage from electrostatic discharge, and store it in a safe location.