Have you ever wondered how to remove a GPU from your motherboard? Perhaps you want to upgrade your graphics card, or maybe you need to replace a faulty unit. Whatever the reason, it’s important to know how to safely and efficiently remove your GPU without causing any damage to your computer or components. In this blog post, we’ll guide you through the process step by step, so you can easily remove your GPU and get back to gaming or other computer tasks without any issues.
So, grab your screwdriver and let’s get started!
Preparation
So you want to remove your GPU from your motherboard? First things first, make sure you have everything in order. Turn off your computer and unplug it from the mains. Open up your case and locate your GPU on your motherboard.
Most GPUs today use a PCIe slot, so make sure you’re looking in the right place. Once you’ve found your GPU, remove any screws or clips that are holding it in place. These can vary from case to case, but you’ll usually need to unscrew something to release the GPU.
Once you’ve done this, gently and carefully wiggle the GPU out of its slot. It may take a bit of force, but don’t be too forceful or you risk damaging the slot. And that’s it! You’ve successfully removed your GPU from your motherboard.
Don’t forget to keep the screws and clips somewhere safe, you’ll need them for when you re-install your GPU.
Gather necessary tools and materials
When preparing for a project, it’s important to gather all the necessary tools and materials beforehand. This will save you time and frustration later on. Depending on the type of project, you may need things like screwdrivers, hammers, nails, and screws.
It’s also a good idea to have a level, measuring tape, and pencil on hand. If you’re working on a DIY project that involves painting, you’ll need paintbrushes, rollers, painting tape, and drop cloths to protect your floors and furniture. Don’t forget safety equipment like gloves, goggles, and masks if needed.
By taking the time to gather everything you need before you start, your project will go smoother and you’ll be able to focus on the task at hand without constantly having to stop and search for a tool or material.
Power off the computer and unplug all cables
Preparation is key when it comes to maintaining your computer and ensuring its longevity. Before performing any maintenance or repairs, it’s important to power off your computer and unplug all cables. This not only ensures your safety but also prevents any damage to your computer or its components.
When cables are plugged in, electricity continues to flow through them, creating a potential hazard if any repairs or maintenance need to be done. By unplugging all cables, you’re eliminating any chance of an electrical current interfering with the repair process. Additionally, powering off your computer ensures that it won’t be damaged during maintenance or repairs, protecting your investment.
So, before diving in to fix your computer, make sure to take the necessary step of powering it off and unplugging all cables for safety and protection.
Disconnecting the GPU
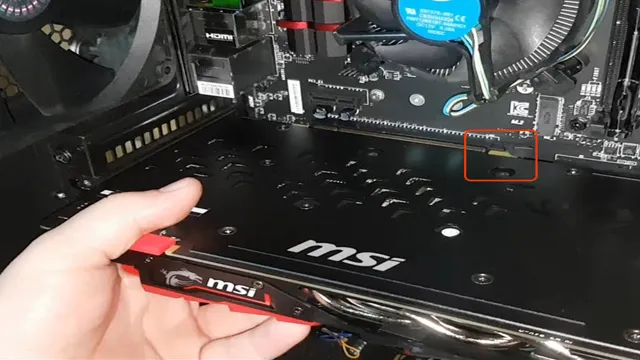
Removing a GPU from the motherboard can be intimidating for first-time builders, but it’s a straightforward process. First, ensure that the computer is turned off and unplugged from the wall. Next, locate the PCIe slot where the GPU is attached and find the retention clip at the end of the slot.
Push this clip down, which will release the GPU from the slot. Carefully remove the GPU from the slot by grasping it by the edges and lifting it straight up. Be mindful of any cables that may be attached to the GPU, including the power cable, and gently disconnect them from the GPU.
Once the GPU is removed, the PCIe slot can be covered with a protective bracket to protect it from dust and debris. Remember to store the GPU securely to protect it from any damage when not in use. With these steps, anyone can confidently and safely remove a GPU from a motherboard.
Locate the GPU slot
When it comes time to upgrade or replace your GPU, the first step is to locate the GPU slot on your motherboard. This can vary depending on your specific motherboard, but is typically found towards the bottom of the board. Once you’ve located the GPU slot, the next step is to disconnect the GPU.
This can be done by gently removing the screws holding the GPU in place and then carefully pulling the card out of the slot. It’s important to be gentle when removing the GPU to avoid damaging any delicate components. With the GPU removed, you can now install your new card or upgrade your current one.
By taking the time to properly disconnect and remove your GPU, you’ll ensure that your system stays in good condition and is ready for your next upgrade or replacement.
Unscrew the retention bracket
When it comes to disconnecting the GPU, one of the tasks that you will need to do is to unscrew the retention bracket. This is important because it secures the graphics card in place and prevents it from accidentally detaching from the motherboard. To do this, you need to locate the retention bracket, which is usually found at the end of the PCIe slot.
Gently push the release clip, and then lift the bracket upwards to release the lock. Once you’ve done this, you can carefully pull the graphics card out of its slot. Remember to proceed with caution and avoid applying excessive force as this can damage the hardware.
By following these steps and taking your time, you should be able to disconnect your GPU without any issues.
Gently pull out the GPU from its slot
When it comes to upgrading or cleaning your computer, one component that may need to be removed is the GPU. Disconnecting the GPU can seem daunting, but with the right tools and knowledge, it can be done easily. The first step is to gently pull out the GPU from its slot.
This can be done by locating the release latch or screws holding the GPU in place. Once released, carefully wiggle the card out of its slot. It’s important to be gentle during this process to avoid damaging the card or the slot.
Additionally, make sure to handle the card by its edges to prevent any static electricity from damaging the internal components. Overall, disconnecting the GPU may seem intimidating at first, but with care and precision, it can be done smoothly.
Removing the GPU completely
If you’re wondering how to remove the GPU from your motherboard, don’t worry – it’s not as daunting as it may seem. There are a few things to keep in mind before you start. First, always turn off the computer and unplug it from the wall to avoid any electrical shocks.
Secondly, locate the screw or latch that secures the GPU to the motherboard. This will usually be on the back plate of the computer. Depending on your computer’s model and make, you may need to use a screwdriver or simply press a button to release the latch.
Once you’ve done this, you can gently remove the GPU from the motherboard. Make sure to pull it out straight and not at an angle to avoid damage to any of the connectors. And that’s it – you’ve successfully removed the GPU from your motherboard!
Unplug any additional power cables
Removing a GPU from a computer can sometimes require a bit of effort, especially when unplugging all the necessary cables. One such cable that you must unplug is the power cable, which supplies additional power to the GPU. If the GPU is running while you’re trying to remove it, the best course of action would be to power down the entire system first.
Once the computer is off, you should unplug all the power cables from the back of the computer. Afterward, carefully remove the screws that keep the GPU secured in place before gently pulling it out of its slot to avoid any damage. It’s essential to exercise caution when removing the GPU as it can be a delicate component that requires careful handling.
With the GPU removed, you can then install a new one or do any maintenance required before putting it back in its original slot. Remember that, before removing or installing any component, you must always wear an antistatic wrist strap to avoid any static electricity that could potentially damage any sensitive bits.
Release any additional retention mechanisms
If you’re looking to release any additional retention mechanisms in your computer, one option worth considering is removing the GPU completely. The GPU, or graphics processing unit, is responsible for rendering images and video on your screen. While it’s an essential component for gamers, graphic designers, and video editors, it may not be necessary for everyone.
Removing the GPU frees up space and can potentially improve airflow, leading to better cooling and performance overall. However, it’s essential to keep in mind that not having a GPU means you’ll need to rely on integrated graphics or purchase a separate GPU if you need it in the future. Before removing your GPU, be sure to research the potential impacts on your specific use case and consult with a professional if necessary.
Conclusion
In conclusion, removing a GPU from a motherboard can seem intimidating, but just like pulling off a band-aid, it’s best to do it fast and confidently. Take note of any release buttons or locking mechanisms, unplug the GPU’s power connectors, then give it a gentle wiggle and pull to free it from the motherboard. And just like that, you’ve successfully removed the GPU – a task even your computer-illiterate grandma could handle.
So, fear not, fellow computer aficionados, as removing a GPU from a motherboard is simply a matter of having the courage to rip it out.”
FAQs
Why should I remove my GPU from the motherboard?
There are several reasons why you may want to remove your GPU from the motherboard, such as upgrading or replacing it, troubleshooting hardware issues, or changing your system configuration.
What tools do I need to remove my GPU from the motherboard?
To remove your GPU from the motherboard, you will typically need a Phillips-head screwdriver, anti-static wrist strap or mat, and possibly a pair of pliers or tweezers.
How do I properly disconnect my GPU from the motherboard?
To properly disconnect your GPU from the motherboard, first power down your computer and disconnect any cables or cords. Then, remove the screw(s) holding the GPU in place and gently pull it out of the PCIe slot. Be sure to release any latches or clips holding the GPU in place.
How do I install a new or replacement GPU onto the motherboard?
To install a new or replacement GPU onto the motherboard, first ensure that it is compatible with your system and that you have all necessary drivers and software. Then, gently insert the GPU into an open PCIe slot and secure it with any necessary screws or clips. Finally, reinstall any cables or connectors.