Do you want to add PCIe slots to your motherboard? Many modern motherboards come with a limited number of PCIe slots, which can be a problem for those who want to add more expansion cards. However, there are several ways to add more PCIe slots to your motherboard, whether you want to install a new graphics card, sound card, or network adapter. One way to add PCIe slots to your motherboard is to use an external PCIe expansion chassis.
These chassis connect to your motherboard using a PCIe cable and provide additional slots for expansion cards. They come in various sizes and configurations, so you can choose one that fits your needs and budget. Another option is to use a PCIe riser kit, which allows you to mount expansion cards in a vertical orientation.
This can be particularly useful if your motherboard has limited space for expansion cards or if you want to show off your hardware in a custom-built PC. If you’re feeling more adventurous, you can even consider modding your motherboard by soldering additional PCIe slots onto it. However, this is not for the faint of heart and can be risky if you don’t know what you’re doing.
In any case, adding PCIe slots to your motherboard can be a great way to expand your PC’s capabilities and future-proof your system for years to come. Just be sure to do your research beforehand and choose a method that’s right for you.
Determine Compatibility
Adding PCIe slots to a motherboard can greatly expand its functionality and enhance its performance. However, determining compatibility can be a challenge. It’s important to check the motherboard’s specifications to see if it supports the type and number of PCIe slots needed.
Additionally, it’s crucial to check the power supply unit (PSU) to ensure that it can handle the additional power demands of the added PCIe components. Some motherboards may also require a BIOS update to recognize the new PCIe cards. It’s essential to do proper research, verify compatibility, and follow manufacturer instructions before attempting to add PCIe slots to a motherboard.
With the right preparation and installation, adding PCIe slots can significantly improve a computer’s capability and provide an optimal user experience.
Check motherboard manual for available expansion slots
When building or upgrading a computer, it’s important to determine the compatibility of the expansion slots on your motherboard. This means checking your motherboard manual for the types of expansion slots available and making sure they are compatible with the add-on components you want to install, such as a graphics card or network card. Some common types of expansion slots include PCI, PCIe, and AGP.
It’s important to note that not all expansion slots are created equal, and some may be faster or more powerful than others. Additionally, different motherboard manufacturers may use different types of expansion slots, so it’s crucial to confirm that your chosen add-on component is compatible with your specific motherboard. Checking your motherboard manual can save you time and money in the long run, ensuring that you purchase the correct components and avoid compatibility issues.
Consider power supply and CPU limitations
When building a computer, it’s important to consider the compatibility of your power supply and CPU. Not all CPUs are compatible with all power supplies, and it’s important to make sure they work well together to avoid issues down the line. One of the first steps is to check the wattage requirements of your CPU.
Then, ensure your power supply can handle that wattage. If your power supply can’t meet the wattage requirement, it can cause instability, crashes, and even damage to your components. On the other hand, if your power supply is overkill, you may be wasting money and sacrificing efficiency.
It’s also important to note that different CPUs use different sockets, and it’s crucial to ensure your CPU socket matches your motherboard’s socket. Overall, taking the time to determine compatibility between your power supply and CPU can prevent headaches down the road and ensure your computer runs smoothly.
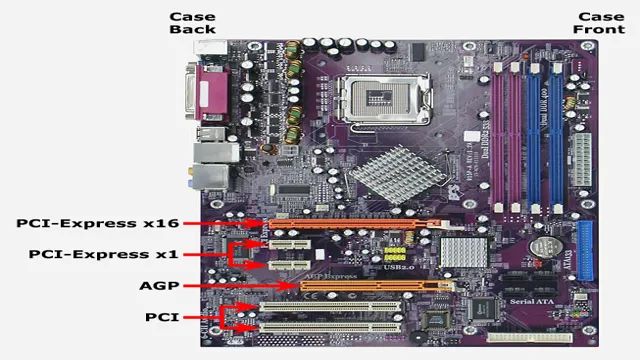
Identify PCIe Slot Type
If you’re thinking about upgrading your computer’s performance, one way to do it is by adding PCIe slots to your motherboard. But before you start shopping for PCIe devices to add to your system, you first need to identify what type of PCIe slot your motherboard has. This is important because not all PCIe slots are created equal! There are different sizes and configurations of PCIe slots, and each one has its own limitations and capabilities.
To find out what kind of PCIe slot you have, you can look at the documentation that came with your motherboard, or you can physically examine the slots themselves. Generally, you’ll see PCIe slots labeled with their number of lanes and their physical size. For example, a small 1x PCIe slot will be labeled 1x, while a larger 16x PCIe slot will be labeled 16x.
Once you know what kind of PCIe slot you have, you can start researching devices that will work with it. By doing this, you’ll be well on your way to upgrading your computer’s performance with the latest PCIe devices!
Research PCIe slot types and their uses
PCIe slot types If you’re building a computer, you’ll need to know about the different types of PCIe slots and their uses. PCIe stands for Peripheral Component Interconnect Express, and it’s a standard for connecting devices like graphics cards, sound cards, and network adapters to a computer’s motherboard. There are several types of PCIe slots, including PCIe x1, PCIe x4, PCIe x8, and PCIe x1
The number after the “x” indicates the number of lanes that slot can support. A PCIe x1 slot has one lane and can be used for things like sound cards or network adapters. A PCIe x16 slot has 16 lanes and is used for high-performance devices like graphics cards.
It’s also worth noting that some PCIe slots are open-ended, which means they can accommodate larger cards, while others are closed-ended, which means the card must fit within a certain length. Knowing the different types of PCIe slots can help you choose the right components for your computer build and ensure you get the best performance from your hardware.
Identify the available PCIe slots on the motherboard
When it comes to identifying the PCIe slots available on a motherboard, the first thing you need to do is determine the type of PCIe slot you’re working with. The three most common types are PCIe x1, PCIe x4, and PCIe x1 PCIe x1 slots are typically used for low-power expansion cards like sound or network cards, whereas PCIe x4 slots provide a bit more bandwidth and are often used for high-speed storage devices like NVMe SSDs.
The most powerful PCIe slot is the PCIe x16, which provides the most bandwidth and is used for graphics cards. To identify the PCIe slot type on your motherboard, you can consult the motherboard’s manual or use tools like CPU-Z or HWiNFO to take a closer look at the hardware details. By identifying the PCIe slots on your motherboard, you can determine which types of expansion cards and devices are compatible with your system.
Install PCIe Card
Are you looking to add more PCIe slots to your motherboard? Installing a PCIe card is the way to go! First, ensure that the PCIe card you’ve purchased is compatible with your current motherboard. Next, turn off the PC and unplug all cables. Locate an available PCIe slot, remove the protective cover, and gently insert the card into the slot.
Apply firm pressure until it clicks into place. Finally, secure the card to the PC case using a screw. Once done, connect the necessary cables to the card and turn on the PC.
The new PCIe card should be recognized and ready to use. Adding PCIe slots to your motherboard can be a breeze with just a bit of caution and attention to detail.
Power off and unplug all cables
When it comes to installing a new PCIe card, there are a few important steps that you need to follow to ensure everything goes smoothly. First and foremost, you’ll want to power off your computer and unplug all cables to avoid any electrical shocks or damage to your hardware. Once you’ve done that, you’re ready to install your new PCIe card.
Before you start, make sure you have the right card that is compatible with your computer and its components. Check the slot markings to ensure that you’re inserting the card in the correct slot. Once you have the card ready, gently insert it into the PCIe slot, making sure to align the notches on the card and the slot.
Apply gentle pressure until the card clicks into place. After you have successfully installed the card, it’s time to reconnect all the cables you previously unplugged. Make sure you connect everything securely so that your computer boots up without any issues.
Once you’ve done that, go ahead and power on your computer and check to see if your new PCIe card is working correctly. Installing a new PCIe card may sound intimidating, but as long as you follow the right steps and take your time, it doesn’t have to be complicated. Just make sure you power off and unplug all cables, choose the right card for your computer, and securely fasten it in the PCIe slot.
With these steps in mind, you’ll be up and running in no time.
Remove cover and access motherboard
When installing a new PCIe card into your computer, the first step is to remove the computer cover and access the motherboard. Once you have located the PCIe slot, gently insert the card into the slot, making sure it is properly aligned. Use screws to secure the card in place, being careful not to over-tighten them.
Before replacing the cover, verify that the card is fully inserted and that all connections are secure. Installing a PCIe card may seem intimidating at first, but with some careful steps, the process is straightforward. Make sure to follow the manufacturer’s instructions and take appropriate anti-static precautions to avoid any potential damage to your computer.
With a newly installed PCIe card, you can enjoy enhanced performance and functionality for your computer.
Insert PCIe card into appropriate slot
If you’re looking to enhance the performance of your PC, you might be considering installing a PCIe card. These cards can help improve your computer’s speed and functionality by expanding its capabilities. But before you can start reaping the benefits of a PCIe card, you’ll need to know how to install it properly.
Firstly, make sure that you have an appropriate slot available on your motherboard. PCI Express slots come in different sizes, so it’s essential to check the specifications of your motherboard and the card to ensure compatibility. Once you have identified the right slot for your card, you can gently insert it into the slot.
Ensure that the card’s connectors are adequately aligned, and the card is seated firmly. Finally, secure the card in place with the appropriate screw or latch. With your card securely installed, you’re now ready to start enjoying the benefits of improved performance and functionality on your PC.
Secure card with screws if needed
When installing a PCIe card in your computer, it is important to ensure that it is secure and properly attached to the motherboard. If needed, you can use screws to secure it in place. Before installing your PCIe card, make sure that your computer is turned off and unplugged.
Then, carefully insert the card into the PCIe slot on your motherboard, making sure that it is properly aligned. Gently push down on the end of the card until it clicks into place. If your card requires external power, make sure to plug in the necessary cables.
Once everything is properly connected, turn on your computer and install any necessary drivers. With a securely installed PCIe card, you can enjoy improved graphics, sound, and other performance enhancements for your computer. So go ahead, upgrade your PC and optimize your experience!
Configure BIOS Settings
If you’re looking to add PCIe slots to your motherboard, there are a few steps to follow before you can install the hardware. One of the first things you should do is configure your BIOS settings to ensure that your motherboard can recognize the new PCIe slots. Different motherboards have different BIOS menus, so you’ll need to consult your motherboard’s manual to find the right settings.
Once you access the BIOS menu, locate the PCIe settings and make sure that they are enabled. Some motherboards also have specific settings for each PCIe slot, such as enabling or disabling hot-plugging. Adjust these settings as necessary to ensure that your PCIe slots are recognized and configured properly.
Once your BIOS settings are in place, you can install your new PCIe slots and start using your expanded hardware setup. With a bit of patience and some careful configuration, you can add PCIe slots to almost any motherboard, giving you the flexibility and power you need to run the latest high-performance hardware.
Boot system and enter BIOS settings
When it comes to configuring a computer’s BIOS settings, the first step is entering into the BIOS menu, which can be accessed by restarting the computer and pressing a specific key (usually F2 or Delete) during the boot process. Once inside the BIOS, you’ll find a range of configuration options that can be adjusted to optimize the computer’s performance and functionality. These settings can include adjusting the boot order of devices, adjusting the clock settings, enabling or disabling hardware components, and adjusting power management settings.
It’s important to understand that making changes to the BIOS can have a significant impact on the computer’s stability and performance, so it’s important to make changes carefully and with guidance from reliable sources. By taking the time to configure the BIOS settings properly, you can ensure that your computer is running at its best and is configured to meet your needs. So, are you ready to dive into configuring your BIOS settings and take control of your computer’s performance? Let’s get started!
Locate PCIe configuration options
When building or upgrading a computer, it is essential to configure the BIOS settings to ensure optimal performance. One crucial aspect to consider is the PCIe configuration options. PCIe stands for Peripheral Component Interconnect Express, and it is the interface used to connect expansion cards to the motherboard.
The BIOS settings for PCIe allow you to control the performance and functionality of these cards. To access these options, you will need to enter the BIOS setup during the computer’s boot process. Once inside, navigate to the PCIe configuration section.
Here, you will find options such as PCIe speed and PCIe lanes. By adjusting these settings, you can improve the performance of PCIe devices such as graphics cards, sound cards, and wireless network adapters. It is important to ensure that the settings you choose are compatible with your hardware and that you do not exceed the maximum capacity of your system.
In short, configuring your PCIe settings in the BIOS can help you get the most out of your computer’s expansion capabilities.
Adjust settings as needed
When it comes to configuring your BIOS settings, it’s important to adjust them as needed to ensure your system is optimized for your specific needs. The BIOS, or Basic Input/Output System, is a critical component of your computer that controls how it communicates with hardware components such as your hard drive, RAM, and CPU. By configuring your BIOS, you can adjust things like boot order, RAM timings, and fan speeds to achieve better system performance.
However, it’s important to approach BIOS settings with caution, as changing certain settings can cause serious issues if you’re not familiar with what you’re doing. That said, with a little research and some trial-and-error, you can fine-tune your BIOS settings to get the most out of your computer.
Test the New Expansion Card
If you need to add PCIe slots to your motherboard, then a new expansion card may be just what you need. These cards are relatively easy to install and can provide additional functionality to your computer system. The first step is finding a PCIe card that is compatible with your motherboard.
Once you have the card in your possession, it’s time to install it. To do so, simply insert the card into an empty PCIe slot and secure it with a screw. Make sure to connect any necessary power cables from your power supply unit to the card to ensure that it has sufficient power.
Once the card is installed, you can start up your system and test to make sure that it’s working properly. You may need to download drivers for the new device, but once that’s done, you’ll be good to go. Adding a new expansion card can be a simple and effective way to upgrade your system and take advantage of the latest technology, so don’t be afraid to give it a try.
Power on system and test the new card
After installing a new expansion card, it’s essential to power on the system and test the card’s functionality. Ensure that all cables are connected correctly and power on your computer. The system should detect the new card automatically.
To test the card, you can run diagnostic software or use the device that requires the new expansion card. For instance, if you installed a new graphics card, test it by running 3D games or watching HD movies. If the card is working correctly, you should experience better graphics and faster system speed.
However, if you encounter any issues, check the card’s connections and ensure that it’s compatible with your computer’s system. You can also refer to the card’s manual or contact the manufacturer for assistance. By testing the new expansion card, you can ensure that it’s working correctly and get the most out of your computer system.
Install drivers and software as needed
When you’ve installed your new expansion card and connected all the necessary cables, it’s time to test it out. But before you do that, make sure you’ve installed the necessary drivers and software. These can usually be found on a CD that comes with the expansion card.
If not, you can often find them online on the manufacturer’s website. Once you have the drivers and software installed, it’s time to test the new card. Try running some programs that you know can benefit from the expansion card, such as graphic-intensive applications or video editing software.
If everything works correctly, then congratulations! You’ve successfully installed and tested your new expansion card. It’s essential to remember that installing a new expansion card can be tricky, and you need to be careful throughout the process. Take the time to research what kind of expansion card you need, and make sure you purchase a compatible one.
Follow the instructions that come with the card carefully, and don’t rush the process. If you encounter any issues, try contacting the manufacturer’s support team for assistance. Overall, installing an expansion card can be a great way to upgrade the performance of your computer, as long as you take the time to do it right.
Conclusion
In conclusion, adding PCIe slots to your motherboard may seem like a daunting task, but with the right tools and a bit of know-how, it can be a breeze. Whether you choose to use an expansion card or go the DIY route and whip out your trusty soldering iron, the possibilities are endless. So go forth, expand your horizons (and your motherboard), and remember: the only limit is your creativity (and maybe your wallet).
Happy upgrading!”
FAQs
What are PCIe slots and why are they important?
PCIe stands for Peripheral Component Interconnect Express and it is a high-speed expansion bus used to connect devices to a computer motherboard. PCIe slots are important because they allow you to add additional components to your computer, such as graphics cards, network cards, and sound cards.
How many PCIe slots can a motherboard have?
The number of PCIe slots on a motherboard can vary depending on the type and model of the motherboard. Some motherboards may have only one or two PCIe slots, while others may have as many as eight or more.
Can you add more PCIe slots to a motherboard?
It is not possible to add more PCIe slots to a motherboard that does not have them already. However, you can purchase an expansion chassis or adapter that connects to your computer’s USB or Thunderbolt port and provides additional PCIe slots.
What is the difference between PCIe 3.0 and PCIe 4.0?
PCIe 3.0 has a maximum transfer rate of 8 gigatransfers per second (GT/s) while PCIe 4.0 has a maximum transfer rate of 16 GT/s. Additionally, PCIe 4.0 has better power management and supports lane margining, which allows for more reliable communication between components. However, PCIe 4.0 is not yet widely supported by all hardware and software.