Have you ever tried to remove a 24 pin connector from your motherboard but found it to be a tricky task? It can be a frustrating experience when you need to disconnect the power supply from your motherboard, but you’re not sure how to go about it. Well, fear not! In this blog post, we will guide you step-by-step on how to safely remove the 24 pin connector from your motherboard without damaging any of the components. Removing a 24 pin connector can be compared to trying to remove a puzzle piece from a larger puzzle.
It requires careful attention and a steady hand. However, once you know the correct technique, it becomes a straightforward task that you can perform quickly and efficiently. So, whether you’re upgrading your computer or simply need to clean the inside, we’ll show you how to disconnect your motherboard’s power supply with confidence.
Are you ready to learn how to remove this connector like a pro? Keep reading to find out!
Prepare for Removal
Removing a 24 pin connector from your motherboard can be a bit intimidating, especially if you’ve never done it before. The first step in the process is to prepare for the removal by shutting down your computer and unplugging it from the wall. Next, locate the 24 pin connector on your motherboard and give it a gentle wiggle to see if it’s loose.
If it doesn’t budge, use your fingers to release the clip on the connector and gently pull it away from the motherboard. Be careful not to pull too hard as this could damage the connector or the motherboard. Once the connector is removed, you can safely move on to whatever task you need to perform, whether it’s replacing a component or simply cleaning your system.
With a bit of practice, you’ll get the hang of removing and reattaching your 24 pin connector in no time.
Shut down the computer
When it comes to removing a computer from its current location, ensuring you shut it down properly can save you a lot of headaches down the line. First, make sure you’ve saved any documents or files you need to keep and have closed any programs that are still running. Once that’s done, navigate to the “Start” menu and click on “Power” to reveal options for either “Shut Down” or “Restart.
” Choose “Shut Down” and give your computer a few moments to power off completely before unplugging it. While it might be tempting to simply hit the power switch, doing so can cause serious damage to your computer’s hardware over time. Taking a few extra seconds to shut your computer down properly can save you a lot of money and frustration in the long run.
Unplug all cables and peripherals
“Prepare for Removal” When it’s time to move your computer setup, it’s important to prepare your equipment properly to avoid any accidental damage during transit. One crucial step in this process is to unplug all cables and peripherals from your computer and any accessories, such as speakers or printers. Not only does this prevent any potential damage to these peripherals, but it also makes it easier to wrap them up and pack them separately.
Be sure to label each cable and peripheral to minimize confusion when it comes time to reconnect everything in your new space, and consider using cable ties or zip-ties to keep everything organized and tangle-free. Additionally, if you have a desktop computer tower, it’s best to remove any additional components, such as graphics cards or hard drives, and pack them separately in anti-static bags to prevent damage from static electricity. Overall, taking the time to properly prepare your equipment for removal will not only make the transition smoother, but it will also help ensure your expensive tech stays safe and functional throughout the move.
So, grab your labels, zip-ties, and anti-static bags, and get started on prepping your setup for a seamless move.
Ground yourself with an anti-static wrist strap
An anti-static wrist strap can prove to be the best investment for any computer enthusiast or technician. It might seem excessive, but when removing components from a computer, proper grounding is essential. Static electricity can damage delicate and expensive components in just a fraction of a second.
An anti-static wrist strap will keep you grounded to prevent any static buildup. It’s easy to use; just connect the clip to a metal object that’s grounded, such as the computer’s chassis or a properly wired outlet. Nobody wants to risk damaging their computer by not taking a simple and inexpensive precaution, so make sure to prepare for any removal with an anti-static wrist strap.
Locate the 24 Pin Connector
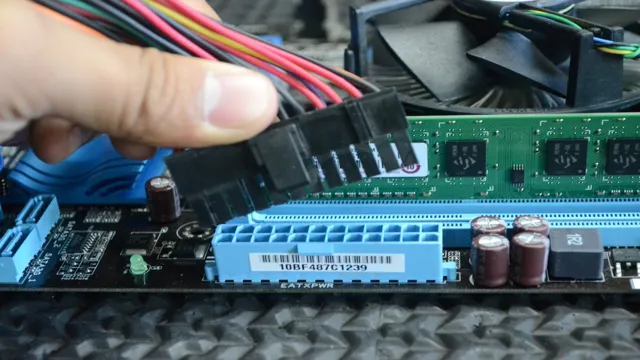
Removing the 24 pin connector from the motherboard is a crucial step when disassembling a computer. Before starting, it’s essential to locate the 24 pin connector. Typically, it’s a rectangular-shaped connector that is placed at the edge of the motherboard.
It’s usually situated near the power supply unit, but the exact location can vary depending on the motherboard manufacturer. To remove the 24 pin connector, gently grasp the connector with your fingertips and firmly pull it out. Be careful not to apply too much force to avoid damaging the motherboard or the connector.
Once the connector is removed, you can proceed with other procedures, such as cleaning the components or upgrading them. Removing the 24 pin connector is easy once you know where to find it, and it’s an essential procedure that every computer owner should know.
Identify the 24-pin power connector on the motherboard
Locating the 24-pin power connector on your motherboard is crucial if you want to power up your computer properly. This connector is responsible for supplying power to your motherboard and all of its components, including the processor, RAM, and peripheral devices. It is usually located near the edge of the motherboard, close to where the power supply is mounted.
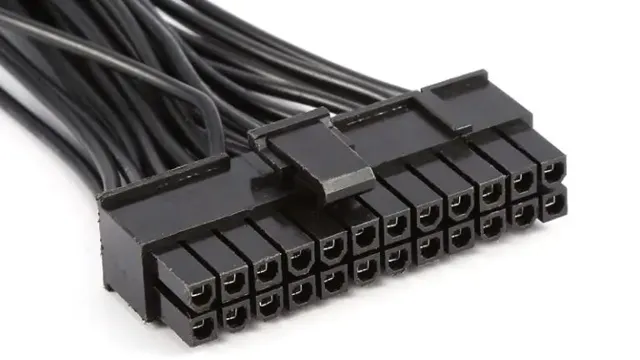
The connector itself consists of a rectangular block with two rows of 12 pins, and the cable that connects to it usually has a single latch or clip that holds it securely in place. To easily identify the 24-pin power connector on your motherboard, look for the largest connector block on the board, as this is most likely the one you need. It is placed in a specific location on the board, which may vary slightly depending on the manufacturer and model of your motherboard.
Some motherboards may have additional connectors nearby, so be sure to locate the connector that matches the shape and size of your 24-pin cable. Once you locate the connector, gently plug in the cable, ensuring that it snaps into place securely. This will ensure the right amount of power is supplied to your motherboard and all of its components, helping to prevent damage or issues with powering up.
Remember that each motherboard is different, so refer to your motherboard manual or manufacturer website for more specific information on locating and connecting the 24-pin power connector.
Identify the locking mechanism on the connector
When it comes to building a computer, one of the most important components is the power supply unit (PSU). The PSU is responsible for providing power to the other components, ensuring that everything runs smoothly. One critical part of the PSU is the 24-pin connector, which connects to the motherboard.
To identify the locking mechanism on the connector, you’ll first need to locate the connector itself. You can find the 24-pin connector on the motherboard near the top left corner of the board. Once you’ve located the connector, take a closer look, and you’ll see that it has a clip on one side.
This clip is the locking mechanism that secures the connector to the motherboard. To disconnect the connector, gently press down on the clip, and the connector will release. When reconnecting the connector, make sure to line up the clip with the corresponding slot on the motherboard, then press down firmly until you hear a click.
This ensures that the connection is secure and the locking mechanism is engaged. Overall, understanding the locking mechanism of the 24-pin connector is essential to building a reliable and functioning computer.
Unlock the Connector
Removing the 24 pin connector from the motherboard can be a bit of a challenge, especially if it’s your first time doing it. The first step is to locate the connector and examine it carefully to determine how it locks onto the motherboard. Most 24 pin connectors have a small locking tab on either side of the connector.
To unlock the connector, gently squeeze the tabs and pull the connector away from the motherboard. It’s essential to take your time while doing this to avoid damaging the connector or motherboard. Once the connector is unlocked, gently wiggle it back and forth to release it from the motherboard’s socket.
After that, you can remove the connector from the motherboard without any issues. If you encounter any difficulties, don’t hesitate to consult your motherboard’s manual or seek help from a computer technician. Remember to handle all computer components with care to avoid damages and always unplug the computer before doing any repairs.
Use a small flathead screwdriver to depress the locking mechanism
If you ever find yourself needing to disconnect or unlock a connector on different devices, you might notice that there’s a small locking mechanism that holds everything together. However, unlocking it might be a bit tricky if you don’t know the right trick. One way to solve this is by using a small flathead screwdriver to depress the locking mechanism.
But first, make sure that you’re doing this on a stable surface and that the tool you’re using is small enough to fit the grooves and slots of the connector. Once you have everything in place, gently insert the screwdriver into the locking mechanism and apply a small amount of pressure. You should feel a click or a release, indicating that it’s now unlocked.
You may then proceed with disconnecting the device or the cable without worrying about damaging the connector or forcing it to unlock. This method works great for a lot of different types of connectors, from computer cables to automotive plugs, and can save you a lot of time and headache in the long run. So, next time you encounter a stubborn lock, don’t hesitate to try this little hack out!
Gently wiggle the connector to loosen it from the socket
When you need to disconnect a connector, the first step is to look for a locking mechanism. This may be a small latch that needs to be released before the connector can be dislodged, or it could be a screw that needs to be undone. Once you have released the locking mechanism, gently wiggle the connector to loosen it from the socket.
The key here is to be gentle, as you don’t want to damage any of the delicate components. If the connector doesn’t come loose easily, don’t force it. Instead, double-check to make sure you have released the locking mechanism and then try again.
With a little bit of patience and persistence, you should be able to disconnect the connector without any problems. Remember, taking the time to unlock the connector properly can save you a lot of headaches down the road. So, take your time, be gentle, and get the job done right the first time.
Remove the Connector
Removing a 24-pin connector from a motherboard can be a bit intimidating, but with the right guidance, the process is straightforward. Before removing the connector, make sure all power is turned off and the computer is unplugged. Then, gently apply pressure to the sides of the connector while wiggling it back and forth to loosen it from its socket.
It may be necessary to use a tool such as pliers to grip the connector firmly and apply more pressure if it’s difficult to remove. Be sure to hold onto the connector and not the wires when pulling it out to avoid damaging any of the components or cables. With a bit of care and patience, the connector should come out without issue.
Taking the time to properly remove and handle the connector will ensure a smooth reinstallation process and prevent any damage to the motherboard or other components.
Using your fingers, pull the connector straight out of the socket
When it comes to removing a connector from its socket, the process can seem daunting. However, it’s much simpler than you might think. Begin by using your fingers to pull the connector straight out of the socket.
Make sure to grip it firmly, but without using excessive force that could cause damage. If it’s stuck, try gently wiggling it from side to side as you pull. Sometimes, connectors can be stubborn and require a bit more effort.
In those cases, it may be helpful to use a tool such as a pair of pliers to grip the connector and apply even pressure as you pull it out. Always exercise caution when using tools to avoid damaging the connector or socket. So, don’t be intimidated by the thought of removing connectors.
With a little bit of patience and gentle force, you can quickly and easily get the job done.
Do not pull at an angle or with excessive force
When it comes to removing connectors, it’s essential not to pull them at an angle or exert too much force. Doing so could damage the connector or worse yet, break it off completely. Instead, take a moment to examine the connector and see if there are any clips or release mechanisms that need to be engaged before pulling it out.
If you’re still having difficulty, give the connector a slight wiggle while pulling gently and steadily. Remember, patience is key when removing connectors, and it’s always better to take things slow and steady to prevent any damage. By taking the time to remove the connector properly, you’ll save yourself time, money, and a potentially larger headache down the road.
Inspect the connector and socket for damage or debris
When inspecting the connector and socket, it’s crucial to remove the connector in order to thoroughly examine all areas for damage or debris. Before removing the connector, ensure that any power sources are turned off to prevent electrical hazards. Gently disconnect the connector from the socket, pulling straight outwards.
Avoid twisting or bending the connector, as this can cause further damage. Once the connector is removed, examine all pins and sockets for any signs of physical damage such as bent pins or corrosion. Additionally, check for any debris such as dust, dirt or lint and use a can of compressed air to blow out any particles that may be stuck.
Remember to be gentle when handling connectors, as they can be fragile and easily damaged. By thoroughly inspecting and cleaning your connectors and sockets, you can ensure that your devices continue to function reliably and safely.
Conclusion
Removing a 24 pin connector from a motherboard may seem like a daunting task, but fear not! With a few simple steps and some gentle persuasion, you can bid farewell to that pesky connector in no time. First, locate the clip on the side of the connector and gently push it down. Then, use a wiggle and pull motion while applying pressure to the base of the connector until it pops out.
If you’re feeling particularly daring, you can even whisper sweet nothings to coax it out. And just like that, your motherboard and power supply can go their separate ways. Who knew parting could be such sweet sorrow? Happy disconnecting!”
Follow these steps to safely remove a 24 pin connector from your motherboard
When it comes to removing a 24 pin connector from your motherboard, there are a few steps you need to follow to ensure that you do it safely. The first thing you need to do is to locate the 24 pin connector, which is usually located near the CPU socket. Once you have located the connector, you need to gently grip it with both hands and wiggle it back and forth to loosen it.
It is important not to pull on the connector too hard as this could damage the motherboard or break the connector. If the connector is stuck, you can use a small screwdriver or needle-nose pliers to gently pry it loose. Remember to be patient and take your time, as any damage to the motherboard could cause serious issues down the line.
With the connector removed, you can now go ahead and make any necessary upgrades or repairs to your PC. Overall, with a little bit of caution and care, removing a 24 pin connector from your motherboard can be an easy and stress-free process.
FAQs
What tools do I need to remove a 24-pin connector from a motherboard?
You’ll need a tool that can gently apply pressure to the connector, such as a pair of needle-nose pliers or a cable removal tool.
How do I safely remove the 24-pin power connector from my motherboard?
First, make sure your computer is powered off and unplugged. Then, gently grasp the connector by the sides and wiggle it back and forth while pulling it gently away from the motherboard.
Can I use a 20-pin power supply connector on a motherboard that takes 24-pin?
Not without an adapter. Using a 20-pin connector on a 24-pin motherboard will result in poor performance or even damage to the components.
What do I do if the 24-pin connector won’t come off my motherboard?
If the connector is stuck, try using a gentle twisting motion while pulling it away from the motherboard. Alternatively, you can use a small flathead screwdriver to gently pry the connector away. Be careful not to damage any of the components on the motherboard.