Are you looking to upgrade your computer with the latest Windows 11 operating system? Do you own an MSI motherboard and wondering if it is compatible with Windows 11? Well, we’ve got great news for you! In this blog post, we’ll guide you through the process of installing Windows 11 on your MSI motherboard. We know how frustrating it can be to encounter technical difficulties while upgrading your computer, but don’t worry, we’ve got you covered! Our step-by-step guide will help you install Windows 11 seamlessly on your MSI motherboard, ensuring a smooth transition to the latest operating system. We’ll provide you with all the information you need, from checking your PC’s compatibility to creating a bootable USB drive and installing Windows 1
So, grab a cup of coffee and settle in as we take you on a journey of upgrading your computer and enjoying all the benefits of Windows 11 on your MSI motherboard. Let’s get started!
Prepare Your MSI Motherboard
If you’re looking to install Windows 11 on your MSI motherboard, there are a few things you need to do first. First, make sure your BIOS is up to date. You can usually find the latest BIOS version on MSI’s website.
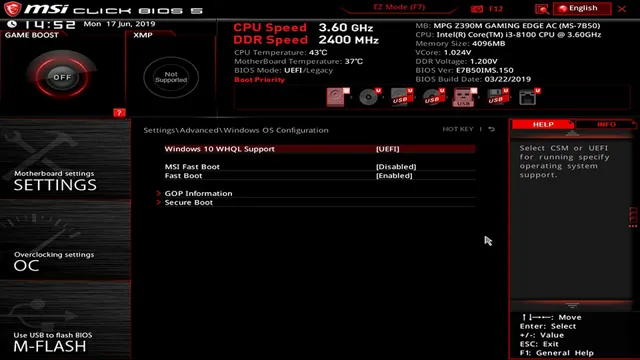
Once you’ve updated your BIOS, you’ll need to make sure that your boot mode is set to UEFI rather than legacy. This is important because Windows 11 requires UEFI boot mode to run. Next, you’ll want to create a bootable USB drive with the Windows 11 installation files.
You can do this using Microsoft’s Media Creation Tool, which will automatically download and create the bootable USB for you. Once you’ve created the bootable USB, plug it into your MSI motherboard and boot from it by pressing the appropriate key during startup. From there, you’ll be guided through the Windows 11 installation process.
Make sure to choose the correct partition to install Windows 11 on, and follow the prompts to set up your account and complete the installation. And that’s it! With these steps, you can easily install Windows 11 on your MSI motherboard.
Check MSI Motherboard Compatibility
If you’re a gamer or a PC enthusiast, then you know how important it is to have the right hardware to get the best performance out of your rig. One of the most important pieces of hardware is your motherboard, and if you’re planning on getting an MSI motherboard, then it’s crucial to make sure it’s compatible with the rest of your components. To prepare your MSI motherboard, first, make sure you have the right size for your case.
MSI motherboards come in various sizes, such as ATX, Micro-ATX, and Mini-ITX, so it’s essential to know which one is compatible with your case before making a purchase. You should also check the chipset of your MSI motherboard, as it determines which type of processor and RAM your motherboard can handle. Make sure to choose a chipset that works with your PC’s hardware to ensure maximum performance.
Additionally, check for other features such as USB and audio ports, as well as expansion slots for additional components. By preparing your MSI motherboard before purchase, you can ensure compatibility and get the best performance out of your PC.
Update MSI Motherboard BIOS
If you are looking to update the BIOS of your MSI motherboard, you will first need to prepare it before you can proceed. This involves downloading the latest BIOS version from MSI’s official website and copying it onto a USB drive that is formatted to Fat3 It is important to note that not all MSI motherboards have the same BIOS update process, so it is recommended that you refer to the user manual or the MSI website for specific instructions on how to update your particular motherboard’s BIOS.
Additionally, before updating the BIOS, make sure that your computer is not running on battery power and that all other applications are closed. With careful preparation and following the instructions, you can successfully update your MSI motherboard BIOS and ensure that it is functioning at its optimal level.
Create Bootable Windows 11 USB Drive
If you’re planning on updating to Windows 11 on your MSI motherboard, the first step is to create a bootable USB drive with the new operating system. To begin, you’ll need a USB drive with at least 16GB of storage and a working computer with internet access. Download the official Windows 11 ISO file from Microsoft’s website and save it to your computer.
Then, insert your USB drive and use a tool like Rufus or the Windows USB/DVD Download Tool to format the drive and make it bootable. Finally, select the Windows 11 ISO file you downloaded and wait for the tool to finish creating the bootable USB drive. Once finished, you can now use the USB drive to install Windows 11 on your MSI motherboard without any issues.
So go on, create that bootable USB drive and experience all the new features and improvements that Windows 11 has to offer!
Download Windows 11 ISO File
Creating a bootable Windows 11 USB drive is essential if you want to install or upgrade to Windows 11 on your computer. To begin, you’ll need to download the Windows 11 ISO file from a reliable source. Once you’ve downloaded the file, you’ll need to create a bootable USB drive using a tool like Rufus or Windows USB/DVD Download Tool.
After opening the tool, select the Windows 11 ISO file, choose the USB drive you want to use, and hit the create button. The tool will then format the USB drive and copy the necessary files to create the bootable drive. When finished, restart your computer and select the USB drive as the bootable device.
The Windows 11 installation process should then begin. It’s important to note that the process may take some time, so be patient and make sure your computer is plugged in and has enough space for the installation. With these steps, you’ll be able to create a bootable USB drive and install Windows 11 on your device seamlessly.
Use Rufus to Create Bootable USB Drive
If you’re looking to install Windows 11 on your computer, you’ll need to create a bootable USB drive first. And that’s where Rufus comes in. Rufus is a free and open-source tool that allows you to create bootable USB drives from ISO files.
To create a bootable Windows 11 USB drive using Rufus, you’ll need to download the Windows 11 ISO file and Rufus software. Once you’ve done that, open Rufus, select your USB drive under “Device,” choose the Windows 11 ISO file under “Boot selection,” and click “Start.” Rufus will then format your USB drive and copy the Windows 11 ISO file onto it, creating a bootable USB drive in the process.
And that’s it! Once the process is complete, you can use your bootable USB drive to install Windows 11 on your computer. With Rufus, creating a bootable USB drive has never been easier!
Boot from USB Drive and Install Windows 11
If you’re looking to install Windows 11 on your MSI motherboard, one option is to boot from a USB drive and perform a fresh installation. To start, you’ll need to create a bootable USB drive with the Windows 11 installation files. You can use the Windows Media Creation Tool to do this.
Once you have the bootable USB drive, insert it into your MSI motherboard and boot up your computer. You’ll need to access the BIOS settings and change the boot order so that your computer boots from the USB drive first. Once you’ve done this, save your changes and reboot your computer.
The Windows 11 installation process should begin automatically. Just follow the on-screen prompts to complete the installation. It’s important to note that installing a new operating system can be time-consuming and may cause you to lose data if you’re not careful.
So, before you begin the installation process, make sure to back up all important files and create a recovery drive just in case. And with these steps, you are good to go with your brand new Windows 11 on MSI motherboard!
Access MSI Motherboard Boot Menu
If you’re struggling to access the MSI motherboard boot menu, you’re not alone. It can be a tricky process, but it’s crucial if you want to boot from a USB drive and install Windows 1 One way to access the boot menu is by pressing the “Delete” key during startup.
This will bring up the BIOS menu, where you can customize your boot options. From there, you can select your USB drive as the primary boot device. Make sure the USB drive is plugged in before you power on the computer, otherwise it may not show up as an option.
Once you’ve selected the USB drive, save your settings and exit the BIOS menu. Your computer will then restart and boot from the USB drive, allowing you to install Windows 1 Just remember to remove the USB drive after installation, or your computer will continue to boot from it.
By following these steps, you’ll be able to access the MSI motherboard boot menu and easily install Windows 1
Select Bootable USB Drive
If you want to install the latest Windows 11 on your computer, you need to first create a bootable USB drive. This type of drive will allow you to boot your computer from the USB device, instead of from the internal hard drive. To start, you will need to select a USB drive that is large enough to hold the Windows 11 installation files, usually at least 8GB in size.
Once you have your USB drive, you will need to use a software program like Rufus to create the bootable USB. In Rufus, select your USB drive, then point to your Windows 11 ISO file, and start the process. Once the Rufus process is complete, you will have a bootable USB drive that you can use to install Windows 1
To boot your computer from the USB drive, restart your computer, access the boot menu options (usually by pressing F12 or ESC during startup), and select the USB device as your boot device. From there, follow the Windows 11 installation prompts to complete the installation process.
Follow Windows 11 Installation Instructions
If you’re looking to install Windows 11 on your computer, then you’ll need to follow certain instructions to do so successfully. First of all, you’ll need to create a bootable USB drive that contains the installation files for Windows 1 Next, you’ll need to access your computer’s Boot Menu and select the USB drive as the boot device.
This will allow the installer to launch and you can proceed with the installation process. The entire process can take some time, so be patient and make sure you have the necessary hardware requirements for Windows 1 Some of these requirements include a compatible processor, sufficient storage space, and at least 4GB of RAM.
Make sure you have all of these before proceeding with the installation process. By following these instructions, you’ll be able to successfully install Windows 11 on your computer and enjoy the benefits of the latest operating system.
Install MSI Motherboard Drivers and Updates
If you’re looking to upgrade your operating system to Windows 11 on your MSI motherboard, you’ll need to ensure that you have the most up-to-date drivers and updates installed. Start by visiting the MSI website and searching for your motherboard’s model number. Here you’ll find a list of downloads and drivers specific to your system.
Download and install any available updates, including those for your chipset, audio, and network devices. It’s also important to keep your BIOS firmware updated to ensure optimal performance. Once all drivers are installed, you’re ready to install Windows 1
Be sure to follow all installation instructions carefully and backup your files before beginning the process. By ensuring your MSI motherboard has the latest drivers and updates, you can enjoy a smooth and problem-free experience with Windows 1
Access MSI Motherboard Support Page
Accessing the MSI motherboard support page is crucial if you want to keep your system running smoothly. Updating your motherboard drivers and firmware is crucial to ensure that your computer is safe from security threats and running at its optimal performance. To access the MSI motherboard support page, start off by navigating to the MSI website, and click on the Support tab.
From there, you can select your motherboard model and download the latest drivers and firmware updates. Remember to always keep your MSI motherboard updated to ensure your computer is running at its best. It’s like maintaining your car by getting regular oil changes and tune-ups; neglecting to update your motherboard drivers and firmware can lead to system errors, crashes, and even system failure.
So, take the time to access the MSI motherboard support page and keep your system up to date.
Download and Install MSI Motherboard Drivers
If you’ve recently purchased an MSI motherboard, you’ll want to ensure that you’re getting the most out of it by downloading and installing the latest drivers and updates. When you install MSI motherboard drivers, you’ll have access to the latest features, bug fixes, and optimizations, all of which can help improve your computer’s performance and stability. To get started, head to the MSI website and search for your motherboard’s model number.
From there, you should be able to find the latest drivers and download them to your computer. Once you’ve downloaded the drivers, simply run the installation wizard and follow the on-screen instructions to complete the installation. With your MSI motherboard drivers up to date, you’ll be able to enjoy all the benefits of your new hardware and ensure that your computer is running at its best.
Update MSI Motherboard Firmware
If you’re looking to get the most out of your MSI motherboard, you’ll want to make sure you’re staying up to date with the latest firmware updates and drivers. These updates can help improve performance, fix bugs and glitches, and even add new features. To get started, head to the MSI website and find the support page for your motherboard.
From there, you can download the latest drivers and firmware updates, and follow the instructions provided to install them. It’s important to keep in mind that updating your firmware can be a delicate process, so be sure to read the instructions carefully and follow them closely. By staying on top of updates and making sure your motherboard is running the latest software, you’ll be able to get the most out of your computer and ensure that it’s running smoothly.
Conclusion
And with that, we have successfully installed Windows 11 on our MSI motherboard! Congratulations! Your computer is now one step closer to being as sleek and modern as a Tesla Cybertruck. So go ahead, enjoy those beautiful new rounded edges and refreshed UI. And in case you’re feeling nostalgic for the good old days of Windows 95, just remember that you can always switch back to the classic mode.
But let’s be honest, who doesn’t love a little bit of modern design in their life? Happy computing!”
FAQs
Is my MSI motherboard compatible with Windows 11?
To check if your MSI motherboard is compatible with Windows 11, you can visit the MSI website and look for information about your motherboard model. MSI has also released a list of compatible motherboards, which you can find on their website.
Can I install Windows 11 on my MSI motherboard without updating the BIOS?
It is recommended that you update the BIOS of your MSI motherboard to its latest version before installing Windows 11. This will ensure that your system is compatible with the new operating system and that it runs smoothly.
What are the system requirements for running Windows 11 on an MSI motherboard?
The minimum system requirements for running Windows 11 on an MSI motherboard are:
– A compatible MSI motherboard
– At least 4GB of RAM
– A 64-bit processor with 1 GHz clock speed or faster
– A DirectX 12 compatible graphics card or integrated GPU with a WDDM 2.0 driver
– A display with at least 720p resolution
– A UEFI compatible system firmware
How do I install Windows 11 on my MSI motherboard?
To install Windows 11 on your MSI motherboard, you can follow these steps:
1. Download the Windows 11 ISO from the official Microsoft website
2. Create a bootable USB drive or DVD with the Windows 11 ISO using a tool like Rufus or the Windows USB/DVD Download Tool
3. Insert the bootable USB or DVD into your computer and restart it
4. Press the key to enter the boot menu (usually F11 or F12), select your bootable media, and press Enter
5. Follow the on-screen instructions to install Windows 11 on your MSI motherboard. Make sure to select your MSI motherboard as the installation location.