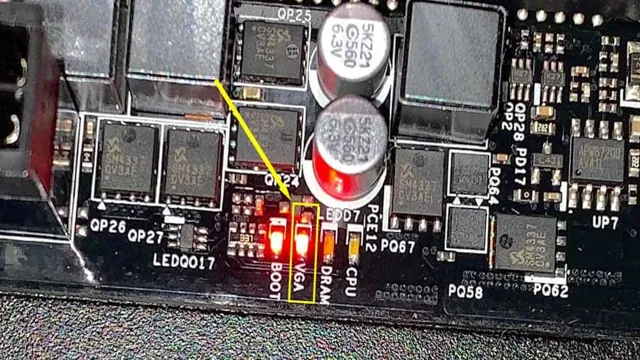
Are you encountering a VGA red light on your motherboard? Don’t worry, you’re not alone. This common issue can be a bit frustrating, but it’s not something that can’t be fixed. First things first, let’s identify what the VGA red light means.
It indicates that there is an issue with your graphics card or the VGA slot on your motherboard. This can be caused by a variety of things such as loose connections, outdated drivers, or hardware damage. But fear not, there are several steps that you can take to resolve this issue.
One solution is to reseat your graphics card. This means removing it from the motherboard and then placing it back in securely. You can also check to ensure that all connections are tight and properly plugged in.
If reseating your graphics card doesn’t work, you can try updating your drivers. Outdated drivers can cause all sorts of issues, including the VGA red light. Check your graphics card manufacturer’s website for the latest drivers.
Lastly, if none of these solutions work, it may be time to replace your graphics card or get your motherboard repaired. This can be a bit of a hassle, but it’s better than dealing with a malfunctioning computer. In conclusion, encountering a VGA red light on your motherboard can be frustrating, but there are several steps you can take to fix the issue.
Don’t be afraid to try different solutions and if all else fails, consider replacing some hardware.
Identifying the Issue
If you’re experiencing a VGA red light on your motherboard, the issue may be due to a hardware or software problem. This VGA light indicates that there may be an issue with the graphics card or its connection to the motherboard. Start by checking that the graphics card is firmly seated in its slot and all connections are secure.
It’s also important to ensure that your computer’s power supply is capable of supporting the graphics card. If the issue persists, you may need to update your graphics card drivers or replace the graphics card altogether. Check for any error messages in your system logs and seek assistance from a professional if necessary.
With careful troubleshooting and diagnosis, you can fix the VGA red light on your motherboard and get back to enjoying your computer.
Checking Motherboard Manual
When troubleshooting your computer, one of the first things you should do is check your motherboard manual. This will help you identify any issues that may be causing problems with your system. The motherboard manual contains valuable information about your motherboard, including what type of ram it uses, what type of processor it can support, and what type of graphics card it is compatible with.
It may also contain troubleshooting guides that can help you diagnose and fix common problems. If you’re having trouble understanding any of the information in the manual, you can always reach out to the manufacturer’s customer support for assistance. Checking your motherboard manual is an important step in troubleshooting your computer and can save you a lot of time and frustration in the long run.
Inspecting VGA and PCIe Cables
When facing issues with VGA and PCIe cables, the first step is to identify the problem. This could be anything from a loose connection to a damaged cable. Inspecting the cables thoroughly is crucial to finding what’s causing the trouble.
You can start by checking for any signs of wear and tear, such as frayed wires or bent or broken connectors. If everything looks okay, examine the connectors themselves, making sure they’re fully seated in their ports and haven’t come loose. It’s also a good idea to try swapping out the cable with another one to see if the problem persists.
By taking a methodical approach, you can narrow down the issue and determine if you need to replace the cable or look elsewhere for a solution.
Troubleshooting Methods
If you’re facing the dreaded VGA red light on your motherboard, don’t panic! This issue can be caused by a variety of factors, but there are a few troubleshooting methods you can try to fix it. First, make sure your VGA cable is securely connected to your graphics card and monitor. Check to see if the graphics card is properly seated in the PCIe slot as well.
If that doesn’t work, try resetting your CMOS by removing the battery and holding down the power button for a few seconds, then reinserting the battery. It’s also worth checking if your PSU (power supply unit) is giving enough power to your graphics card, as a lack of power could cause the VGA red light to come on. If none of these solutions work, it may be a hardware issue and you may want to consider seeking professional help.
Don’t worry though, with a little troubleshooting, you may be able to get your computer up and running again in no time!
Reseating Graphics Card
If you’re having trouble with your graphics card, one of the tried-and-true troubleshooting methods is reseating the card. This involves removing and then carefully reinserting the card into its slot on the motherboard. It may seem simple, but this process can often fix problems like poor performance or video output issues.
Just make sure you power down your computer and unplug it before you begin, and be gentle when handling the card so as not to damage it or the slot. Reseating your graphics card is a great first step to take when encountering graphics-related issues, as it’s easy to do and can often save you the trouble of more complex solutions. So if you’re running into problems with your graphics card, try reseating it and see if that does the trick!
Checking Power Supply Unit
Power Supply Unit (PSU) Trying to identify what is causing your computer to malfunction can be a frustrating experience, especially if you aren’t sure where to focus your troubleshooting efforts. One often overlooked component that can quickly cause problems is the power supply unit (PSU). If your computer isn’t starting up or is shutting down unexpectedly, it’s important to check your PSU to ensure that it isn’t a contributing factor.
Some common indicators of a faulty PSU include a lack of power to your devices, fans not running, or strange noises coming from the unit. One way to troubleshoot your PSU is to test it with a multimeter or a power supply tester. This can identify whether your PSU is providing consistent voltage levels or if it’s fluctuating.
The last thing you want is an unreliable PSU, as it can damage your components and cause data loss. If you don’t feel comfortable testing your PSU on your own, it’s best to consult a professional who can accurately determine the issue and offer a solution. In conclusion, regularly checking your PSU can help prevent issues, increase your computer’s lifespan, and keep your data safe.
Updating Graphics Drivers
Updating graphics drivers is an essential aspect of troubleshooting any problems with your computer’s graphics performance. Outdated drivers can cause graphic glitches, lag, and screen tearing, ultimately hindering your overall experience. There are several ways to update your graphics drivers, but it’s crucial to choose the right method depending on your graphics card type and installed operating system.
One of the most popular methods is using the manufacturer’s update utility, such as Nvidia Ge-force Experience or AMD Catalyst Control Center, which automatically identifies and updates your graphics driver with the latest version. Another option is to manually download and install drivers from the manufacturer’s website, which requires some technical know-how. Regardless of the method you choose, updating your graphics drivers can improve performance, enhance graphic quality and prevent technical issues.
Final Steps
If you are still experiencing the VGA red light on your motherboard, there are a few final steps you can take to resolve the issue. First, make sure that all of your cables are properly connected to both your graphics card and your motherboard. Check for any loose connections or debris that may be obstructing the ports.
Next, try removing your graphics card and then reinserting it, ensuring that it is securely in place. You can also try updating your graphics card drivers to the latest version, as this may help to resolve any compatibility issues between your GPU and your motherboard. If these steps do not work, you may need to consult with a technical specialist to further troubleshoot your system and diagnose the issue.
By following these steps, you can ensure that your VGA red light is resolved and that you can get back to gaming or working on your computer without any interruptions.
Replacing Graphics Card
If you have followed all the previous steps successfully, you are now ready to install the new graphics card. Begin by inserting the card into the appropriate slot on the motherboard, normally the largest PCIe slot available. Make sure that the card snaps securely into place.
Next, connect the power supply cables to the graphics card. Many graphics cards require additional power beyond what the motherboard can provide, so be sure to check the manufacturer’s specifications and connect the appropriate cables. Once you have completed these steps, replace your computer’s case cover and reconnect any cables you may have removed.
Turn on your computer and check that you see the new graphics card recognized in the device manager. If everything is working correctly, you are now ready to enjoy enhanced gaming, video editing, and graphics performance. Congratulations!
Consulting a Professional
If you’re feeling overwhelmed or unsure about the situation you’re facing, it’s always a good idea to seek professional advice. Consulting with a professional can help you make informed decisions and ensure you’re taking the right steps. Whether you’re dealing with a legal issue, financial concern, or a personal matter, there are experts available who can offer guidance and support.
They can help you understand the complexities of your situation and provide you with the knowledge necessary to move forward confidently. Don’t hesitate to reach out for help – it’s okay to ask for guidance when you need it. Remember, a little support can go a long way.
Conclusion
Although the VGA red light on your motherboard can be alarming, it is most often a fixable issue. First, ensure the graphics card is properly seated and connected. Next, check for any damage or loose components and replace them if necessary.
If the problem persists, consider updating your graphics card drivers or even upgrading your card altogether. With a little troubleshooting and attention to detail, you’ll be back up and running in no time. Just remember, a red light doesn’t always mean game over!”
FAQs
What does a red VGA light on a motherboard indicate?
A red VGA light on a motherboard usually indicates that there is an issue with the graphics card or its connection.
How do I fix a red VGA light on a motherboard?
First, ensure that the graphics card is properly connected and seated in the PCIe slot. You may also try updating the graphics card drivers or resetting the CMOS battery.
Can a faulty power supply cause a red VGA light on a motherboard?
Yes, a faulty power supply can cause issues with the graphics card and result in a red VGA light on the motherboard. Check the power supply and its connections to ensure it is functioning properly.
Is a red VGA light on a motherboard always related to the graphics card?
Not necessarily. It could also indicate a problem with the monitor, the motherboard, or other components. It is important to troubleshoot the issue and rule out all other potential causes before determining that it is solely related to the graphics card.