
Does your MSI motherboard seem to be lacking in performance? Are you looking to enhance it in a cost-effective and straightforward way? Look no further than enabling XMP on your MSI motherboard! This simple solution can make a world of difference in the speed and responsiveness of your computer. XMP, or Xtreme Memory Profile, is an Intel technology that enables faster and more efficient RAM performance. By activating XMP, your MSI motherboard can recognize the full potential of your RAM, maximizing its output, and providing a noticeable increase in speed.
In this article, we will guide you through the simple process of enabling XMP on your MSI motherboard, so you can get the most out of your computer.
Introduction
If you’re looking to enhance your computer’s performance, enabling XMP (Extreme Memory Profile) on your MSI motherboard can make a significant difference. XMP allows your RAM to run at higher frequencies than the default settings, resulting in faster processing speeds and smoother operation. To enable XMP, first, enter your computer’s BIOS and navigate to the memory settings.
Look for an option called “XMP,” “DOCP,” or “EOCP,” depending on your motherboard model. Once you’ve located this setting, select the profile that matches your RAM’s specifications, save your changes, and reboot your computer. Keep in mind that enabling XMP can cause fluctuations in system stability, so be sure to stress-test your system and monitor your temperatures after applying the changes.
With proper adjustments, you can unleash the full potential of your computer’s memory and take your performance to the next level.
What is XMP?
XMP, or Extensible Metadata Platform, is a file format that allows for the storage of metadata in digital files. Metadata is information about the file, such as the author, date created, and file size. XMP was first introduced by Adobe in 2001 and has since become a standard for attaching metadata to files in various formats, including images, videos, and PDFs.
XMP enables the sorting and searching of digital files by providing detailed information about the content within them. By using XMP, users can easily find specific files based on their metadata, and they can also edit the metadata if necessary. XMP’s flexibility and compatibility make it an essential tool for photographers, filmmakers, and graphic designers who rely on accurate and organized metadata to manage their digital assets.
Why enable XMP on MSI Motherboard?
If you’re an avid PC gamer, you know the agony of facing lags and reduced performance during gameplay. The slightest delay or inconsistency could potentially ruin the experience, making it frustrating for you. But have you ever wondered if there’s a way to optimize your gaming experience, and get the most out of your motherboard? The solution to your problem may be enabling XMP on your MSI motherboard.
XMP, short for Extreme Memory Profile, is a technology that allows you to optimize your RAM performance, which can give you faster load times, better frame rates, and overall smoother gameplay. By enabling XMP, you can unleash your system’s full potential, and take your gaming experience to the next level.
Checking compatibility
If you want to get the most out of your MSI motherboard and your RAM modules, enabling XMP (short for Extreme Memory Profile) is the way to go. XMP allows for the automatic optimization of your memory’s speed and timings, which can significantly boost your system’s performance. But before you dive in and start tinkering with your BIOS settings, you should first make sure that your RAM and motherboard are compatible with each other.
You can check this by consulting the manual of your MSI motherboard and looking for the QVL (Qualified Vendor List) section. Here, you’ll find a list of RAM modules that have been tested and certified to work with your motherboard. Simply choose one of the modules from the list, install it on your system, and then proceed with enabling XMP on your BIOS.
With the right combination of RAM and motherboard, you can enjoy faster boot times, smoother multitasking, and improved gaming performance.
Compatibility checker tool
Are you tired of downloading software or apps only to find out later that they’re not compatible with your device? Well, fret no more! Compatibility checker tools are here to save the day. With these tools, you can easily check if the software or app you want to install is compatible with your device or not. These compatibility checker tools are very easy to use and can save you a lot of time and frustration.
They analyze your device specifications and compare them against the software requirements, giving you a simple yes or no answer on whether or not the software will work. So, before you waste your time downloading software that won’t work, give a compatibility checker tool a try. It’s a simple and effective solution to a common tech problem.
Manual compatibility check
When it comes to setting up or upgrading your computer hardware, manual compatibility checks are essential. This process involves ensuring that every component in your computer system is compatible with each other before installation. This step is crucial to avoid any potential damage and decrease the performance of your computer.
Compatibility issues can result in various problems like system crashes, blue screen errors, and so on. By conducting a manual compatibility check, you can prevent these issues and save yourself from the headache and cost of repairing or replacing hardware components. Additionally, a manual check can help you ensure that you are getting the most out of your new hardware.
It is always better to do things right the first time, so make sure you perform a manual compatibility check before any installation. It’s better safe than sorry!
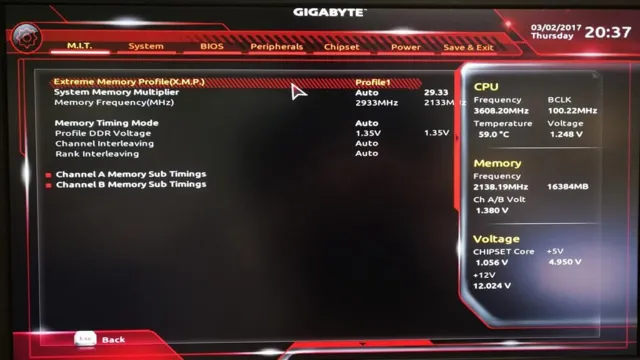
Enabling XMP on MSI Motherboard
Enabling XMP on an MSI motherboard is essential if you want to unlock the full potential of your RAM. XMP, or Extreme Memory Profile, is a manufacturer-designed profile that maximizes the speed and performance of your memory modules. To enable XMP on your MSI motherboard, you need to enter the BIOS settings by pressing the designated key during boot up.
Once in the BIOS, locate the Memory section and select the XMP profile that matches your RAM’s speed and timings. Save the changes and exit the BIOS. Your system will now be optimized to take advantage of the faster memory speeds.
Make sure to verify the changes have been applied by checking your system information in Windows. Enabling XMP is a straightforward process that can provide you with significant performance gains without spending any extra money. So, if you have an MSI motherboard, don’t hesitate to take advantage of XMP.
Step-by-step guide
Are you looking to optimize your MSI motherboard’s performance by enabling XMP? Look no further! Here’s a step-by-step guide to help you achieve just that. First, access your BIOS by pressing the “Delete” key during boot-up. Once you’ve entered the BIOS, navigate to the “OC” tab and select “A-XMP.
” Next, choose the appropriate XMP profile that corresponds to your RAM’s speed. Keep in mind that some profiles may require manual tweaking, so pay close attention to the voltage and frequency settings. Once you’ve selected the profile, save your changes and exit the BIOS.
Upon reboot, your motherboard should recognize the new RAM settings. It’s that simple! Just a few clicks in the BIOS and you’re on your way to improved performance. By enabling XMP, you’ll unlock your RAM’s full potential and experience faster load times and smoother multi-tasking.
So go ahead and give it a try!
Common error and how to fix them
When it comes to maximizing your computer’s performance, enabling XMP in your MSI motherboard can make a big difference. But sometimes, getting XMP to work properly can be a bit tricky. One common error is when the XMP profile doesn’t apply correctly, resulting in a slower memory speed than what you expected.
To fix this, you should first make sure that your BIOS is up-to-date with the latest firmware. Then, try manually adjusting the memory timings and voltage settings to match the XMP profile. Also, check that your CPU and motherboard are compatible with the memory you’re using.
By following these steps, you should be able to get XMP working on your MSI motherboard and enjoy faster memory performance. So, if you’re looking to optimize your computer’s performance, enabling XMP could be the way to go.
Conclusion
Congratulations! You now know the secret code to unlocking your computer’s full potential – XMP! By enabling XMP on your MSI motherboard, you can boost your gaming performance, speed up your workflow, and unlock new levels of productivity. Just remember to follow the simple steps we’ve outlined and enjoy the sweet, sweet fruits of your labor. Happy gaming, working, or whatever else you use your computer for – go forth and conquer!”
Importance of enabling XMP on MSI Motherboard
Enabling XMP on MSI Motherboard can provide several benefits, particularly for those who rely on their computer’s performance. XMP or Extreme Memory Profile, is a technology developed by Intel that allows memory modules to automatically configure their clock speed, timings, and voltage settings. By enabling XMP on your MSI motherboard, you can unlock the full potential of your memory modules, allowing for faster data processing and smoother multitasking.
This is achieved because XMP can optimize your memory’s timings, so it performs well with your processor. You can easily enable XMP by accessing your BIOS settings and selecting the option for XMP. This simple tweak can significantly improve your computer’s overall performance, making it an essential step for avid gamers, content creators, and anyone who requires a high-performance computer.
Final thoughts and recommendations
Enabling XMP on MSI Motherboard Enabling XMP (Extreme Memory Profile) on your MSI motherboard can greatly enhance your system’s memory performance. By allowing your system to utilize the full potential of your memory modules, you can experience faster load times, smoother multitasking, and overall improved system performance. To enable XMP, you should first enter your BIOS settings, which can usually be accessed by pressing a specific key during bootup.
Once in the BIOS, navigate to the memory settings and locate the XMP option. Select XMP and choose the profile that corresponds to your memory modules. It’s important to note that enabling XMP may result in increased power consumption and higher temperatures, so ensure that your system is properly cooled and that your power supply can handle the increased demand before enabling XMP.
In conclusion, enabling XMP on your MSI motherboard can be a simple yet effective way to optimize your system’s memory performance and enhance your overall computing experience. Just be sure to proceed with caution and keep an eye on your system’s power and temperature levels.
FAQs
What is XMP profile and its importance in MSI motherboards?
XMP (Extreme Memory Profiles) is a technology developed by Intel that allows users to overclock their RAM for better performance. Enabling XMP profiles on MSI motherboards can result in faster processing speeds and improved system stability.
Can all MSI motherboards support XMP profiles?
No, not all MSI motherboards support XMP profiles. Only MSI motherboards with certain chipsets, such as Z-series, can support XMP profiles.
How do I enable XMP profiles on an MSI motherboard?
To enable XMP profiles on an MSI motherboard, go to the BIOS settings and navigate to the memory settings. Look for the XMP option and select the profile you want to use. Save the settings and restart your computer for the changes to take effect.
What precautions should I take before enabling XMP profiles on my MSI motherboard?
Before enabling XMP profiles on your MSI motherboard, make sure that your RAM is compatible with the XMP settings. Also, ensure that your motherboard’s BIOS and drivers are up to date to prevent any potential conflicts or issues. It is always advisable to take a backup of your system before making changes to the BIOS settings.