Do you have an ASUS motherboard and are wondering how to enable XMP? Well, you’ve come to the right place. XMP (Extreme Memory Profile) is a feature that allows your computer to run memory modules at their maximum performance levels. Enabling XMP on your ASUS motherboard can boost your system’s speed and improve overall performance.
But getting it done may seem like a daunting task, especially if you’re not a tech-savvy person. Fret not, as we’ve got you covered with this comprehensive guide on how to enable XMP on your ASUS motherboard. So sit back, relax, and let’s get started on unlocking the full potential of your system’s memory modules!
Check BIOS Version
If you’re looking into overclocking your ASUS motherboard, one important step is to check your BIOS version. This can help ensure that you have the necessary updates to enable XMP (eXtreme Memory Profile) for your RAM. To check your BIOS version, you can either check the manual that came with your motherboard or access the BIOS menu during startup.
Once in the BIOS menu, look for the “System Information” or “Main” tab, which should display your current BIOS version. If your BIOS version is outdated, you can download the latest version from the ASUS support website and update it using a USB drive. Updating your BIOS version can provide performance improvements and enable features like XMP to ensure that your RAM is running at its optimal speed.
Access BIOS Settings
Access BIOS Settings When it comes to checking BIOS version, accessing BIOS settings is the first step. BIOS or Basic Input/Output System is a firmware that initializes hardware and software components during system boot-up. The BIOS version represents an important piece of information that can provide useful data for troubleshooting or upgrading purposes.
To access BIOS settings, you need to restart your computer and press the BIOS key during startup. The BIOS key varies depending on your computer manufacturer and model. For instance, on an HP computer, you may need to press F10, while on a Dell computer, you may need to press F
Once you enter BIOS settings, you should be able to find the BIOS version by looking under the System Information or Main Menu tab. By verifying your BIOS version, you can determine if you need to update it or if it is compatible with certain hardware or software upgrades.
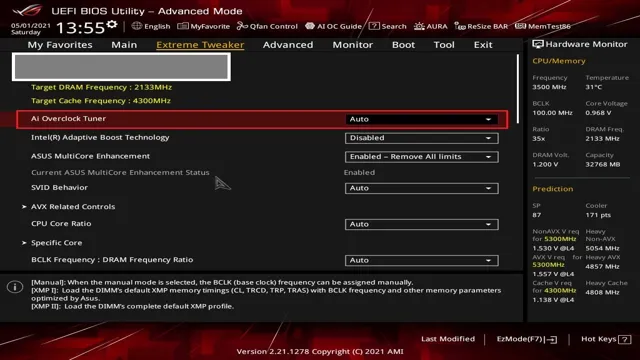
Locate XMP Profile Settings
When looking to optimize your computer’s performance, it’s important to consider the XMP profile settings of your BIOS. First, it’s crucial to check your BIOS version, as not all versions support XMP. You can typically find this information by restarting your computer and looking for a prompt to enter the BIOS setup utility – this can vary depending on your computer’s manufacturer, so it’s best to consult the manual.
Once you’ve entered the BIOS setup utility, look for the XMP profile settings – this may be located in a submenu or under advanced settings. Enabling XMP can help improve your computer’s memory performance, allowing for faster and more efficient data processing. With a few simple steps, you can ensure that your XMP profile settings are optimized and helping your computer perform at its best.
Enabling XMP Profile
If you’re working on a high-performance ASUS motherboard and looking to enhance its speed and performance, enabling XMP profiles can do the trick. XMP, or Extreme Memory Profiles, is a feature that facilitates automatic overclocking of your RAM and CPU for efficient and faster functioning. To enable the XMP profile, you begin by accessing your BIOS, then navigate through the memory tab to locate the XMP option.
Select the profile you would like to enable, and save changes before exiting your BIOS. However, it is imperative to note that overclocking exposes your CPU and RAM to more heat, which could cause damage over time if not adequately addressed. To avoid powering the RAM beyond its maximum limit, ensure that the XMP settings align with the RAM specifications before enabling.
By enabling the XMP profile and implementing the proper adjustments, you could enjoy faster computing and optimal performance.
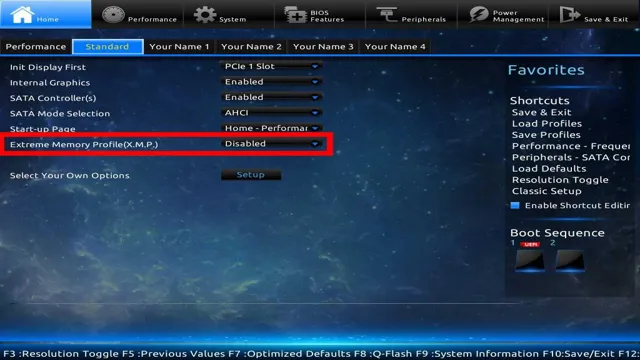
Select XMP Profile and Save Changes
Enabling the XMP profile on your computer can significantly boost its performance. XMP, or Extreme Memory Profile, is a technology that allows your computer’s RAM modules to run at their maximum advertised speeds. By default, RAM modules only run at a standardized, slower speed, but enabling XMP can unlock the full potential of your RAM, allowing your computer to perform faster.
To enable the XMP profile, you’ll need to enter your computer’s BIOS settings and select the appropriate profile. XMP profiles are designed specifically for different RAM modules, so make sure you select the profile that matches your RAM module. Once you’ve selected the profile, save the changes and restart your computer.
Your computer should now be running at its optimal performance level. So, if you’re looking to improve your computer’s overall speed and performance, enabling the XMP profile is definitely worth considering.
Verify XMP Profile Settings
Enabling XMP Profile is essential to getting the most out of your computer’s RAM speed. XMP or eXtreme Memory Profile is a feature that allows you to overclock your memory, which increases its speed and bandwidth. To enable XMP Profile, you need to access the BIOS settings on your computer’s motherboard.
Once you are on the BIOS settings page, look for the XMP option, and click on enable. This will enable your RAM to operate at its full potential, which means faster load times, smoother multitasking, and better performance overall. Enabling XMP Profile is a straightforward process, but it can have a significant impact on your computer’s performance.
So, if you want to get the most out of your RAM, it’s time to enable XMP Profile today.
Performance Boost and Stability
If you’re looking to boost the performance and stability of your Asus motherboard, you should consider enabling XMP. XMP (eXtreme Memory Profile) is a feature that allows your motherboard to automatically detect and configure your system’s memory settings to achieve maximum performance. To enable XMP on your Asus motherboard, you’ll need to enter the BIOS setup and find the XMP option.
Once located, simply select the XMP profile you want to use and save your changes. Your system should now run faster and more stable than ever before. Enabling XMP is a great way to get the most out of your computer’s memory and ensure optimal performance and stability.
Benefits of Enabling XMP Profile
Enabling XMP profile provides many benefits, including a boost in performance and stability. XMP, or eXtreme Memory Profile, is a technology built into modern computer memory that allows for faster memory speeds and improved stability. By enabling XMP profile in your computer’s BIOS, you can unlock the full potential of your memory, resulting in faster processing speeds and improved overall system responsiveness.
Additionally, enabling XMP profile can help reduce system crashes and other stability issues that can arise when memory is not properly configured. So if you’re looking for a simple way to improve your computer’s performance and stability, enabling XMP profile is definitely worth considering.
Test System Stability
To achieve maximum performance from your system, it’s important to test and optimize its stability. A stable system ensures long-term use without experiencing crashes or system failures. There are a few tests you can carry out to check the stability of your system, such as Prime95, FurMark, and OCCT.
These software programs assess the performance of overclocked components, CPU, and GPU, to test if they remain stable under load. If any hardware component fails these tests, it may be a sign that your system is not stable and could lead to crashes or system failures. Therefore, testing the stability of your system is crucial to ensure that it’s running at optimal performance while avoiding overheating or hardware failures that could lead to data loss or system crashes.
Don’t ignore the importance of system stability, it is the foundation for performance optimization.
Conclusion
Enabling XMP on your ASUS motherboard is like unleashing the true potential of your computer, just like putting the pedal to the metal in a sports car. It’s a quick and easy process that can make a noticeable difference in the speed and performance of your system. So, don’t wait any longer, follow the steps and watch your computer go from zero to hero! Happy computing!”
FAQs
What is XMP and why is it important for my ASUS motherboard?
XMP (eXtreme Memory Profile) is a feature that allows your memory modules to run at their highest rated speeds and timings. This is important for ensuring optimal performance and stability in your computer system.
How do I enable XMP on my ASUS motherboard?
To enable XMP on your ASUS motherboard, you will need to go into your BIOS settings and find the XMP profile option. This is typically located under the memory settings section. Once you have found this option, simply enable it and save your changes.
What should I do if my system becomes unstable after enabling XMP?
If your system becomes unstable after enabling XMP, there are a few things you can try. First, try lowering the memory speed or timings to a more stable setting. You can also try increasing the voltage to your memory modules slightly. If all else fails, you may need to disable XMP and stick with default memory settings.
Is XMP only compatible with certain types of memory?
XMP is typically designed for high-performance memory modules, such as those with higher clock speeds and lower latencies. However, not all memory modules will support XMP, so you will need to check your memory manufacturer’s specifications to see if your particular modules are XMP compatible.