If you’re looking to improve the security of your computer, you may want to consider enabling TPM 0 on your Gigabyte motherboard. TPM (Trusted Platform Module) is a microchip that provides a secure environment for cryptographic processes, such as encryption and decryption.
Enabling TPM 0 allows for a more secure boot process and helps protect sensitive data from unauthorized access. In this blog post, we’ll walk you through the steps to enable TPM
0 on your Gigabyte motherboard, so you can enjoy enhanced security and peace of mind. So, let’s dive in!
Check your BIOS Version
If you’re looking to enable TPM 0 on your Gigabyte motherboard, the first step is to check your BIOS version. To do this, you’ll need to restart your computer and press the appropriate key (usually F2 or DEL) as it begins to boot up to access the BIOS settings.
Once you’re in the BIOS, navigate to the “Main” or “Advanced” tab to find your BIOS version. If you find that your BIOS is outdated, you’ll need to update it before you can proceed with enabling TPM 0.
Updating your BIOS can be a bit tricky, so be sure to carefully follow the manufacturer’s instructions to avoid damaging your hardware. Once your BIOS is up to date, you should be able to enable TPM 0 and take advantage of its security features.
Don’t forget to double-check that your motherboard supports TPM 0 before diving into this process!
Enter BIOS Setup
Entering the BIOS setup is crucial for many reasons, including checking your BIOS version. The BIOS, short for Basic Input Output System, is a firmware that starts your computer and passes control to the operating system. To enter the BIOS, you have to press a specific key during startup, depending on your computer’s manufacturer and model.
Common keys include F2, F10, Del, and Esc. Once you are in the BIOS setup, look for the system information screen or the main menu, where you can find your BIOS version. It’s important to keep your BIOS up-to-date, as new versions can fix bugs, enhance performance, or add new features.
However, updating your BIOS can be tricky and risky, as any mistake can render your system unusable. Therefore, always read the release notes carefully, follow the instructions precisely, and backup your data before proceeding. By checking your BIOS version and updating it if necessary, you can ensure that your computer runs smoothly and securely.
Navigate to the Security Settings
When it comes to checking your BIOS version, navigating to the security settings is the first step. This can be done by accessing your computer’s BIOS menu, which is typically done by pressing a specific key during startup (usually F2 or Del). Once you’re in the BIOS menu, look for the option that says “Security” or “Security Settings” and select it.
From there, you should be able to find your current BIOS version. It’s important to keep your BIOS up to date, as new updates can fix security vulnerabilities and bugs, as well as improve system performance. So, make sure to check your version periodically and update as needed.
By doing so, you’ll help protect your computer and ensure it’s running smoothly.
Enable TPM 2.0
If you are looking to enable TPM 0 on your Gigabyte motherboard, you have come to the right place. TPM, or Trusted Platform Module, is a hardware security chip that provides an extra layer of security to your device.
Enabling TPM 0 involves going into the BIOS settings of your motherboard, and enabling the feature. First, you need to restart your computer and enter the BIOS menu.
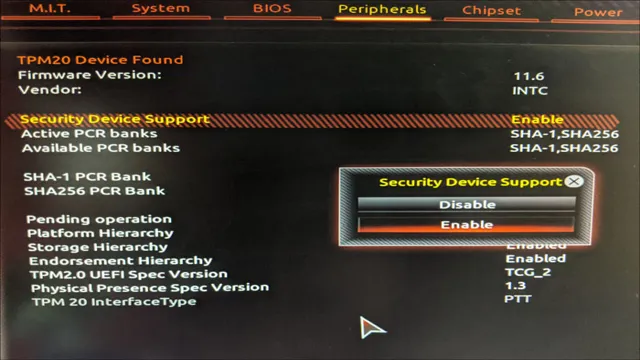
Once there, look for the option that says “Security” or “Advanced Security” and find the setting for TPM. It may also be labeled as “TPM Configuration” or something similar. Finally, enable TPM
0 and save the changes. Keep in mind that the exact steps may vary depending on your specific motherboard, so it’s best to consult your manual or seek assistance from an expert if you encounter any issues. With TPM
0 enabled, you can enjoy added security and peace of mind when using your device.
Find the TPM Setting
If you’re planning to secure your PC’s data with TPM (Trusted Platform Module), you’ll first need to enable it. To do this, head over to your computer’s BIOS settings and locate the TPM option. Usually, the setting is under the Security or Advanced tab.
Once you have found it, make sure to enable TPM 0, which is the latest version of the technology. TPM
0 offers better security measures compared to its predecessors, thus making it an ideal option for safeguarding your system from cyber threats. Be sure to save your settings before exiting the BIOS screen. After successfully enabling TPM, you can proceed with configuring it further by setting up disk encryption or other security features.
With TPM enabled, you can enjoy peace of mind knowing that your data is secure, even in the event of a theft or unauthorized access.
Enable the TPM Setting
If you want to secure your computer from potential threats, enabling the Trusted Platform Module (TPM) setting should be on your to-do list. TPM 0, also known as the hardware-based security feature, adds an extra layer of protection to your computer by keeping your data encrypted.
Enabling TPM 0 requires some steps, and it is better to make sure your computer supports it first before continuing with it. Once you ensure that your computer has TPM enabled, you can go to your device’s BIOS setting, go to the security or advanced tab, and enable TPM.
Enabling TPM might vary from device to device, but it is usually an easy and straightforward process. Remember that TPM is not a one-time solution; you will need to keep updating it to ensure your computer’s security. Therefore, it is best to check the updates periodically and make necessary changes to keep your data safe.
By enabling the TPM 0, you can have peace of mind knowing that you have taken a necessary step towards data protection.
Save and Exit BIOS
To enable TPM 0 on your computer, you need to access the BIOS settings. After restarting your computer, press the appropriate key (usually F2 or Del) to enter the BIOS.
Look for the Security or Advanced tab and select the TPM option. Check if TPM is enabled and if not, change the value to enable it. Once you’ve made the necessary changes, save and exit the BIOS.
Your computer should now support TPM 0, which offers improved security features such as secure boot and device encryption. By enabling TPM, you can help protect your sensitive data and prevent unauthorized access to your computer.
So, take the time to secure your system and enable TPM 0 today!
Ensure TPM is Initialized and Functional
If you’ve purchased a new Gigabyte motherboard, you may be wondering how to enable TPM 0 for added security. First things first, you’ll want to ensure that your TPM is both initialized and functional.
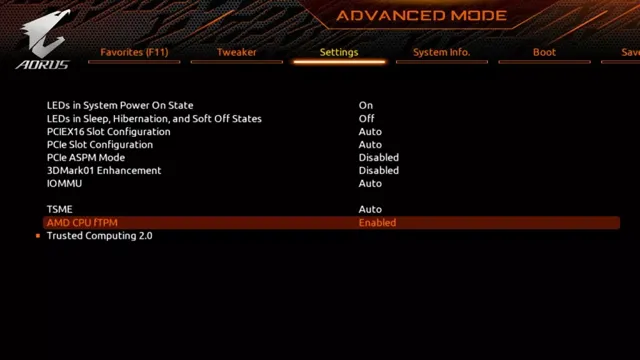
To do this, you can follow a few simple steps. First, access your motherboard’s BIOS settings by pressing the delete key during startup. From there, navigate to the Advanced tab and then to the Trusted Computing menu.
Here, you should see an option to Enable TPM. Select this option and then save your changes before exiting the BIOS. Once you’ve done this, you’ll want to verify that your TPM is working properly.
This can be done by running the TPM Management Console in Windows. If everything is working as it should, you’ll be good to go with enhanced security for your system.
Check the TPM Status in Windows
If you want to ensure the security of your Windows computer, it’s essential to check the Trusted Platform Module (TPM) status. TPM is a hardware-based security feature that helps protect your system against malware, unauthorized access, and other threats. To check if your computer has enabled TPM, you can access the TPM management console by following these steps: Press Win + R to open the Run dialog box.
Type tpm.msc and hit enter. The TPM management console will now open.
Here, you can check if TPM is activated or not. If it’s not activated, you may need to enable it in your computer’s BIOS settings. Remember that TPM should always be enabled and running for maximum security.
Initialize the TPM Chip if Required
TPM chip. When it comes to securing data, an organization can take several measures, including the use of a trusted platform module (TPM) chip. A TPM chip is a hardware component that stores confidential information such as encryption keys and passwords.
To ensure that the TPM chip is working correctly, it must be initialized. Initialization often involves updating firmware or software, which can be more complex depending on the platform being used. Most PCs already come with functional TPM chips, but if an organization needs to install one, it is essential to check whether the device supports the TPM chip.
In some cases, manufacturers disable the TPM chip by default, so it is important to check that the chip is enabled before running initialization. TPM initialization is not only a necessary step, but one that can prevent serious data breaches. By initializing TPM, an organization can ensure that data encryption keys are secure and minimize the risk of unauthorized access to sensitive information.
Conclusion
Congratulations! You’ve successfully navigated the murky waters of enabling TPM 0 on your Gigabyte motherboard. With the proper security measures in place, you can rest easy knowing that your data is safe and sound.
And who knows, maybe you’ll even impress your tech-savvy friends with your newfound knowledge. Now go forth and conquer the digital world, one secure step at a time.”
FAQs
What is TPM 2.0 and why is it important?
TPM 2.0 (Trusted Platform Module) is a security feature that provides hardware-based security for your PC. Enabling TPM 2.0 on your Gigabyte motherboard helps ensure that your PC is protected from unauthorized access, and helps secure your data and online activities.
How do I enable TPM 2.0 on my Gigabyte motherboard?
To enable TPM 2.0 on your Gigabyte motherboard, you will need to enter the BIOS settings and enable the security feature. The exact steps will vary depending on your specific motherboard model, but you can typically access the BIOS by pressing a key (such as F2 or Del) during the boot process. From there, navigate to the security settings and enable TPM 2.0.
What are the system requirements for using TPM 2.0 on a Gigabyte motherboard?
To use TPM 2.0 on a Gigabyte motherboard, your system must meet the hardware and software requirements. This includes having a compatible motherboard with a TPM connector header, a compatible TPM module, and a supported operating system (such as Windows 10 or later).
What are some benefits of using TPM 2.0 on a Gigabyte motherboard?
Enabling TPM 2.0 on your Gigabyte motherboard provides several benefits, including improved hardware-level security, enhanced protection for your data and online activities, and support for advanced security features such as Windows Hello and BitLocker. Additionally, using TPM 2.0 can help ensure that your system is compliant with security standards and regulations.