Are you looking to secure your MSI motherboard? The secure boot feature is crucial in guarding your PC against malicious software. This security measure checks the validity of firmware and hardware during the startup process. However, enabling the secure boot feature on your MSI motherboard could be challenging, especially if you’re not tech-savvy.
This blog will guide you through the process and ensure that your system is well-protected from any potential threat. So, stay tuned to learn how to enable the secure boot feature on your MSI motherboard and keep your data safely guarded.
Step 1: Access the BIOS Setup Utility
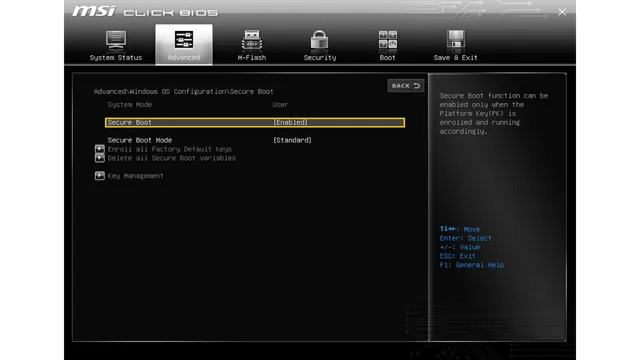
Enabling secure boot on an MSI motherboard is a straightforward process that involves accessing the BIOS Setup Utility. Once you power on your computer, press the DEL key repeatedly to enter the BIOS Setup Utility. Next, navigate to the Security tab using the arrow keys, and select the Secure Boot option.
After selecting Secure Boot, you can then enable it by selecting Enabled from the dropdown menu. Some MSI motherboards may require you to select a boot mode either UEFI or Legacy+UEFI before being able to enable Secure Boot. Note that Secure Boot is designed to restrict unauthorized operating systems and hardware from booting, which is an essential security feature nowadays.
By enabling Secure Boot on your MSI motherboard, you can protect your computer from malicious software and unauthorized access, which ensures that your data is secure.
Boot the PC and Press the BIOS Key
When it comes to accessing the BIOS setup utility on your computer, the first step is to boot up your machine while pressing the BIOS key. This key will depend on your computer’s manufacturer and model, but most commonly it is the Delete, F2, or F10 key. Once you press this key, you will be taken to the BIOS setup utility, which is a program that lets you configure various settings of your computer’s hardware.
From here, you can make changes to your computer’s boot order, enable or disable certain hardware components, and check system information like CPU temperature and fan speed. It’s important to be careful when making changes in the BIOS setup utility, as incorrect settings can cause your computer to malfunction or fail to boot. But with a bit of knowledge and caution, accessing and using the BIOS setup utility can be a powerful tool for tweaking your computer’s performance to suit your needs.
Select [Settings] or [Advanced BIOS Features]
When it comes to accessing the BIOS Setup Utility, there are a few different routes you can take depending on your specific computer model. One common way is to select either the [Settings] or [Advanced BIOS Features] option in the initial startup menu. Once you’ve made your selection, you’ll be taken to the BIOS screen where you can customize your computer’s settings to your preferences.
Keep in mind that accessing the BIOS can be a bit daunting for those who are not tech-savvy, but with some practice and patience, you’ll be able to navigate it with ease. One helpful tip is to utilize the search function within the BIOS to quickly find the settings you’re looking to adjust. Overall, accessing the BIOS is an essential step for anyone looking to optimize their computer’s performance, so be sure to take the time to familiarize yourself with it.
Step 2: Enabling Secure Boot
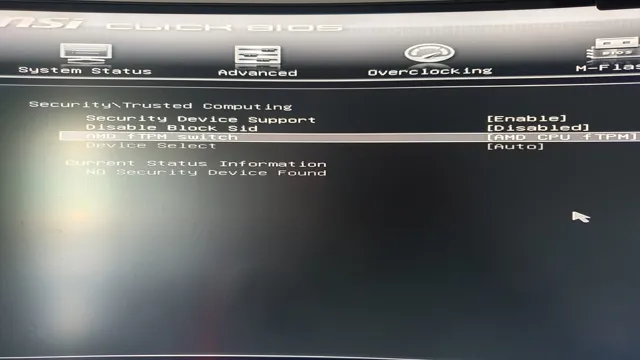
Enabling secure boot on MSI motherboards is a crucial step in ensuring that your system is protected against unauthorized access and malware. To enable secure boot, you will first need to access the BIOS settings by pressing the DEL or F2 key during startup. Once in the BIOS, locate the Secure Boot option under the Security tab and set it to Enabled.
You may also need to enable the UEFI Boot option and disable Legacy Boot if they are not already configured that way. Secure boot uses digital signatures to ensure that only trusted operating systems and software can run on your system, adding an extra layer of security to your computer. With secure boot enabled, you can rest easy knowing that your system is protected from malicious code and unauthorized changes to your startup process.
Select [Boot] or [Security] Tab
When it comes to enabling Secure Boot on your computer, the second step involves selecting either the [Boot] or [Security] tab in the BIOS settings. This step is crucial for ensuring that your computer is protected from unauthorized access by malicious software or potential hackers. Once you select the appropriate tab, look for an option to enable Secure Boot and turn it on.
This will prevent the computer from running any unsigned or unauthorized operating systems or bootloaders. By doing so, it provides an added layer of security to your system and ensures that your data and other sensitive information are protected. So, if you want to ensure the security of your computer, don’t forget to enable Secure Boot by following these simple steps in the BIOS settings.
Enable Secure Boot Option
When it comes to protecting your computer against potential attacks, enabling the Secure Boot option is an essential step to take. The Secure Boot option ensures that only trusted software can run on your computer during the boot-up process. This helps to prevent malicious software from infecting your device and maintains the integrity of your system.
To enable the Secure Boot option, you’ll need to access your computer’s BIOS settings and locate the Secure Boot option. Some systems may require you to first disable the Legacy Boot option before enabling Secure Boot. Once you’ve located the option, simply enable it and save your changes before exiting the BIOS settings.
Keep in mind that not all systems support Secure Boot, so it’s essential to check your device’s documentation to ensure you can take advantage of this essential security feature and keep your computer protected from potential security threats.
Step 3: Save and Exit BIOS Setup Utility
Enabling Secure Boot on MSI motherboards is a simple task that can be done in the BIOS Setup Utility. First, you need to enter the BIOS by pressing the corresponding key during startup. Once you are in the BIOS, you should navigate to the “Security” tab, where you will find the option to enable Secure Boot.
This option is usually located under the “Boot Options” section. After enabling Secure Boot, make sure to save your changes and exit the BIOS Setup Utility. This will ensure that your MSI motherboard is now running in Secure Boot mode, which provides an extra layer of protection against unauthorized access and malware.
So, if you are looking to improve the security of your MSI motherboard, enabling Secure Boot is definitely worth considering.
Press F10 Key to Save Changes and Exit
After making changes to the BIOS settings, you need to save and exit the BIOS setup utility. To do this, you need to press the F10 key on your keyboard. This will bring up a dialog box asking you to confirm the changes you made and save them to the BIOS.
Once you’ve confirmed the changes, you can exit the BIOS setup utility by pressing the F10 key again. This is an important step because it ensures that your changes are stored in the BIOS and will be used the next time you boot up your computer. It’s important to note that if you don’t save your changes before exiting the BIOS setup utility, your changes won’t be applied, and your computer will revert back to its original settings.
So, be sure to press the F10 key to save your changes and exit the BIOS setup utility properly.
Conclusion: Verify Secure Boot Status
Congratulations, you’ve successfully enabled secure boot on your MSI motherboard! You’ve taken a small step towards securing your system and keeping hackers at bay. Just like locking your front door, enabling secure boot can help keep the bad guys out and keep your data safe. So go ahead, pat yourself on the back, and enjoy your newfound peace of mind.
Your computer and your security will thank you!”
Boot into Windows and Check Secure Boot Status
As you’ve made changes in the BIOS Setup Utility to disable Secure Boot, it’s important to Save and Exit to make sure your computer boot into Windows. Without this step, your modifications might not take effect, and you will not be able to determine if Secure Boot is disabled or not. To save and exit, you can find the instructions on the screen or refer to your user manual for the exact variant of your BIOS.
Once you have located the options, ensure to save the changes before exiting the utility. Now that you have saved settings and exited the BIOS Setup Utility, it’s time to check whether Secure Boot is disabled or not next time you boot into Windows.
FAQs
What is Secure Boot and why is it important?
Secure Boot is a feature that helps prevent unauthorized operating systems and malware from loading during the boot process. It’s important because it helps ensure the integrity and security of your system.
How do I know if my MSI motherboard supports Secure Boot?
Most modern MSI motherboards have support for Secure Boot. You can check the motherboard’s specifications on the MSI website or in the user manual to confirm.
How do I enable Secure Boot on my MSI motherboard?
To enable Secure Boot on an MSI motherboard, access the BIOS settings by pressing the DEL key during boot. Navigate to the Secure Boot settings and enable it. You may need to also enable UEFI mode and disable legacy boot options.
What should I do if I encounter issues with Secure Boot on my MSI motherboard?
If you encounter issues with Secure Boot on your MSI motherboard, make sure that your system is running the latest BIOS firmware. Additionally, you can try disabling other security features or adjusting the boot order of your devices to resolve issues. If all else fails, contact MSI support for further assistance.