
If you’re an avid PC user, you know how important security is for your system. Enabling Secure Boot on your Gigabyte motherboard is a crucial step in ensuring your motherboard’s firmware is secure from unauthorized firmware access. This feature helps prevent malicious software from running at boot time and secures your system from rootkits.
Switching on Secure Boot assures your computer’s safety is the top priority, but how can you enable it? In this article, we will guide you through the process of enabling Secure Boot on your Gigabyte motherboard and explain its importance. So let’s dive in!
Why Enable Secure Boot?
If you’re wondering how to enable Secure Boot on your Gigabyte motherboard, there are several reasons why you should do so. First and foremost, Secure Boot ensures that your system only boots up with trusted software and prevents any malicious code from running. This is especially important for those who frequently download software or visit dubious websites, as it can protect your system from malware and other threats.
Additionally, Secure Boot can prevent unauthorized access to your system by blocking boot loaders that are not approved by the system manufacturer. This is particularly important for those who store sensitive information on their computers. By enabling Secure Boot, you can have peace of mind knowing that your system is secure and protected.
So, if you’re looking to enhance your system’s security, enabling Secure Boot is definitely the way to go.
Protect Against Malware and Unauthorized OS
If you’re concerned about malware or unauthorized operating systems infecting your computer, you should consider enabling secure boot. This feature is available on most modern devices and offers protection against malicious software that always tries to take over your system during start-up. By enabling secure boot, you can rest assured that only trusted software, signed by recognized authorities, will be allowed to run on your device.
This prevents any unauthorized software from running on your device, keeping it safe from any potential threats. Think of secure boot like a bouncer at a club – they only let in the people who are on the guest list and have the proper identification. Similarly, secure boot only lets in software that has the proper certificates and digital signatures to ensure it’s a trusted program.
This extra layer of security is particularly crucial in today’s world, where cyber threats are becoming more and more sophisticated. Not only does secure boot offer protection against malware, but it also safeguards your device against unauthorized operating systems. Sometimes, hackers will try to install a separate operating system on your device that can be used to snoop on your data or commit other illegal activities.
However, with secure boot enabled, the operating system will be checked against a database of known good systems, ensuring it’s a legitimate, authorized operating system. In conclusion, if you’re looking to protect your device from cyber threats, malware, and unauthorized operating systems, enabling secure boot is a smart move. It offers a layer of defense against malicious software and ensures that only trusted programs are running on your device.
By doing so, you can be confident in the safety and security of your computer or device.
Prevent Unapproved Changes to Boot Configuration
Enabling secure boot can prevent unapproved changes to boot configuration, and this is why it’s crucial to have it activated on your system. Secure boot is a security feature that ensures only trusted software can start up your computer. It works by verifying the digital signatures of the bootloader and operating system, guaranteeing that they’re legitimate and unmodified.
This prevents malicious software from injecting itself into the boot process and potentially taking over your system. Turning on secure boot is a simple way to strengthen your computer’s protection and minimize the risk of unauthorized changes to the boot configuration. It’s like having a lock on your front door to keep intruders out: it gives you peace of mind that your system is safe and secure.
So, make sure to enable secure boot on your device and keep your boot configuration secure.
Checking Motherboard Compatibility with Secure Boot
If you’re wondering how to enable secure boot on your Gigabyte motherboard, it’s important to first ensure that your motherboard is compatible with the feature. Secure boot is a feature that helps protect your computer from malware by verifying the authenticity of the operating system during startup. To enable secure boot on a Gigabyte motherboard, you’ll need to access the motherboard’s BIOS settings.
Once there, navigate to the “Boot” section and look for the option to enable secure boot. Note that some older motherboards may not support this feature, so it’s always a good idea to check the documentation or contact Gigabyte support to confirm compatibility. If your motherboard does support secure boot, enabling it can provide an extra layer of security and peace of mind when using your computer.
Confirm UEFI BIOS Version and Check Secure Boot Compatibility
If you’re looking to activate secure boot on your computer, you’ll first need to ensure that your motherboard is compatible with this feature. This means checking your motherboard’s UEFI BIOS version to verify its compatibility with secure boot. UEFI BIOS version
1 or later supports secure boot, so if your motherboard’s BIOS version is lower than this, you’ll need to update it before you can fully use secure boot. It’s important to note that not all motherboards support secure boot, so you should also check your motherboard’s documentation or specs to confirm compatibility.
By doing this, you can ensure that your computer is protected against unauthorized operating system and bootloader attacks.
Make Sure Hardware Meets Secure Boot Requirement
When it comes to ensuring your computer’s security, one crucial step is making sure your hardware meets the requirements for Secure Boot. This is a feature that ensures your system boots up using only authorized software, protecting against malware and other threats. One way to check if your motherboard is compatible with Secure Boot is to access its UEFI settings.
From there, you can find the Secure Boot option and check if it’s enabled. If it’s not, you may need to update your motherboard’s firmware or even consider purchasing a new motherboard altogether. It’s important to note that not all motherboards are compatible with Secure Boot, so it’s crucial to verify compatibility before making any hardware purchases.
Ultimately, ensuring that your hardware meets Secure Boot requirements is a crucial step in safeguarding your computer against potential security threats.
Step-by-Step Guide to Enable Secure Boot on Gigabyte Motherboard
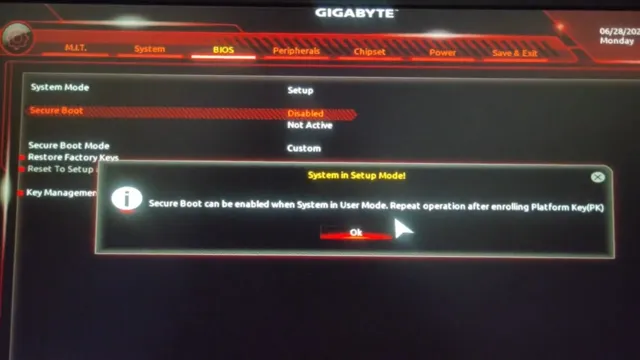
If you’re looking to boost the security of your Gigabyte motherboard, then turning on Secure Boot is a great way to do it. Here’s how to enable Secure Boot on Gigabyte Motherboard: Step 1: Enter BIOS settings by pressing the “Delete” key during startup. Step 2: Navigate to the “Boot” tab and then select “Secure Boot.
” Step 3: Change the “Secure Boot” setting to “Enabled” and save your changes by pressing “F” Step 4: Restart your computer and Secure Boot should be active. Remember, Secure Boot adds an extra layer of security to your computer by ensuring that only trusted software is loaded during startup.
If you have any issues with Secure Boot after enabling it, you can always go back to the BIOS and turn it off. Overall, enabling Secure Boot is a simple process that can go a long way towards protecting your computer from potential threats.
Enter UEFI BIOS
If you’re looking to enable Secure Boot on your Gigabyte motherboard, the first step is to enter the UEFI BIOS. To do this, you’ll need to restart your computer and press the key that corresponds with your motherboard’s BIOS, usually F2 or Del. Once you’re in the BIOS, navigate to the “Security” tab and enable the “Secure Boot” option.
This will ensure that only trusted bootloaders and operating systems are allowed to run on your computer, providing an extra layer of protection against malware and other security threats. Whether you’re setting up a new computer or want to improve the security of an existing one, enabling Secure Boot on your Gigabyte motherboard is an essential step in protecting your data and ensuring the safety of your system.
Navigate to the Security Tab
To enable secure boot on your Gigabyte motherboard, the first step is to navigate to the Security tab. This is a crucial step in ensuring that your system is protected from malicious attacks and unauthorized access. To get started, you’ll need to access the BIOS settings by pressing the appropriate key during boot-up (usually F2 or DEL).
Once you’re in the BIOS, locate the Security tab and select it. From there, you’ll be able to find the option to enable secure boot and set the necessary settings to ensure that your system is fully protected. Secure boot is an essential feature that should be enabled on all systems to safeguard your data and ensure the integrity of your operating system.
By following these simple steps, you can take full advantage of this powerful security feature and keep your Gigabyte motherboard protected against any potential threats.
Select the Secure Boot Menu
If you’re looking to improve your Gigabyte motherboard’s security, one step you can take is to enable Secure Boot. This feature verifies the digital signatures of any bootloader or OS that attempts to load on your system, ensuring that only trusted software can run. To enable Secure Boot on your Gigabyte motherboard, you’ll need to enter the BIOS setup utility and navigate to the Security tab.
From there, select the Secure Boot menu and choose Enabled. You can also select other options, such as selecting to enable or disable Secure Boot with an override key or custom key. Remember to save your changes before exiting the BIOS setup utility.
Enabling Secure Boot is just one way to improve the security of your system, and it’s a simple step that can help protect against malware and other threats.
Enable Secure Boot
Secure Boot, Gigabyte Motherboard Enabling Secure Boot is an essential step to secure your computer’s boot process and keep it safe from potential threats. If you’re using a Gigabyte motherboard, here’s a quick and easy guide to enable Secure Boot. First, enter the BIOS setup by pressing the “Delete” key during startup.
Once inside the BIOS, navigate to the “Boot” tab and locate the “Secure Boot” option. Change the value to “Enabled” and then go to the “Save and Exit” tab to save your changes and exit the BIOS. Secure Boot is now enabled on your Gigabyte motherboard, ensuring that only trusted bootloaders will be loaded during the boot process.
This helps prevent unauthorized and malicious software from affecting your computer’s performance. By enabling Secure Boot, you can take an important step towards keeping your computer safe and secure.
Verifying Secure Boot is Enabled
If you want to improve the security of your gigabyte motherboard, enabling secure boot is a great option. This feature ensures that only authorized and trusted software can run during the boot process, protecting your system from malware and other security threats. To verify if secure boot is enabled on your gigabyte motherboard, you will need to access the BIOS or UEFI settings.
First, restart your computer and enter the BIOS by pressing the appropriate key during startup. Look for the secure boot option under the advanced options menu and make sure it is enabled. If it is not, select it and save your settings before exiting the BIOS.
Once you have enabled secure boot, you can rest assured that your system is more secure than ever before.
Check the Verification of Bootable Code (VBC) Status
Verifying Secure Boot is Enabled When it comes to securing your device, one of the most important things is to ensure that the Secure Boot feature is enabled. This feature, found in many modern operating systems, helps protect against the installation of malicious software by verifying that any code booting on the system is signed and trusted. To verify that Secure Boot is enabled, you can check the Verification of Bootable Code (VBC) status.
This will confirm that the machine is set up to only boot from trusted sources and helps to prevent unauthorized access to your system. Securing your device is essential to keep your sensitive data and personal information safe from hackers and malware attacks. Therefore, it is essential to regularly check and verify that Secure Boot is enabled to maintain the highest level of security, protecting you and your device from potential threats.
Confirm that Secure Boot is Activated in the UEFI BIOS
When it comes to ensuring the security and integrity of your system, verifying that the Secure Boot feature is enabled is an essential task. This feature, which is available in the Unified Extensible Firmware Interface (UEFI) BIOS, ensures that only verified, trusted software can boot up on your computer, protecting it from malware and unauthorized access attempts. To confirm that Secure Boot is activated, you’ll need to access the UEFI BIOS settings by restarting your computer and entering the BIOS setup.
From there, look for the Secure Boot option and ensure that it’s enabled. This may involve selecting the “Enabled” or “On” option, or it may involve selecting a trusted boot system key. Once you’ve done that, you can save your changes and exit the BIOS settings.
By making sure that Secure Boot is activated, you’ll help keep your system safe and secure from potential threats and attacks.
In Conclusion
Congratulations, you’ve successfully enabled Secure Boot on your Gigabyte motherboard! Now your computer will have an extra layer of protection against unauthorized access, just like a fortress with a moat. Keep your system safe and secure, and if anyone tries to breach your castle walls, let Secure Boot be your trusty drawbridge.”
Secure Your Computer with Secure Boot and Enjoy Peace of Mind
Secure Boot. If you’re concerned about the security of your computer, enabling Secure Boot is a great step to take. This feature is built into the Unified Extensible Firmware Interface (UEFI) and ensures that only trusted operating system bootloaders are allowed to run on your computer.
To verify that Secure Boot is enabled, you’ll need to access your BIOS or UEFI settings. The process will vary depending on the manufacturer and model of your computer, but it typically involves restarting your computer and pressing a key to access the firmware settings. Once you’re in the settings, look for the Secure Boot option and make sure it’s enabled.
With Secure Boot enabled, you can rest assured that your computer will only be running software that’s been vetted for security by the manufacturer. It’s a simple step that can give you peace of mind and keep your computer safe from malware and other threats.
FAQs
What is secure boot and why is it important on a motherboard?
Secure boot is a feature that ensures that only trusted software can be loaded during the boot up process, making it more difficult for malware to take over the system. This is important for protecting sensitive data and ensuring the system’s stability.
Does my Gigabyte motherboard support secure boot?
Most newer Gigabyte motherboards support secure boot. You can check if your motherboard supports it by going into the BIOS settings and looking for the secure boot option.
How do I enable secure boot on my Gigabyte motherboard?
First, you need to enter the BIOS settings by pressing the designated key during boot up (usually Delete or F2). Once in the BIOS, look for the secure boot option and enable it. Save and exit the BIOS settings, and your motherboard should now be using secure boot.
What should I do if I encounter issues with secure boot on my Gigabyte motherboard?
If you encounter any issues with secure boot, such as the system not booting up properly, you may need to check if your hardware or operating system is compatible with secure boot. You can also try updating your motherboard’s BIOS or disabling secure boot temporarily to troubleshoot the issue.