Connecting wifi antenna to motherboard may seem like a difficult task, but it’s actually quite simple. A wifi antenna is an essential component for any computer or laptop that requires internet access. It allows your device to connect wirelessly to the internet without the need for a wired connection.
However, if you’re not confident in your technical skills, then you might find it overwhelming. Don’t worry, though; we’re here to help! With our step-by-step guide, you’ll be able to connect your wifi antenna to your motherboard with ease. So let’s get started and ensure you have an uninterrupted internet browsing experience.
Gathering necessary tools and materials
If you’re looking to connect a wifi antenna to your motherboard, you’ll need a few essential tools and materials. The first thing you’ll need is a wifi antenna that is compatible with your motherboard. This may require a bit of research to determine what kind of antenna you need.
You’ll also need a screwdriver, as most antennas will need to be screwed in place. Additionally, you may need to purchase an antenna cable, depending on the type of antenna you have and the location of your motherboard. Once you have all the necessary tools and materials, it’s simply a matter of following the instructions to properly install the antenna.
It’s important to take your time during the installation process to ensure that everything is properly connected and secured. With the wifi antenna properly connected to your motherboard, you’ll be able to enjoy a stronger and more stable internet connection.
Wifi antenna, motherboard manual, screwdriver
If you’re looking to upgrade your computer’s Wifi capabilities, it’s important to have the necessary tools and materials on-hand before you start the process. First, you’ll need a Wifi antenna that’s compatible with your computer’s motherboard. To make sure you have the right antenna, consult your motherboard manual or do some research online to find out which type of antenna will work best.
Next, you’ll need a screwdriver to open up your computer and install the antenna. The size and type of screwdriver you’ll need will depend on your computer’s make and model, so be sure to do some research before you get started. With these tools in hand, you’ll be well on your way to upgrading your computer’s Wifi capabilities and enjoying a faster, more reliable connection.
Identifying Antenna connector
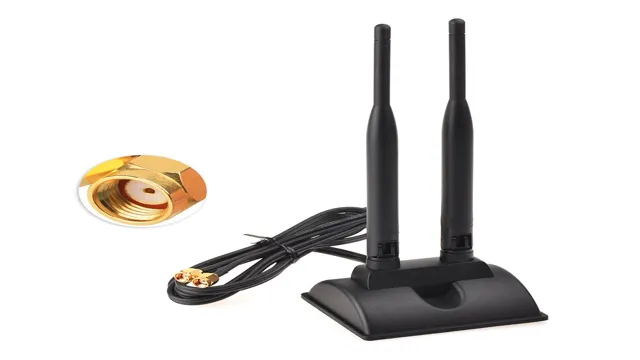
Connecting a WiFi antenna to your motherboard is a fairly straightforward process, as long as you know what type of connector your antenna uses. There are several different types of antenna connectors, including SMA, RP-SMA, and MCX, among others. To determine which connector your antenna uses, you’ll typically need to consult the documentation that came with the antenna or check the specifications online.
Once you know what type of connector you’re dealing with, you’ll need to find the corresponding port on your motherboard. This port can usually be found on the back of the PC, although it may be located elsewhere depending on your system. Once you’ve located the port, simply insert the antenna connector and tighten any screws or locking mechanisms as necessary.
It’s important to remember to handle the antenna carefully while attaching it, as these components are often quite delicate and can easily be damaged. With a little bit of patience and a steady hand, however, connecting your WiFi antenna to your motherboard should be a breeze!
Check motherboard manual for antenna connector location.
When setting up your computer, it’s essential to connect the antennas for your motherboard. These antennas help the motherboard to establish a stable wireless connection, which is necessary for browsing the internet, accessing online resources, and downloading or uploading files. To find the antenna connector location on your motherboard, you should check the motherboard manual.
The manual contains all the necessary information regarding your motherboard’s components and where they are located. Once you have identified the antenna connector, you can attach the antenna to it and adjust it to maximize the signal strength. Remember that a strong signal can help improve your computer’s performance, making it faster and more efficient.
So, while it may be a small detail, connecting the antenna can have a big impact on your overall computer experience.
Unscrewing Antenna Hole
Connecting a WiFi antenna to a motherboard is essential for enabling a stable and reliable wireless connection on your computer. If your motherboard doesn’t come with a built-in antenna, you can connect an external one through the antenna hole. To do this, you’ll need to unscrew the antenna hole cover on your motherboard, which is typically located near the PCIe slots or the I/O shield.
Once you remove the cover, you can attach the antenna to the designated port and screw it in place. It’s crucial to ensure that the antenna is compatible with your motherboard and operates on the same frequency band as your router, or else you may experience connectivity issues. By following these steps and making sure you have a compatible antenna, you’ll have a smooth and fast WiFi connection on your computer.
Use screw driver to unscrew the antenna connector
If you’re having trouble with your antenna connection, one solution may be to unscrew the antenna hole using a screwdriver. To do this, simply locate the antenna connector and insert the screwdriver into the slot. Then, gently rotate the screwdriver counterclockwise to loosen the screw and remove the connector.
It’s important to be careful when doing this, as you don’t want to damage the connector or the surrounding components. Once you’ve unscrewed the connector, you can inspect it to see if there are any visible issues like rust or wear and tear. This process can help solve any issues you may be experiencing with your antenna connection.
Connecting Wifi Antenna
Connecting a wifi antenna to a motherboard can be an easy task if you know what you’re doing. Before you start, make sure to have the right equipment on hand. You’ll need the antenna itself, which typically comes with a cable and a connector, as well as a wifi card mounted on the motherboard.
Begin by finding the wifi connector on the motherboard, which is typically near the PCIe or RAM slot. Once you find the connector, attach the antenna cable to it, making sure it is securely fastened. You may need to use a screwdriver to tighten it.
Finally, attach the wifi antenna to the other end of the cable by screwing it in place. Once everything is connected, make sure to test the wifi connection to ensure it’s working correctly. Congratulations, you’ve successfully connected your wifi antenna to the motherboard!
Connect antenna to the motherboard antenna connector.
Connecting Wifi Antenna When it comes to setting up a desktop or a new motherboard, one of the critical components that need to be installed is the wifi antenna. Wifi antennas are essential for connecting to wireless networks and enjoying high-speed internet. Connecting the antenna to your motherboard is relatively easy and can be done in a few simple steps.
First, you need to locate the antenna connector on your motherboard. This is typically located on the back of the motherboard and is clearly labeled. Once you have located it, connect the antenna by aligning its plug with the connector and gently pushing it into place.
Ensure that the antenna is firmly connected to the motherboard and is not loose. The importance of the wifi antenna cannot be overstated. It’s the crucial link between your computer and your wireless network, and without it, you won’t be able to enjoy the full benefits of wireless internet.
It’s worth noting that not all motherboards come with built-in wifi connectivity, so you may need to purchase a separate wifi card or USB adapter to connect to the internet wirelessly. Once you’ve connected the antenna, it’s essential to power up your computer and ensure that the connection is stable and secure. In conclusion, connecting the wifi antenna to your motherboard is a simple process that can make a world of difference when it comes to enjoying the full benefits of wireless internet.
By following the steps outlined above, you can rest assured that your computer is ready to connect to the internet wirelessly and enjoy fast and reliable speeds. Whether you’re using your computer for work or entertainment, having a stable and secure internet connection is essential. So if you haven’t connected your wifi antenna yet, there’s no better time to get started.
Screwing the connector Hole
Connecting a WiFi antenna to a motherboard can seem daunting, but it’s actually quite simple. The main thing you need is a WiFi antenna with a connector that matches the port on your motherboard. Once you have that, all you need to do is screw the connector hole onto the port, making sure it’s tight enough to keep the antenna in place.
Some motherboards may have multiple ports, so make sure you choose the correct one for your antenna. It’s important to note that not all motherboards may have the option to connect an external antenna. Make sure to refer to the motherboard manual or consult with a professional if you’re unsure.
Overall, connecting a WiFi antenna to your motherboard shouldn’t be too difficult as long as you have the proper equipment and take the necessary precautions.
Use screw driver to screw back the connector
Screw driver, connector, hole If you’ve ever dealt with a loose connector, you know how frustrating it can be. Whether you’re dealing with a computer cable or a power cord, a loose connection can cause intermittent issues that can be hard to pinpoint. Fortunately, the solution is often as simple as tightening the connector back into place.
To do this, you’ll need a screwdriver that fits the screw hole on the connector. If you don’t have the right size, you’ll need to head to the hardware store to find the correct size. Once you have the right screwdriver, carefully fit the tip into the hole on the connector and turn it clockwise until it’s snug.
Be careful not to over-tighten, as this can cause damage to the connector or the device it’s attached to. With a little care and attention, you can quickly and easily resolve most loose connector issues.
Testing Wifi connection
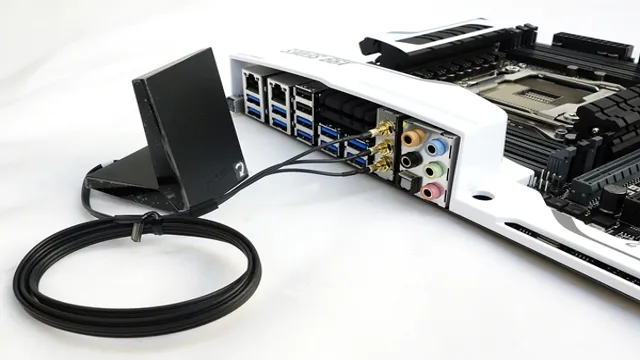
To connect a Wifi antenna to your motherboard, the first step is to identify the Wifi connector on your motherboard. Most modern motherboards come with built-in Wifi connectivity, in which case you will usually find the Wifi antenna connector located at the back of the I/O shield. If your motherboard doesn’t have built-in Wifi capabilities, you can purchase an expansion card that plugs into one of your PCI or PCIe slots.
These expansion cards typically come with an external antenna that can be mounted on your PC case. Once you have identified the type of Wifi connector on your motherboard, you can screw in the antenna and connect it to the connector. It’s important to ensure that the antenna is securely attached and that the connector is properly seated to avoid any connectivity issues.
Once the Wifi antenna is connected, you should be able to enjoy fast and reliable wireless internet connectivity.
Check connection by using wifi to browse
When it comes to testing your Wifi connection, browsing the web is an excellent way to determine if your connection is stable or not. By trying to load web pages in your browser, you can quickly see if your connection has any issues, such as slow loading times, buffering videos, or failed connections. One thing to keep in mind is that not all websites are the same when it comes to their speed and responsiveness, so try different sites to get a better understanding of your connection.
Additionally, you may want to try browsing on different devices to see if the issue is isolated to one device or if it’s a broader problem. With a little bit of testing, you can determine if your Wifi connection is up to par or if you need to troubleshoot to improve your internet speed and reliability.
Conclusion
Congratulations, you have successfully connected your wifi antenna to your motherboard! Now, your computer is ready to receive wireless signals with more zeal than a dog chasing its tail. Just remember, making this connection is as easy as following a recipe for a grilled cheese sandwich. With joyous efficiency, your computer will now connect to wifi faster than Usain Bolt runs the 100 meter dash.
So, sit back, relax, and enjoy the seamless connectivity of your newly connected wifi antenna.”
FAQs
What type of connector is needed to connect a wifi antenna to a motherboard?
A wifi antenna typically requires an RP-SMA connector to connect to a motherboard’s wifi card.
Can I use any wifi antenna to connect to my motherboard’s wifi card?
No, you need to ensure that the antenna frequency range matches the wifi card’s frequency range to achieve optimal performance.
How do I know if my motherboard has a built-in wifi card?
You can check your motherboard’s specifications online or consult the user manual to see if the motherboard has a wifi card or antenna connector.
Is it possible to connect multiple wifi antennas to a single motherboard?
Depending on the motherboard, you may be able to connect multiple antennas using a wifi card that supports antenna diversity. However, not all motherboards have this capability.