
Have you ever encountered a problem with your Brother MFC-J430W printer where the print quality is poor or inconsistent? If so, the culprit may be a dirty print head, which can cause streaks, smudges, or missing lines on your documents. But don’t worry, cleaning the print head is not as difficult or time-consuming as it sounds. With a few simple steps and tools, you can restore your printer’s performance and save money on costly repairs or replacements.
In this blog, we will guide you through the process of cleaning your Brother MFC-J430W print head, and give you some useful tips to prevent future issues. So, sit back, grab a cup of coffee, and let’s get started!
Gather Your Supplies
If you’ve noticed streaks or lines on your Brother MFC-J430W printer output, it might be time to clean the print head. Cleaning it can help restore the quality of your prints and prolong the lifespan of your printer. Before you start, gather the necessary supplies: a lint-free cloth, distilled water, and a cleaning kit.
Using a lint-free cloth is important as it won’t leave any fibers or debris on the print head, while distilled water ensures that there are no minerals or impurities that could harm the printer. You can also use a cleaning kit specifically designed for Brother printers, which usually includes cleaning fluid and a syringe for more precise application. Make sure you have all your supplies handy to avoid any interruptions during the cleaning process.
Isopropyl Alcohol
Isopropyl alcohol is a versatile and essential product that can benefit people’s lives in various ways. Before we dive into all the fantastic things this substance can do, you’ll need to gather your supplies. Firstly, you need to get your hands on some isopropyl alcohol, which you can buy from most drugstores or online retailers easily.
It is best to opt for a high concentration of at least 70% or greater. Additionally, you will need a clean, dry cloth or a cotton ball and rubber gloves to prevent any skin irritation or allergies. A spray bottle or an empty container of isopropyl alcohol can also be useful.
Make sure to keep all your supplies in a safe and secure place away from any heat sources or open flames. With all the supplies assembled, you can now start exploring the numerous benefits of isopropyl alcohol, such as cleaning surfaces, disinfecting wounds, and many more.
Distilled Water
Distilled water is a pure form of water that has been filtered to remove any impurities or contaminants. To make distilled water at home, there are a few supplies you will need to gather. The first thing you will need is a distiller, which can be found at most home appliance stores or online retailers.
You will also need a water source, preferably tap water, as well as a clean container to collect the distilled water. A thermometer may also come in handy to ensure the distilled water reaches the appropriate temperature. Once you have all of your supplies gathered, you can begin the process of distilling the water.
This involves heating the water to its boiling point, collecting the steam, and then condensing the steam back into water. The end result is pure, clean, and safe drinking water. By making distilled water at home, you can have peace of mind knowing that you are consuming water that is free of any harmful chemicals or contaminants.
Lint-free Cloth
If you’re looking to clean a surface without leaving any lint or residue, a lint-free cloth is the way to go. But where can you find one? First, gather your supplies. You’ll need a microfiber cloth, which you can find at most stores that sell cleaning supplies, as well as a lint roller or vacuum if you want to make sure that any loose fibers are gone before you start cleaning.
Once you have these materials, you’re ready to start cleaning almost any surface without worrying about leaving behind any unwanted debris. Whether you’re dusting surfaces in your home or cleaning your glasses, a lint-free cloth will ensure that you get a streak-free, spotless finish every time. So why not make sure that you have one on hand for your next cleaning project?
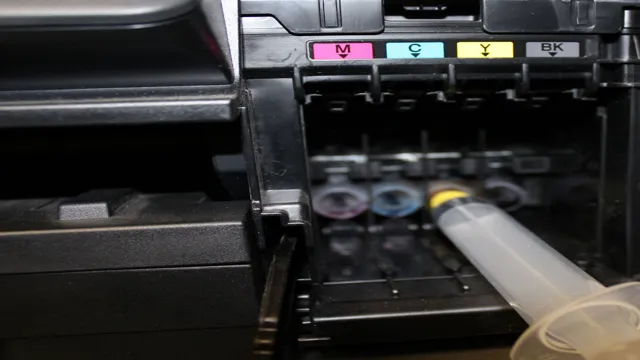
Remove and Soak the Print Head
If you’re wondering how to clean Brother MFC-J430W print head, the first step is to remove and soak the print head. This will help remove any clogs or buildup inside the print head that might be hindering its performance. To remove the print head, start by turning off your printer and unplugging it from the power source.
Then, open the printer cover to access the ink cartridges. Next, locate the print head assembly and gently pull it out of the printer. Once the print head is out, place it in a container filled with distilled water or a cleaning solution specifically designed for print heads.
Let it soak for at least thirty minutes, or until all the buildup is removed. After soaking, gently dry the print head using a lint-free cloth and reinsert it back into the printer. This simple process can help prolong the life of your Brother MFC-J430W printer and ensure that it continues to produce high-quality prints.
Turn Off the Printer
When it comes to fixing a print head that’s not working correctly, the first step is to turn off the printer. Once you’ve done that, the next step is to remove the print head and soak it. Soaking the print head can help remove any clogs or residue that might be affecting its performance.
To do this, gently remove the print head and place it in a bowl of warm water. Let it soak for a few hours, or overnight if possible. Before you reinstall the print head, make sure it’s completely dry and free of any water droplets.
Once it’s ready to go, carefully reinstall it in the printer and turn the machine back on. By taking the time to soak the print head, you can often solve printing issues without needing to replace any expensive parts.
Remove the Ink Cartridges
When you’re experiencing printing issues, one potential solution is to remove and soak the print head. But before doing so, it’s essential to remove the ink cartridges. Doing this will prevent any unnecessary leaks or spills while handling the print head.
To take out the ink cartridges, check your printer manual for specific instructions, as the method may vary depending on the model. In most cases, you’ll need to open the printer cover or access panel and push down on the cartridge until it releases. Then, gently pull it out of the slot.
Once you’ve removed all the cartridges, set them aside in a safe place while you clean the print head. Remember to handle the cartridges with care! The last thing you want is to stain your clothes or furniture.
Remove Print Head
If you’re experiencing print quality issues or error messages on your printer, removing and soaking the print head might help. Before doing so, make sure your printer is turned off and unplugged. First, locate the print head.
It’s typically located beneath the ink cartridges and can easily be removed by pressing down on the release lever or button. Gently pull the print head out, making sure not to touch the contacts or nozzles. Next, prepare a bowl of warm water and add a few drops of dish soap.
Place the print head in the solution and let it soak for about 30 minutes. After soaking, gently shake off the excess water and use a soft, lint-free cloth to pat it dry. Once dry, reinsert the print head back into your printer and turn it on.
This simple process can often resolve print quality issues caused by clogged or dirty printheads, saving you time and money.
Soak in Isopropyl Alcohol
If you’re experiencing poor print quality, streaks, or uneven ink distribution, it could be time to remove and soak your print head in isopropyl alcohol. The process is simple: carefully detach the print head from the printer and place it in a container filled with isopropyl alcohol, ensuring it’s completely submerged. Isopropyl alcohol is an effective solvent that breaks down dried ink and removes any debris or residue that may be blocking the print head’s nozzles.
Soaking time varies, but 30 minutes is usually sufficient. After soaking, rinse the print head with warm water and leave it to dry before reattaching it to the printer. This process may seem time-consuming, but it can be the difference between a printer that works perfectly and one that continues to produce subpar output.
So, if you’re having printing problems, give the soak in isopropyl alcohol a try – it may be just what you need to get your printer back to excellent working order.
Clean the Print Head
If your Brother MFC-J430W printer is not printing as it should, then the print head may need to be cleaned. The print head is responsible for ensuring that the ink is delivered to the paper correctly, and any blockages or clogs can cause lines, smudging, or color issues. To clean the print head in your Brother MFC-J430W printer, you will need to access the maintenance settings through the printer’s control panel.
Once you have located the maintenance settings, choose the “clean print head” option, and the printer will run a cleaning cycle to clear out any blockages or clogs. It’s important to note that excessive cleaning can also cause issues, so only clean the print head when necessary. By maintaining a clean print head, you will ensure that your Brother MFC-J430W printer performs at its best, delivering high-quality prints every time you use it.
Wipe with Lint-free Cloth
When it comes to maintaining your printer, cleaning the print head is an essential task that you should never overlook. A dirty print head can cause poor print quality, streaks, and smudges on your documents. To clean the print head, the first thing you need to do is switch off your printer and remove the cartridges.
Then, take a lint-free cloth and dampen it with water. Wipe the print head gently to remove any dust or debris that may have accumulated. It is essential to be gentle when cleaning the print head to avoid damaging it.
Once you have finished wiping the print head, allow it to dry completely before reinserting the cartridges and switching the printer back on. By following these simple steps, you can keep your print head clean and prolong the life of your printer. The keyword used organically: Clean the Print Head.
Rinse with Distilled Water
When it comes to maintaining your printer, one of the most important things to focus on is the print head. Over time, the print head can become clogged with dried ink, leading to poor print quality. So, how do you clean the print head? One method that many experts recommend is rinsing it with distilled water.
This may sound counterintuitive since water and electronics don’t usually mix, but distilled water is safe to use on print heads because it doesn’t contain minerals or contaminants that can damage the delicate parts. To get started, remove the print head and place it in a shallow dish filled with distilled water. Gently agitate the water to help dislodge any stubborn clogs.
After about 10 minutes, remove the print head and pat it dry with a clean, lint-free cloth. With a little bit of care and attention, you can keep your print head in top condition and enjoy high-quality prints every time you hit “print.” Keyword: print head, distilled water.
Reinstall Print Head and Ink Cartridges
If you have noticed that your prints are coming out blurry or smudged, it may be time to clean your print head. Over time, dust and debris can build up on the print head, causing issues with the ink cartridges. To clean the print head, first, remove the ink cartridges and set them aside.
Then, carefully remove the print head from the printer. Use a clean, damp cloth to gently wipe away any debris from the print head. Once the print head is clean, carefully reinstall it, making sure to align it properly.
Finally, reinsert the ink cartridges and run a test print to ensure everything is working correctly. By regularly cleaning your print head, you can ensure that your prints will always be of the highest quality.
Test the Printer
If you’re experiencing issues with your Brother MFC-J430W printer, such as streaks or uneven lines in your prints, it may be time to clean the print head. Here’s how to do it. First, access the printer’s settings menu and locate the option to clean the print head.
Follow the prompts to initiate the cleaning process. After the cleaning cycle is complete, run a test print to see if the issue has been resolved. If the problem persists, repeat the cleaning process or try a deeper cleaning option.
It’s important to clean the print head regularly to maintain the quality of your prints and prevent any long-term damage to your printer. By following these steps, you can ensure that your Brother MFC-J430W printer continues to produce high-quality prints for years to come.
Print a Test Page
If you’ve just purchased a new printer or you’re experiencing issues with your existing one, it’s always a good idea to print a test page. Test pages can help you identify common printer problems such as blurry or faded prints, and they can also give you an idea of how well your printer is functioning. To print a test page, simply navigate to your printer settings and select the option to print a test page.
Depending on the type of printer you have, the process may vary slightly, but most printers have a test page option in their settings. Once you’ve printed out your test page, take a close look at the text and images to ensure that they’re clear and legible. If you notice any issues with the print quality, you may need to calibrate or clean your printer to improve its performance.
By taking a few minutes to print a test page, you can save yourself a lot of time and frustration down the line.
Check for Clean Printing
When it comes to printing, ensuring your printer is producing clean prints is crucial. Not only can smudges, streaks, and uneven ink levels make your documents look unprofessional, but they can also affect the readability of the text. So, how can you test if your printer is producing clean prints? One way is to print a test page.
Most printers have a built-in feature that allows you to print a test page, which will give you an idea of how well your printer is performing. This test page will typically include a series of lines, patterns, and blocks of color, allowing you to check for any issues with alignment, print quality, and color accuracy. By regularly running a test page on your printer, you can catch any potential problems early on and take steps to address them before they become major issues.
Prevention Tips
Cleaning the print head of a Brother MFC-J430W is essential to maintain optimal print quality and prolong the lifespan of the printer. Prevention is key to avoiding the need for frequent cleaning, and there are several tips to keep in mind. Firstly, use high-quality ink cartridges that are compatible with the printer.
Poor-quality ink can lead to clogging and buildup in the print head. Secondly, ensure that the printer is used regularly to keep the ink flowing and prevent it from drying out. If the printer is not used frequently, consider running a cleaning cycle every week to prevent clogging.
Thirdly, avoid touching the print head as this can damage the delicate parts and lead to blockages. Finally, keep the printer in a clean and dust-free environment to prevent debris from accumulating in the print head. By taking these simple steps, you can prevent the need for frequent cleaning and ensure that your Brother MFC-J430W prints high-quality documents and images every time.
Print Regularly
Printing is an essential daily activity that most of us take for granted. However, regular printing can prevent some common printing issues that can be a hassle to fix. A best practice is to print something at least once a week, even if you don’t need to.
Doing this keeps the ink in the cartridges flowing smoothly, preventing the ink from drying up and clogging the nozzle. When this happens, it can lead to streaky prints or even damage to your printer head. Also, when you print regularly, you get ahead of any issues that may come up, instead of being caught off guard and stuck with a broken printer when you need it the most.
It’s an easy and preventive measure that only takes a few minutes of your time. So, instead of waiting for a printing emergency to happen, go ahead and print something now to keep your printer in top shape.
Use High-Quality Ink
When it comes to printing, using high-quality ink is key to ensuring your prints look their best and last as long as possible. Not all ink is created equal, and using low-quality ink can lead to smudging, fading, or other problems with your prints. To prevent these issues, it’s important to invest in high-quality ink that is specifically designed for your printer model and intended use.
This may cost a bit more upfront, but it can save you time and money in the long run by reducing the need for reprints or costly repairs. Additionally, using high-quality ink can help produce more vibrant and accurate colors, making your prints truly pop. So, the next time you’re looking to refill your printer’s ink supply, consider investing in a high-quality option that will help you get the best possible results.
Avoid Touching Print Head
When it comes to maintaining your printer, one of the most important things to keep in mind is to avoid touching the print head. This is the small component that actually applies the ink to the paper, and it can be very sensitive. Touching it with your fingers or any other object can damage it and reduce the quality of your prints.
To prevent this, there are a few simple tips to follow. First, always be gentle when handling your printer and try to avoid bumping or shaking it. Second, never use any cleaning chemicals or solvents on the print head, as this can also damage it.
Finally, if you do need to clean the print head, use a soft, lint-free cloth and be very careful not to touch any of the delicate parts. By following these tips and taking good care of your printer, you can enjoy clear, high-quality prints for years to come.
Conclusion
Cleaning your Brother MFC-J430W print head is a task that requires patience and attention to detail. With the right tools and a little know-how, you can keep your printer running smoothly and producing high-quality prints for years to come. So roll up your sleeves, grab a couple of cotton swabs, and get ready to eliminate clogs and bring your printer back to life.
Happy cleaning!”
FAQs
What is a print head in Brother MFC-J430W printer?
A print head in Brother MFC-J430W printer is a component that transfers ink onto paper and creates the final printout.
How do I know if my Brother MFC-J430W print head needs cleaning?
If you notice lines or streaks in your prints, faded or missing colors, or poor print quality, your print head may need cleaning.
How do I clean my Brother MFC-J430W print head manually?
To clean the Brother MFC-J430W print head manually, first, turn off the printer and unplug it. Then, remove the ink cartridges and the print head. Soak the print head in a cleaning solution for a few hours, and then rinse it with distilled water. Dry the print head thoroughly before reinstalling it.
Is it safe to use a cleaning solution on the Brother MFC-J430W print head?
Yes, it is safe to use a cleaning solution on the Brother MFC-J430W print head. However, make sure to use a cleaning solution that is compatible with your printer model. Avoid using plain tap water, as it can damage the print head.