Have you ever installed a new game or software on your Windows 10 computer only to find that it isn’t running as smoothly as it should be? One possible culprit could be an outdated graphics card driver. Graphics card drivers are essential components that allow your computer to communicate effectively with the graphics card. Outdated drivers can cause graphical glitches, lags, and even crashes in extreme cases.
So, it’s crucial to know how to check your graphics card driver version and update it if necessary. In this blog, we’ll explore different methods to check your graphics card driver version in Windows 10, so you can ensure that your computer is always up to date and running smoothly.
Using Device Manager
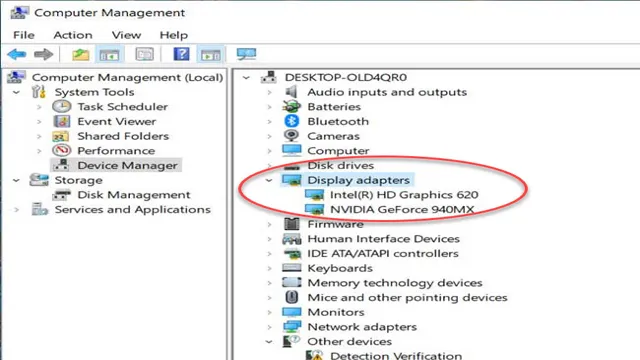
If you’re looking to update or just check the version of your graphics card driver on Windows 10, the Device Manager is your go-to tool. This built-in utility application provides a comprehensive list of installed hardware components on your computer system, including graphics cards. To access the Device Manager, simply right-click on the Start menu and select “Device Manager” from the list of options.
From there, click on “Display adapters” to expand and view your graphics card details. You should be able to see the name and version of your graphics card driver listed. If you want to update to the latest version, you can simply right-click on the graphics card and select “Update driver,” then follow the step-by-step instructions to complete the process.
With this helpful tool, checking and updating your graphics card driver version on Windows 10 has never been easier.
Open Device Manager
When it comes to troubleshooting your computer, one of the most useful tools at your disposal is Device Manager. This tool allows you to view and manage the hardware devices installed on your computer, making it a great way to diagnose any issues you may be having. To open Device Manager on Windows 10, simply right-click on the Start button and select “Device Manager” from the options menu.
Alternatively, you can also use the Run dialog to open Device Manager by pressing the Windows key + R, typing in “devmgmt.msc”, and pressing Enter. Once you have Device Manager open, you can expand the different categories to view the devices installed on your computer and check for any issues with drivers or hardware malfunctions.
So the next time you’re troubleshooting a computer issue, don’t forget to check out Device Manager to help you get things running smoothly again.
Find Display Adapters
Display Adapters If you are experiencing graphics-related issues on your computer, it might be time to check your display adapters. A display adapter, also known as a video card or graphics card, is responsible for rendering images and videos on your screen. To find your display adapter on your computer, you can use the Device Manager.
Simply right-click on the Start button on your taskbar and select Device Manager from the options. From there, expand the Display adapters category to see a list of all the display adapters installed on your computer. If you notice any issues or errors, you may need to update your drivers or replace your hardware.
Keeping your display adapter up-to-date can help improve your computer’s graphics performance and prevent any issues from occurring. So the next time you experience a graphics issue, remember to check your display adapters through the Device Manager.
Expand Display Adapters
If you’re experiencing graphics issues on your computer, one potential solution is to expand your display adapters. You can do this through the Device Manager on a Windows PC. First, right-click on your Start menu and select “Device Manager.
” From there, look for “Display adapters” and click on the arrow to the left to expand the section. This will show you the different display adapters your computer is using. If you see any yellow exclamation points, it means there’s an issue with that adapter and it may need to be updated or replaced.
You can right-click on the adapter and select “Update driver” or “Uninstall device” to fix the problem. Expanding display adapters can be a helpful troubleshooting step to improve graphics performance on your computer.
Right-click Graphics Card
When it comes to troubleshooting graphics card issues, one of the first steps you can take is to check if the device is enabled and up-to-date in the Device Manager. Access the Device Manager by right-clicking on the Start button, selecting “Device Manager” from the menu, and clicking on the arrow to expand the “Display adapters” section. If your graphics card is listed here, you can right-click on it to access options such as updating the driver, disabling and enabling the device, and even uninstalling it if necessary.
Remember to always check for any updates or changes to the graphics card driver, as they can greatly improve the functionality and performance of your device. By using the Device Manager, you can quickly and easily manage any issues with your graphics card and ensure that your computer is running at its best.
Select Properties
When it comes to troubleshooting device issues on your computer, Device Manager is a powerful tool that can help you pinpoint the problem. One of the key features of Device Manager is the ability to select properties for individual devices. This feature allows you to view important information about each device, including its status, driver version, and any error codes.
To access device properties in Device Manager, simply right-click on the device in question and select Properties from the drop-down menu. From there, you can view a wide range of information about the device and its drivers. This can be especially helpful if you’re trying to troubleshoot a problem and need to gather information about a specific device.
Overall, using the Select Properties feature in Device Manager can help you diagnose and fix problems with your computer’s hardware and peripherals quickly and efficiently. So, next time you encounter an issue with a device on your computer, be sure to check out its properties in Device Manager to get a thorough understanding of the issue.
Navigate to Driver Tab
If you are experiencing driver issues with your computer, one way to troubleshoot the problem is by using Device Manager. To navigate to the Driver tab, first, open Device Manager by typing “device manager” in the Windows search bar and selecting it from the list of results. You can also access it by pressing the Windows key + X, then selecting Device Manager from the menu.
Once you have Device Manager open, find the device with the driver issue and right-click on it. Select “Properties” from the dropdown menu, and then click on the “Driver” tab. From there, you can update, rollback, or uninstall the driver.
Keep in mind that updating the driver may resolve the issue, but if it doesn’t, you may need to try rolling back or uninstalling the driver and finding a compatible version to install instead. By taking these steps, you can navigate to the Driver tab and potentially fix any driver issues you are encountering.
Check Driver Version
If you’re experiencing issues with your device, one way to troubleshoot is by checking your driver version. Thankfully, Windows has a built-in tool called Device Manager that makes this process easy. To access Device Manager, simply right-click the Start menu and select “Device Manager” from the list of options.
From here, you can navigate to the specific device you’re interested in and double-click it to open its properties. In the properties window, click the “Driver” tab to view details about the currently installed driver, including the version number and date. If a new driver is available, you can click the “Update Driver” button to download and install it.
Keep in mind that updating drivers can sometimes cause issues, so it’s always a good idea to create a system restore point beforehand. By using Device Manager to check and update your drivers, you can improve the performance and reliability of your device.
Using DirectX Diagnostic Tool
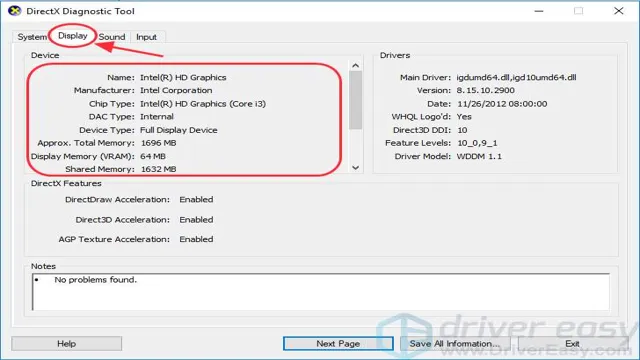
Checking the version of your graphics card driver on Windows 10 is important to ensure optimal performance when gaming or using any graphic-intensive applications. One way to do this is by using the DirectX Diagnostic Tool. To access this tool, simply press the Windows key + R and type in “dxdiag”.
Once the tool opens, navigate to the “Display” tab where you can see information about your graphics card, including the driver version. If you need to update your driver, you can easily find it online or download it through Windows Update. Keeping your graphics card driver up-to-date will ensure that you get the most out of your gaming and graphics experience.
So next time you’re noticing lag or lower-quality graphics, be sure to check your driver version using the DirectX Diagnostic Tool.
Open Run Dialog Box
Open Run Dialog Box When you’re troubleshooting issues with your computer’s hardware or software, it’s important to have access to a variety of tools that can help you diagnose the problem. One such tool that can be very useful is the DirectX Diagnostic Tool. This tool provides a wealth of information about your computer’s graphics and sound capabilities, and can be used to help diagnose issues with games or other applications that require high performance graphics or sound.
To access the DirectX Diagnostic Tool, simply open the Run dialog box by pressing the Windows key + R, and then type “dxdiag” in the search box. This will launch the tool, which will begin running tests to gather information about your computer’s hardware and drivers. Once the tests are complete, you’ll be able to view detailed information about your system’s DirectX capabilities, including the version of DirectX that’s installed, information about your graphics card, and more.
With this information in hand, you’ll be better equipped to troubleshoot any issues you’re experiencing with graphics or sound performance on your computer.
Type dxdiag
If you’re a gamer or have ever had to troubleshoot compatibility issues on your computer, you may have come across the term “dxdiag.” DXDiag stands for DirectX Diagnostic Tool, which is a program built into Windows that helps diagnose and troubleshoot issues with DirectX, a collection of APIs that enables graphics-intensive applications to work on Windows computers. To use dxdiag, simply press the Windows key + R to open the Run dialog box, type in “dxdiag,” and press enter.
This will bring up the DirectX Diagnostic Tool, which displays information about your system’s hardware and software configuration, including your graphics card, audio chipset, and system memory. You can also use dxdiag to test your graphics and audio performance and troubleshoot any issues you may be having with games or other multimedia applications. Whether you’re a seasoned tech pro or a casual user, dxdiag is a powerful tool that can help you get the most out of your Windows computer.
Open DirectX Diagnostic Tool
DirectX Diagnostic Tool If you’re a PC gamer, then you know how important it is to have all the latest software and hardware to run your games smoothly and efficiently. One tool that can be extremely helpful for diagnosing and troubleshooting issues with your PC’s graphics is the DirectX Diagnostic Tool. This tool is included with all versions of Windows and allows you to check the status of your DirectX installation, your graphics card, and any other related hardware or software.
To open the DirectX Diagnostic Tool, simply type “dxdiag” into the search bar on your taskbar and hit enter. The tool will then open and give you a detailed report on the status of all your graphics components, including driver versions, DirectX version, and any potential issues that might be affecting your gaming performance. So the next time you’re experiencing graphics-related issues, make sure to give the DirectX Diagnostic Tool a try and see if it can help you troubleshoot the problem!
Navigate to Display Tab
If you’re experiencing issues with your display settings, using the DirectX Diagnostic Tool can help you troubleshoot the problem. To access this tool, simply type ‘dxdiag’ into the search bar and click on the application that appears. Once the tool opens up, navigate to the ‘Display’ tab to view information about your graphics card, monitor settings, and display output.
This tab will also allow you to test your graphics card performance and enable/disable hardware acceleration. By utilizing this feature, you can identify and fix any display-related issues, making sure your computer is running smoothly and efficiently. So, the next time you encounter a display problem, remember to use the DirectX Diagnostic Tool!
Check Driver Version
If you want to ensure your computer is running smoothly, it’s important to check and update your drivers regularly. One way to check your driver version is by using the DirectX Diagnostic Tool. This tool is built into Windows and provides information about your system’s graphics and audio drivers.
To access it, simply search for “dxdiag” in the Start menu or Run dialog box. Once it’s open, navigate to the “Display” and “Sound” tabs to view information about your graphics and audio drivers, including the driver version and manufacturer. Keeping your drivers up to date can help improve your computer’s performance and prevent compatibility issues with software and hardware.
So, take some time to check and update your drivers regularly to keep your system running smoothly.
Conclusion
So there you have it folks, checking the graphics card driver version on Windows 10 is as easy as pie! By following these simple steps, you’ll be able to ensure that your system is running on the latest and greatest drivers, keeping your gaming and overall computing experience smooth and glitch-free. Remember, just like a car needs regular oil changes to stay in top shape, your PC requires regular updates to keep up with the demands of the latest software and applications. So don’t wait any longer, give your graphics card the TLC it deserves and check that driver version today!”
FAQs
How do I check what graphics card my Windows 10 computer has?
You can check your graphics card by opening the Device Manager and expanding the Display adapters category. The name of your graphics card will be listed there.
How do I check the driver version for my graphics card in Windows 10?
To check your graphics card driver version, open the Device Manager and double-click on the Display adapters category. Right-click on your graphics card and select Properties. Click on the Driver tab and you will see your driver version listed.
Is it necessary to update my graphics card driver in Windows 10?
Updating your graphics card driver can improve performance, fix bugs, and provide new features. It is generally recommended to keep your drivers up to date.
What happens if I have an outdated graphics card driver on Windows 10?
Outdated graphics card drivers can cause performance issues, compatibility problems with new software, as well as crashes and other errors. It is important to keep your drivers up to date to avoid these issues.