Has your Brother printer’s fuser cover been giving you a headache lately? Are you constantly struggling to get it fixed? Worry not! We have got you covered in this step-by-step guide on fixing the fuser cover on your Brother printer. The fuser cover is an important component in your printer that protects the fuser unit from damage and ensures smooth operation. Therefore, it is essential to fix it as soon as it starts malfunctioning.
However, fixing the fuser cover can be a bit tricky, especially if you’re not familiar with the process. In this guide, we will walk you through the entire process of fixing the fuser cover on your Brother printer. We will explain each step in detail and provide easy-to-follow instructions.
Whether you’re a tech-savvy person or a beginner, this guide is tailored to help anyone fix their printer’s fuser cover efficiently. So, if you’re tired of struggling with your printer’s fuser cover, grab your tool kit and join us in this adventure of fixing your printer’s fuser cover. With our step-by-step guide, you’ll have your printer working smoothly in no time!
Identifying the Fuser Cover
When it comes to maintaining your Brother printer, identifying and accessing the fuser cover is a crucial step. The fuser cover is a protective piece that keeps the heat-sensitive parts of the printer safe during the fusing process. To locate the fuser cover on your Brother printer, you’ll need to consult the user manual or do some online research to find a diagram of your specific model.
Once you’ve located the fuser cover, it’s important to handle it with care as it can become hot during use. To access the fuser cover, you may need to remove other pieces of the printer first or follow specific instructions outlined in your manual. By properly identifying and maintaining the fuser cover on your Brother printer, you can prolong the life of the machine and ensure that it continues to operate efficiently and effectively for all of your printing needs.
Locating the Fuser Cover on Your Brother Printer
Locating the Fuser Cover on Your Brother Printer is an important step in maintaining your printer’s functionality. The fuser cover is the protective casing that covers the fuser unit of your printer, which is responsible for bonding toner to paper. To identify the fuser cover, you will need to locate the area where the printed paper exits the machine.
The fuser unit is usually located directly after this exit point. The cover will be located on top of the fuser unit, and may be labeled as such or simply appear as a removable panel. To ensure proper maintenance and repair of your printer, it is important to familiarize yourself with the location and functionality of the fuser cover.
Understanding the Importance of the Fuser Cover
The fuser cover is an important component of laser printers that is responsible for keeping the toner in place as it is transferred to the paper. Its main function is to protect the fuser from dust and other debris that can affect its performance and lifespan. The fuser itself is responsible for melting the toner onto the paper, so it’s essential that the fuser cover is in place and functioning properly to ensure optimal print quality.
But how do you identify the fuser cover? Look for a removable cover on the back or side of your laser printer that protects a metal cylinder, usually located towards the back of the printer. If you’re not sure, consult your printer manual or contact a professional for assistance. In short, the fuser cover is a small but important part of your printer that can make a big difference in the quality of your prints.
Removing the Old Fuser Cover
If you’re looking to replace or repair the fuser cover on your Brother printer, the first step is to remove the old cover. This can be done fairly easily, as long as you follow a few basic steps. First, locate the fuser cover on your printer.
This will usually be located on the back of the printer, towards the bottom. Once you have located the cover, you will need to open it up. Depending on your printer model, this may involve pressing a button or lever, or simply lifting up on the cover.
Once you have opened up the cover, take a moment to inspect the fuser unit inside. You may notice that it is hot, as it is responsible for fusing the toner onto the paper. Be careful not to touch the fuser unit directly, as it could cause burns.
With the cover open, you should be able to easily remove it from the printer. You may need to gently wiggle it back and forth to loosen it up, but it should come off without too much force. Once you have removed the old fuser cover, you’re ready to install the new one and get your printer back up and running!
Shutting Down Your Printer Safely
When it comes to shutting down your printer safely, it is important to remove the old fuser cover before proceeding. This cover can become quite hot during operation, so it is essential to wait until it has cooled down before attempting to remove it. Once the fuser cover has been removed, you can safely shut down your printer and perform any necessary maintenance tasks without risk of injury.
It’s important to remember that even though shutting down your printer may seem like a simple task, it is one that should be done with care to ensure the longevity of your machine. By taking the time to remove the old fuser cover before shutting down your printer, you can avoid potential damage and ensure that your device remains in top working condition for many years to come.
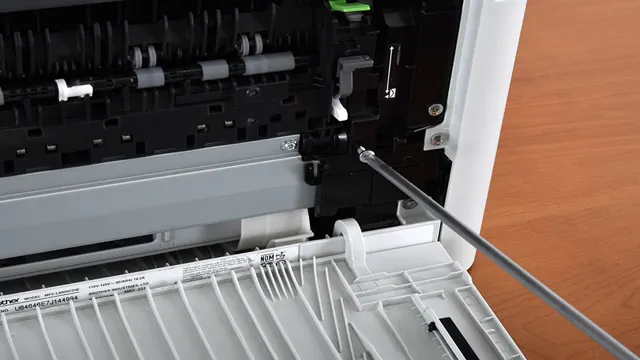
Removing the Damaged Fuser Cover
When it comes to repairing a damaged fuser cover, the first step is to remove the old cover carefully. It’s essential to do this correctly as any slip-ups can cause further damage to the printer or may cause harm to yourself. To start, we need to identify the position of the cover and the brackets holding it in place.
Once we have located them, we can secure the printer and remove the screws holding the cover. It’s essential to use the correct screwdriver and ensure that the screws are in a safe place for reinstallation later. Gently pull the cover, lifting it from the brackets while trying not to damage any of the components inside the printer.
Remember to be patient and not rush, as this process is crucial in repairing your printer. Once the cover is removed, we can assess the damage, replace the cover, and reinstall it correctly. By following these steps diligently, we can ensure that the printer is repaired correctly, and it regains its optimal functionality.
Inspecting Your Printer for Any Other Damage
When inspecting your printer for any other damage, it is important to pay attention to the fuser cover. This cover protects the fuser and helps to regulate the temperature inside the printer. If it becomes damaged, it can cause a variety of issues, including paper jams and uneven printing.
To remove the old fuser cover, start by turning off the printer and unplugging it for safety. Then, locate the retaining screws or clips that hold the cover in place and remove them using a screwdriver or pliers, being careful not to damage the cover or any surrounding components. Once removed, inspect the cover for any signs of cracking, warping, or other damage.
If it is in good condition, it can be reinstalled by reversing the removal process. However, if it is damaged, it will need to be replaced to ensure the printer operates correctly. Considering the importance of the fuser cover, it’s essential to inspect it regularly and replace it when necessary to avoid any further damage to your printer.
Installing the New Fuser Cover
If you own a Brother printer and need to replace the fuser cover, don’t worry – it’s a relatively easy task. The fuser cover is the top part of the printer that covers the fuser unit, which is responsible for melting the toner onto the paper during printing. To begin the process, first turn off the printer and wait for it to cool down.
Open the back panel of the printer to access the fuser assembly. Carefully remove the old fuser cover by pulling it gently upwards. Place the new fuser cover onto the printer and press it firmly until it snaps into place.
Ensure it is secure before closing the back panel. And that’s it – you’re done! Replacing the fuser cover is an important maintenance task as it helps protect the internal components of your Brother printer and ensures a longer lifespan. So, don’t put off this simple repair and enjoy your printer for many years to come.
Purchasing the Correct Replacement Part
When it comes to replacing a fuser cover, it’s important to purchase the correct replacement part to ensure a proper fit and functionality. There are a variety of fuser covers available, so it’s important to check the make and model of your printer to find the right one. Installing the new fuser cover can be a relatively simple process, but it’s important to follow the manufacturer’s instructions carefully.
Start by powering off the printer and disconnecting it from any power source. Then, locate the old fuser cover and carefully remove it. Next, insert the new cover in its place and ensure it’s securely in place before turning on the printer.
With the right replacement part and careful installation, your printer will be up and running smoothly again in no time!
Installing the Fuser Cover Correctly
Installing the Fuser Cover Correctly If you’ve recently replaced the fuser cover on your printer, it’s crucial to ensure you install the new cover correctly to prevent any further damage. To begin, locate the fuser unit and identify the cover. Then, gently snap the cover onto the fuser unit until you hear a click.
It’s important to make sure the cover is securely attached to the unit, as an improperly installed cover can lead to toner smearing and paper jams. Ensure that you don’t leave any gaps between the cover and the unit, as this can allow debris to enter the fuser unit and cause damage. By following these easy steps, you can install the fuser cover correctly and prevent any further printer issues.
Testing Your Printer’s Functionality
If you’re having trouble with your printer, it’s vital to pinpoint the issue and fix it quickly. One potential problem with Brother printers is the fuser cover. This cover is designed to protect the fuser, which is a crucial component responsible for fusing toner to paper.
If the fuser cover isn’t functioning properly, it can lead to problems with the overall printing process. To make sure your printer is working as it should, run a test print and examine the output. Look for any streaks, smears, or blank areas on the page.
If you notice any issues, check the fuser cover to make sure it’s securely in place. If it’s loose or damaged, replace it with a new one. By taking a proactive approach to printer maintenance, you can ensure that your Brother printer is always in tip-top shape and ready to handle whatever printing tasks you throw its way.
Turning the Printer Back On
If your printer is not responding when you try to print something, it may have been turned off or disconnected from your computer or network. To test your printer’s functionality, the first thing you should do is turn it back on and see if it responds. This can be done by pressing the power button on the printer or plugging it back into a power source.
Once the printer is turned on, check to see if there are any error messages or warning lights on the printer’s control panel. If you see any errors, refer to the printer’s manual or online troubleshooting guide to resolve the issue. Once you’ve resolved any errors, try printing a test page to ensure that the printer is working properly.
If you’re still having issues, consider contacting the printer manufacturer’s customer support team for additional assistance. By taking these steps, you’ll be able to quickly identify and resolve any printer issues you may be experiencing.
Checking for Proper Functionality
When you buy a new printer, testing its functionality is essential to ensure seamless printing experiences. Checking for proper functionality not only saves time but also prevents frustrating situations where you need to redo or reprint pages, leading to paper and ink wastage. To test your printer’s functionality, begin by examining the print quality to ensure that the printer produces clear, sharp, and properly aligned prints.
Next, ensure that the printer recognizes and responds to all commands promptly. You can also check the printer’s connectivity by printing from various devices, such as laptops, tablets, or smartphones. Testing your printer’s functionality regularly is crucial to guarantee smooth printing and the longevity of your device.
With regular testing, you can identify any issues and address them promptly to prevent delays and additional costs. By testing your printer’s functionality regularly, you can ensure that your printer is in top-notch shape and that you’re always ready for printing tasks when they arise.
Conclusion
In summary, the fuser cover of a Brother printer serves as the protective shield for its fuser unit. Just like how knights wear armor to protect themselves in battles, the fuser cover shields the printer’s internal components from wear and tear caused by constant use and the harsh, dusty office environment. Without the fuser cover, the printer would be exposed to potential damage and might suffer from poor print quality, leading to frustration and lost productivity.
So, uphold your printer’s chivalry and remember to keep its fuser cover intact!”
FAQs
What is a fuser cover in a Brother printer?
A fuser cover in a Brother printer is a plastic cover that protects the fuser unit. It is usually located at the back of the printer and can be easily removed for maintenance or replacement.
How can I replace the fuser cover in my Brother printer?
To replace the fuser cover in your Brother printer, follow these steps:
1. Turn off the printer and unplug it from the power source.
2. Open the rear cover of the printer and locate the fuser cover.
3. Gently remove the fuser cover by releasing the tabs on the sides.
4. Place the new fuser cover in place and secure it by snapping it back into position.
5. Close the rear cover of the printer.
6. Plug in the printer and turn it on.
What are the signs that the fuser cover in my Brother printer needs to be replaced?
The signs that the fuser cover in your Brother printer needs to be replaced include:
– It is cracked or broken.
– It is loose or does not fit securely.
– It is causing paper jams or other printing issues.
– It is visibly damaged or worn out.
Can I use a third-party fuser cover in my Brother printer?
It is not recommended to use a third-party fuser cover in your Brother printer as it may cause compatibility issues and damage to the printer. It is always best to use genuine Brother parts for optimal performance and longevity of your printer.