Have you ever found yourself staring at a bunch of wires and wondering how to connect the front panel connectors to a motherboard? It can be an intimidating task, especially if you’re not familiar with the inner workings of a computer. But fear not, for with a little guidance and patience, you’ll be able to successfully connect your front panel connectors in no time! Think of it like putting together a puzzle – each wire has a specific place it needs to go, and once you figure out the pattern, it becomes much easier to navigate. In this blog, we’ll cover everything you need to know about connecting front panel connectors to a motherboard, including what they are, where they’re located, and how to properly insert them.
Whether you’re building a computer from scratch or just upgrading some components, it’s important to have a good understanding of how everything connects together. So let’s dive into the world of front panel connectors and get you connected!
Gather Necessary Tools and Materials
When building a PC, connecting the front panel connectors, like the power button and USB ports, to the motherboard can be a bit challenging. That’s why having the necessary tools and materials is crucial. To start, make sure you have the manual for your motherboard, which typically has a diagram showing where each connector should be plugged in.
Key tools you’ll need include a screwdriver, helpful for opening and closing the case, and a pair of pliers to help you grip and plug in the small connectors. Additionally, it’s essential to have a well-lit workspace and, if possible, a magnifying glass to help you see the smaller connectors and pins more easily. With these tools and materials, you’ll be well-equipped to confidently connect your front panel connectors to your motherboard.
Motherboard manual
When it comes to assembling a new computer, the motherboard manual is an essential guide that outlines the installation process step by step. Before diving into the installation, however, it’s essential to gather all the necessary tools and materials. Typically, you’ll need a Phillips head screwdriver, a set of pliers, cable ties, thermal paste, and a grounding strap for anti-static protection.
Make sure to check the motherboard manual for any specific requirements or recommendations. It’s also helpful to have a clear workspace with good lighting and ample room to move around. Taking the time to gather these tools and materials before starting the installation process can save a lot of hassle and frustration down the road.
With everything at the ready, you’ll be well on your way to completing the computer build successfully.
Screwdriver
When it comes to using a screwdriver for DIY projects, the first step is to gather all the necessary tools and materials. You’ll need a screwdriver set that includes both flathead and Phillips head drivers in various sizes, as well as pliers, a level, and a tape measure. It’s also a good idea to have a container to keep these tools organized and easily accessible.
In addition to the tools, you’ll need screws, nails, and any other fasteners necessary for your project. When selecting these materials, be sure to consider the size and weight of the items you’ll be attaching, as well as the type of material you’re working with. By having all the necessary tools and materials at your disposal, you’ll be able to work efficiently and effectively, without having to stop and search for missing items.
So, before you get started on your next DIY project, take the time to gather your tools and materials, and set yourself up for success.
Front panel connectors
When it comes to connecting front panel connectors, it’s important to have the right tools and materials at your disposal. Firstly, make sure you have a screwdriver that fits the screws on your computer case. You’ll also need access to the motherboard manual in order to properly identify where each connector should go.
Additionally, it’s helpful to have a flashlight or other lighting source as some of the connections can be difficult to see. Finally, ensure that you have a steady hand and plenty of patience – these connectors can be fiddly and it may take a few attempts to get them properly aligned. With the right tools and a bit of care, however, you’ll be able to connect your front panel connectors with ease and get your computer up and running in no time.
Identify the Front Panel Connectors
When building a PC, one of the most important steps is connecting the front panel connectors to the motherboard. These connectors are responsible for connecting the power button, reset button, USB ports, audio jacks, and more to the motherboard. The problem is that there is no standard for where these connectors should be placed on the board, so it’s essential to refer to the motherboard’s manual to identify the correct location and orientation of these pins.
It’s highly recommended to draw a diagram or take a picture before disconnecting any wires to help you remember which cable goes where. While it may seem daunting at first, connecting the front panel connectors is an important part of assembling your PC, and done carefully, it will ensure that your computer runs smoothly.
Power switch
The power switch on a computer controls the flow of electricity to the system, allowing you to turn it on or off as needed. When building a computer, it’s important to know how to identify the front panel connectors, including the power switch. Usually, the power switch connector is a two-pin connector marked with a positive and negative sign.
It’s usually located near the bottom of the motherboard and can be connected to the front panel of the case. It’s important to make sure that the power switch is properly connected to the motherboard to ensure that you can easily turn on/off your computer. Additionally, it’s important to make sure that the power switch is securely attached to the front panel to avoid any accidental disconnections.
By identifying the power switch connector, you’ll be able to successfully build your own computer and enjoy the benefits of having a system that meets your specific needs.
Reset switch
If you’re building your own PC, it’s essential to know how to connect the front panel connectors such as the reset switch. To identify the reset switch connector, you’ll need to check your motherboard manual. The connector is generally labeled as RESET_SW or RS_SWITCH.
Once you’ve located the connector, you’ll need to connect the reset switch to the corresponding pins on the motherboard according to the manual’s instructions. The reset switch is a handy button that you can use to restart your PC if it becomes unresponsive or freezes. It’s important to connect the reset switch correctly, as an improperly connected switch can cause issues with your PC.
So, take your time and make sure you connect it properly to ensure your PC runs smoothly. Remember, the key to building a PC is to take your time and follow instructions carefully.
Power LED and HDD LED
If you’re building a PC from scratch, one of the main challenges you’ll face is identifying the front panel connectors. Specifically, you’ll need to know how to connect the power LED and HDD LED. These are small connectors that attach to the motherboard and light up when the PC is powered on or when the hard drive is active.
To locate these connectors, you’ll need to consult your motherboard manual. It should have a diagram that shows where these connectors are located and how to connect them. Once you’ve located them, the process is relatively straightforward.
Simply attach the connectors to the right pins on the motherboard, making sure to match the positive and negative connections. With the power LED and HDD LED connected, you’ll have a clear indication of when your PC is powered on and when your hard drive is active.
Audio and USB connectors
When setting up a new computer, it’s important to be able to identify the front panel connectors. This is especially true for audio and USB connectors because they allow you to plug in your headphones, microphone, USB drives and other peripherals. The audio connector is typically colored green and has a headphone icon next to it.
The microphone connector is usually pink and has a microphone icon next to it. For USB connectors, you’ll typically see one or two rows of pins with a plastic block next to them. The pins are arranged in a specific pattern and it’s important to match them up with the corresponding pins on your motherboard.
Once you’ve identified your audio and USB connectors, you’ll be able to easily plug in your peripherals and start using your new computer.
Locate the Proper Connections on the Motherboard
Connecting the front panel connectors to the motherboard is an essential step when building a computer. It might seem a bit complex at first, but the process is straightforward. The first step is to locate the proper connections on the motherboard, which can be found in the manual that comes with it.
You can also search for the motherboard diagram online. Once you have located the connectors, you need to identify each connection on the front panel. Each connector usually has an abbreviation or a label that indicates its function.
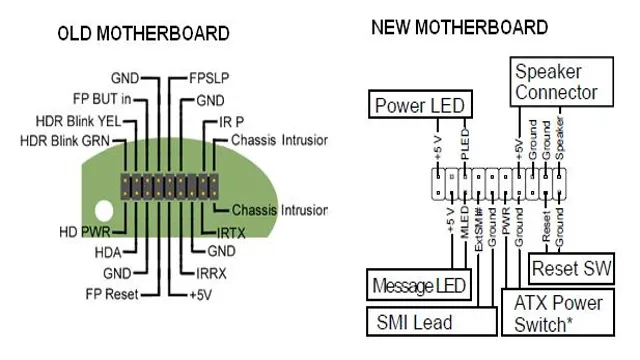
The most common labels are “PWR SW” for the power switch, “HDD LED” for the hard drive LED, “RESET SW” for the reset switch, and “PWR LED” for the power LED. It’s crucial to connect each cable properly to avoid damaging the motherboard or other components. Take your time to connect each cable carefully, following the labels.
Once everything is connected, you can turn on the computer and test the front panel functions to make sure they are working correctly. By using these steps, you can successfully connect the front panel connectors to the motherboard and have your computer running smoothly.
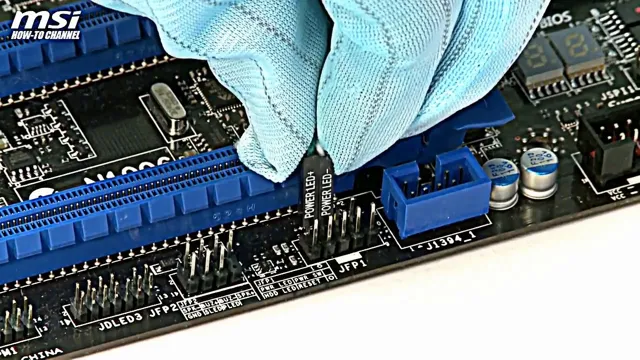
System panel connector
If you’re building your own PC or making upgrades to an existing one, locating the system panel connector on the motherboard is an important step. This connector is a group of pins that link the various buttons and LED lights on the computer case to the motherboard. To find this connector, consult your motherboard manual for its exact location.
Generally, it can be found in the lower-right corner of the motherboard, near the front of the case. Depending on your case design, you may need to remove the front panel to access the connector. Once you have located it, you can connect the various cables from the case to the appropriate pins on the connector.
These connections may include the power switch, reset switch, HDD activity LED, power LED, and speaker. Double-check your manual to make sure you have connected everything correctly. With the proper connections made, you can ensure that your computer’s buttons and lights will work as intended.
Audio and USB headers
When building a computer, it’s important to know where to connect the audio and USB headers on the motherboard. These connections can be found in different places, depending on the model of your motherboard. Audio headers are usually located near the back of the board, where you can plug in your headphones or speakers.
On the other hand, USB headers can be found on the bottom right-hand side of the motherboard. It’s important to ensure that you connect these headers correctly, or else you might not be able to use your computer’s audio or USB ports. Make sure to consult your motherboard’s manual or look for labels on the board itself to locate these important connections.
By properly connecting the audio and USB headers, you can ensure that your computer is fully functional and ready to use.
Connect the Front Panel Connectors to the Motherboard
If you’re building a PC, you need to know how to connect the front panel connectors to the motherboard. These connectors are what allow you to use the power button, reset button, LED indicators, and USB ports on the front of your case. It can be confusing to figure out which cable goes where, but don’t worry, we’ve got you covered with a diagram on how to connect front panel connectors to the motherboard.
First, locate the front panel header on your motherboard. This is usually in the bottom right corner, and it should be labeled with FPANEL or something similar. Next, consult the manual that came with your motherboard to determine which pins correspond to which connectors.
Once you know where everything goes, you can start plugging in the cables. It’s important to note that these cables are typically very small and delicate, so you’ll need to be gentle when handling them. Use a small flashlight to help you see where everything goes, and take your time to make sure everything is plugged in correctly.
Once you’re finished, double-check your work to make sure you didn’t miss anything. Overall, connecting the front panel connectors to the motherboard can be a bit of a challenge, but with a bit of patience and the right diagram, you’ll get it done in no time. Just remember to be careful when handling these tiny cables and double-check your work to ensure everything is connected correctly.
Power switch and reset switch
Connecting the power switch and reset switch of your computer to the motherboard can seem daunting, but it’s actually quite simple. First, locate the two sets of pins for the power switch and reset switch on the motherboard. These will often be located near the bottom of the motherboard, labeled “PWR_SW” and “RESET_SW.
” Your motherboard manual should have a diagram to help you locate them. Once you’ve found the pins, connect the power switch and reset switch cables from your computer case to their respective pins. The power switch cable will usually have two wires, while the reset switch cable may have only one.
Be sure to double-check that they are properly connected before turning on the power to your computer. With this easy step, you’re ready to start using your computer! Remember, while it might seem intimidating at first, connecting the front panel connectors to the motherboard is a straightforward process that anyone can do.
Power LED and HDD LED
When building your own PC, there are a lot of small details that can easily trip you up. One of these is connecting the front panel connectors to the motherboard. Specifically, you’ll need to connect the Power LED and HDD LED cables.
The Power LED cable is responsible for lighting up when your computer is turned on, while the HDD LED cable lights up whenever your hard drive is in use. Connecting these cables correctly is important so that you can keep an eye on the status of your computer. Fortunately, most motherboards will have these connectors labeled and color-coded to make the process easier.
Just make sure to consult your motherboard’s manual if you have any doubts. With a little patience and attention to detail, you’ll have your PC up and running in no time!
Audio and USB connectors
When it comes to setting up your computer, it’s important to know how to connect the front panel connectors to the motherboard. These connectors include the audio and USB connectors, which are located on the front of your computer case. First, you’ll need to locate the corresponding pins on the motherboard.
The pins are usually labeled in small writing, so you might need a flashlight or magnifying glass to see them clearly. Once you’ve found the pins, you’ll need to connect the audio and USB connectors to them, using the correct orientation. This can be a bit tricky, but it’s important to get it right to avoid any potential damage.
Make sure to read the motherboard manual carefully to ensure that you’re connecting the connectors to the correct pins. With a bit of patience and attention to detail, you’ll be able to successfully connect the front panel connectors and enjoy all the features your computer has to offer.
Test the Connections
When building a PC, it is important to know how to connect the front panel connectors to the motherboard. This can be a confusing process, but with the right diagram and careful attention, it can be done with ease. First, identify the front panel connectors, which include the power button, reset button, HDD LED, and power LED.
Next, locate their corresponding pins on the motherboard, which can be found in the motherboard manual or online. Once you have identified the pins, carefully match each connector to its corresponding pin, making sure they are securely attached. Once all connectors are in their appropriate pins, you can test the connections by starting up the PC and checking if the buttons and LEDs are functioning properly.
By following these steps and referring to the appropriate resources, you can confidently connect your front panel connectors to your motherboard and ensure a smooth system startup.
Power on the computer and test each connection
When setting up a computer, it’s important to ensure that all connections are working properly. Before powering on the computer, double-check each connection to ensure that it is secure and in the right place. This includes the power cable, keyboard, mouse, monitor, and any other peripherals.
Once everything is in place, power on the computer and test each connection. Check that the monitor is displaying an image, that the mouse and keyboard are responding, and that any other devices are being recognized by the computer. Testing each connection may seem tedious, but it can save you a headache later on if you catch any issues early.
Plus, there’s nothing more frustrating than trying to troubleshoot a problem that boils down to a loose cable. So take the time to test each connection and rest easy knowing that your computer is set up properly.
Conclusion
In conclusion, connecting your front panel connectors to your motherboard can seem like a daunting task, but with the right tools and a little bit of know-how, it’s actually quite simple. Like connecting the dots, following the labeled pins on your motherboard will ensure that you are plugging in the right connectors in the right place. With a steady hand and a bit of patience, your front panel buttons and lights will be up and running in no time, providing you with a seamless and stylish PC experience.
So don’t be afraid to get your hands dirty – give it a try and see how easy it can be!” (Please note that as AI language model, I can’t generate any diagrams. My response above is written in text.)
FAQs
What are front panel connectors in a motherboard?
Front panel connectors are small cables that connect the power button, reset button, USB ports, LED lights and other front panel elements to the motherboard.
Why are front panel connectors important in a PC build?
Without connecting the front panel connectors, you won’t be able to turn on your PC or use any of the front panel ports.
Can all motherboards use the same front panel connectors?
No, front panel connectors vary in pin layout and configuration. You need to ensure that your motherboard and case have compatible connectors.
How do I connect front panel connectors to my motherboard?
You need to consult your motherboard manual for the exact pin layout of the front panel connectors. Once you know which connectors go where, you can carefully plug them into the corresponding pins on the motherboard.