
If you’re a gamer or are into computer graphics, chances are you want your graphics card to be the default one on your system. But sometimes, your system may not use your dedicated graphics card for certain applications, leading to lag and low performance. The good news is, you can make your graphics card the default one, ensuring your system uses it for all the heavy-lifting tasks.
In this step-by-step guide, we’ll walk you through the process, helping you optimize your system’s performance and enjoy a seamless experience while gaming, video editing, or performing other graphics-intensive tasks. So, buckle up and let’s get started!
Why Choose a Dedicated Graphics Card?
One of the main reasons to choose a dedicated graphics card is because it provides better performance compared to integrated graphics. Integrated graphics rely on the CPU, which means that the CPU has to divide its processing power between running the applications and the graphics processing. On the other hand, a dedicated graphics card has its own processor, memory, and power supply, specifically designed for handling graphics-intensive tasks.
By setting the graphics card as default, you can ensure that your computer utilizes the dedicated graphics card for better performance while running games, video editing software, or other graphics-intensive applications. However, it’s important to note that not all computers are compatible with dedicated graphics cards, and it’s essential to check your system requirements before purchasing one. Additionally, the specific graphics card model you choose will determine the level of performance you can expect.
Overall, a dedicated graphics card is a valuable investment for anyone who wants to enhance their computer’s graphical capabilities.
Improve Performance and Gaming Experience
If you’re looking to improve your computer’s performance and overall gaming experience, choosing a dedicated graphics card may be your best bet. Unlike integrated graphics, which rely on the computer’s CPU to handle graphics processing, a dedicated graphics card has its own processor specifically designed for handling graphics-intensive tasks. This means that a dedicated graphics card can handle complex visuals and high-demanding games more efficiently, resulting in smoother and more realistic gameplay.
Additionally, dedicated graphics cards often come with their own cooling systems and memory, which can further improve performance and prevent overheating. Investing in a dedicated graphics card is a great way to level up your gaming experience and take your computer’s performance to the next level.
Relieve Burden on CPU and Memory
A dedicated graphics card can offer a plethora of benefits for those looking to improve their gaming or video editing experience. One of the biggest advantages is that it can relieve the burden on your CPU and memory. This is because a dedicated graphics card has its own processor and memory, allowing it to handle complex graphics and visuals more efficiently.
Without a dedicated graphics card, your computer’s CPU would have to work overtime to render images and videos, which can slow down your system and cause it to become overloaded. Additionally, a dedicated graphics card allows you to take advantage of advanced graphics settings, such as high-resolution textures and advanced lighting and shadows. Overall, if you want to enhance your multimedia experience and take the pressure off your CPU and memory, investing in a dedicated graphics card is definitely worth considering.
How to Set Graphics Card as Default
Are you experiencing issues with your computer’s graphics performance? One solution is to set your graphics card as the default. This will allow your computer to prioritize the use of your graphics card over the built-in graphics on your motherboard. To set your graphics card as the default, you will need to access your computer’s BIOS settings.
Restart your computer and press the key to enter the BIOS. Navigate to the “Integrated Peripherals” or “Advanced” section and find the “Graphics Settings” or “GPU Configuration” option. From there, select the option to switch from “integrated graphics” to “PCI-E” or “PCI”.
Save your changes and exit the BIOS. Your computer should now prioritize your graphics card for any tasks that require graphical processing. Setting your graphics card as the default can significantly improve your computer’s graphics performance, whether you’re a gamer or just need a smoother visual experience.
Access the Control Panel or Settings
One of the important steps to enhance the overall performance of your computer is to set the graphics card as the default. Doing so will ensure that graphic-intensive tasks like gaming and high-quality video streaming are processed smoothly, without any lag or stutter. To set the graphics card as your default, you need to access your computer’s control panel or settings, depending on your operating system.
Once you’re there, look for the “Display” or “Graphics” settings and select the graphics card you want to set as default. While the process may vary slightly depending on your operating system and graphics card model, it’s a relatively simple process that can make a noticeable difference in your computer’s graphics performance. Remember, setting the graphics card as default is crucial if you want to enjoy an outstanding visual experience when gaming or streaming videos on your Windows or Mac computer.
Select the Display Adapter Option
When it comes to gaming or working on graphical applications, having a good graphics card becomes essential. To ensure the best performance from your system, you need to set your graphics card as the default display adapter. First, go to the Display Settings by right-clicking on your desktop.
Then, select the Display Adapter properties, where you will find the option to set your graphics card as the default adapter. This step is necessary because the computer’s integrated graphics card might take priority over the dedicated graphics card, which can create performance issues. By setting your graphics card as the default, you can eliminate any lags that may arise due to the default graphics adapter.
Taking this step will make it easier for your system to render graphics and improve the overall quality of your gaming or graphical applications. By following these steps, you can ensure that your system is using the best option for displaying graphics, which will enhance your overall experience.
Choose the Dedicated Graphics Card
If you’re a gamer or work with graphics-heavy software, using a dedicated graphics card is a must. It’s a specific type of hardware that manages and processes image data faster and with better quality than an integrated GPU that comes with the processor. The question is how to set it as a default option on your system? The first step is to check if there’s a built-in graphics card, or else, it’s automatically set to dedicated GPU.
Just go to the Display Settings, choose Graphics Settings, and then choose the Program Settings. Here, you’ll see a list of applications that you’re running, and with a few clicks, you’ll have the option to set which one uses the default graphics card. This will automatically enable your computer to use the additional processing capabilities of the card for a smoother and more enhanced visual experience.
Remember, using a dedicated graphics card can be more power-intensive than using the integrated options, so make sure your computer is plugged in and not running on battery power.
Save and Reboot Your System
Setting your graphics card as the default option can go a long way in improving your computer’s performance. If you’re experiencing slow or lagging graphics, then it’s time to set your graphics card as the default option. To do this, you need to open the BIOS of your computer and disable the onboard graphics card.
This will make your graphics card the primary option when it comes to processing visuals. Once you’ve done this, you can save your settings and reboot your system. You’ll notice a remarkable improvement in your computer’s graphics performance.
So if you’re a gamer, graphic designer, or video editor, make sure to set your graphics card as the default option to get the most out of your computer’s horsepower.
Troubleshooting Common Issues
Setting your graphics card as the default option can sometimes be the best way to ensure your computer runs smoothly. However, it’s not always straightforward to do, and you may encounter some issues along the way. One common problem is that your computer may not automatically detect the graphics card, or it may prioritize another option by default.
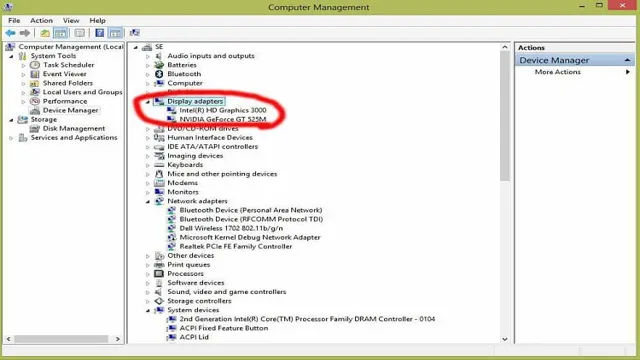
This can lead to slower performance or other errors. To resolve this issue, you’ll need to manually adjust your Windows settings. Navigate to the Device Manager, expand the Display Adapters category, and select the graphics card you want to make the default.
You can then right-click and select “Set as Default Device.” This should ensure your computer uses your preferred graphics option moving forward. If you’re still experiencing issues, be sure to check for driver updates or seek additional support.
By setting your graphics card as the default device, you can enjoy better performance and improved visuals.
Driver Incompatibility or Outdated Drivers
Driver incompatibility or outdated drivers can cause a variety of issues on your computer, from slow performance to hardware malfunction. One of the most common ways to encounter driver issues is when you upgrade your operating system. Drivers that were designed for an older version may not be compatible with the newer system, leading to problems.
If you have recently updated your OS and are experiencing issues, updating your drivers may solve the problem. However, it’s important to make sure you’re getting the right drivers for your device. Downloading the wrong one can make the problem worse, so it’s a good idea to use a trusted source and double-check before proceeding with the installation.
If you’re unsure which drivers to download or feel uncomfortable updating them on your own, seeking help from a professional or using a driver updater software can save a lot of time and frustration. Don’t let outdated drivers cause you unnecessary headaches, take action and keep your computer running smoothly with the latest and most compatible driver updates.
BIOS Settings Conflict
BIOS settings are critical to the overall functionality of your computer. Conflict in BIOS settings can lead to a host of issues, including system instability and failure to boot. Troubleshooting common BIOS settings conflicts involves reviewing settings in the BIOS menu that could be creating issues.
For instance, conflicts can arise when the BIOS is set to boot from an incorrect source. Additionally, conflicts can occur when initiating hardware upgrades such as replacing the hard drive or installing new RAM. To avoid BIOS settings conflicts, it’s essential to make changes one at a time and verify that your computer is functioning correctly before making additional modifications.
Overall, paying attention to BIOS settings conflicts and resolving them quickly can help keep your computer running smoothly and minimize downtime.
Conclusion: Enjoy Your Enhanced Graphics and Performance
When it comes to maximizing your computer’s performance, setting your graphics card as the default is the way to go. No more sluggish movements or choppy visuals – instead, your games, videos, and designs will run smoothly and beautifully. Think of it like upgrading from a clunky old bicycle to a shiny, high-speed sports car.
So go ahead, take the wheel and enjoy the ride!”
FAQs
How do I set my graphics card as the default on Windows 10?
To set your graphics card as the default on Windows 10, go to the “Display Settings” and click on “Graphics Settings”. From there, select the application you want to use the graphics card for and then click on “Options”. Choose the “High-performance” option and your graphics card will be set as the default.
How do I know if my graphics card is set as the default?
To know if your graphics card is set as the default, you can check it in the device manager. Open the device manager and expand the “Display adapters” section. The graphics card that is set as the default will have a green checkmark on it.
How can I change the default graphics card on my laptop?
To change the default graphics card on your laptop, go to the “Display Settings” and click on “Graphics Settings”. From there, select the application you want to change the graphics card for and then click on “Options”. Choose the graphics card you want to set as default and then click on “Save”.
How do I update my graphics card driver?
To update your graphics card driver, you can go to the manufacturer’s website and download the latest driver for your graphics card. You can also use third-party software like Driver Booster or Driver Easy to update your graphics card driver automatically.