It’s frustrating when your computer’s performance is sluggish, especially when you know you have high-quality hardware installed. One of the main culprits could be your graphics card, which often plays a vital role in how well your PC runs. By default, Windows 10 might be using an integrated graphics card instead of your dedicated GPU, leading to slower performance.
But don’t worry, there’s an easy fix! You can set your graphics card as the default device in Windows 10 and ramp up your computer’s speed and performance to its full potential. In this blog post, we’ll walk you through the steps so you can start gaming, editing videos, and running high-performance software without any obstacles.
Why Set your Graphics Card as Default?
If you’re a gamer or someone who works with graphics-intensive software, setting your graphics card as default in Windows 10 can significantly improve your system’s performance. By default, Windows 10 assigns graphics tasks to an integrated graphics processor, which might work fine for basic tasks, but is not powerful enough to handle heavy-duty graphics usage. This can lead to slow performance, lagging, and even crashing.
By setting your graphics card as default, you can ensure that your system uses the more powerful dedicated graphics card to handle graphics tasks, resulting in faster and smoother performance. So, if you want to boost your system’s graphics performance, tweak your Windows 10 settings and set your graphics card as default today!
Improve Gaming Performance
If you’re looking to improve your gaming performance, one of the best things you can do is set your graphics card as default. When you first start playing games on your computer, the graphics card might not be the first thing that comes to mind, but it’s actually one of the most important components for gaming. Your graphics card is responsible for rendering and displaying all the graphics in your games, and a powerful graphics card can mean the difference between a smooth, responsive gaming experience and a choppy, laggy one.
By setting your graphics card as default, you’re ensuring that your computer is prioritizing its use for gaming, which can result in smoother and more immersive gameplay. So, if you want to take your gaming performance to the next level, make sure your graphics card is set as default.
Increase Graphics Rendering Speeds
If you use your computer to play video games or work on graphics-heavy projects, you can benefit greatly from setting your graphics card as default. Why? Simply put, your graphics card is built specifically to handle graphic-heavy tasks and can process them much faster than your computer’s processor. By defaulting to your graphics card, you can boost your computer’s performance and increase graphics rendering speeds.
This means you can enjoy smoother and more seamless gameplay, as well as faster and more efficient rendering of graphics. So, if you’re a gamer or a designer, setting your graphics card as default is a smart move that can improve your overall experience.
Eliminate Video Playback Lag
When it comes to watching videos, there’s nothing more frustrating than dealing with playback lag. It can take away from the enjoyment of the content and make it almost impossible to follow along. One way to eliminate this issue is by setting your graphics card as the default option.
This can significantly improve video playback and overall performance when using your computer. Your graphics card is specifically designed to handle intense graphics and video rendering, which makes it the ideal choice for media playback. By setting your graphics card as default, your computer will allocate more resources towards video playback, allowing for a smoother and more enjoyable viewing experience.
So the next time you find yourself dealing with frustrating playback lag, consider setting your graphics card as the default option to improve performance and ensure you don’t miss a beat.
Check your Graphics Card Compatibility
If you’re a Windows 10 user looking to set your graphics card as the default option, there are a few things you should check first. First and foremost, you need to make sure that your graphics card is compatible with your PC and operating system. This can be done by checking your graphics card’s specifications and comparing them to your PC’s requirements.
You should also check whether your graphics card drivers are up-to-date, as outdated drivers can cause compatibility issues and impact performance. Once you’ve ensured compatibility and updated your drivers, you can then proceed to set your graphics card as the default option in the system settings. Doing so can help improve the overall performance and visual quality of your PC, particularly when running graphics-intensive applications like games or video editing software.
Accessing Display Settings in Windows 10
When trying to access the display settings in Windows 10, it’s essential to check the compatibility of your graphics card. The graphics card you have installed determines the maximum display resolution and refresh rate you can achieve. It’s also crucial to ensure that your graphics card is up-to-date with the latest drivers to avoid any compatibility issues.
To check your graphics card’s compatibility, you can head over to the manufacturer’s website and look up the model number. If you’re unsure of the compatibility of your graphics card, you can use the Windows Device Manager to check its specifications. By doing so, you can ensure that you’re getting the best possible display performance out of your system.
Remember, keeping your graphics card updated is vital to maximizing your display’s potential, whether you’re using your computer for work or play.
How to Check Your Graphics Card Information
When it comes to checking your graphics card information, it’s important to ensure that your graphics card is compatible with the program or game you’re trying to run. To check your graphics card compatibility, there are a few things you can do. Firstly, you can check your computer’s system information, which should provide details on your graphics card model and manufacturer.
You can also use third-party software, such as GPU-Z or Speccy, which can provide more detailed information on your graphics card’s specs and performance. Additionally, if you’re unsure whether your graphics card is compatible with a particular program or game, you can check the system requirements for that software, which should list the minimum graphics card specifications needed to run it smoothly. By being aware of your graphics card’s capabilities and limitations, you can ensure a smoother and more efficient experience when running demanding programs or games.
So, the next time you’re wondering about your graphics card compatibility, be sure to check out some of these helpful tools and resources to give yourself peace of mind.
Set Graphics Card as Default
If you’ve ever purchased a dedicated graphics card for your computer, you know how powerful they can be. However, sometimes your system won’t automatically set the graphics card as the default, and instead will rely on the integrated graphics processor. This can lead to slower performance, and games and applications won’t run as smoothly as they should.
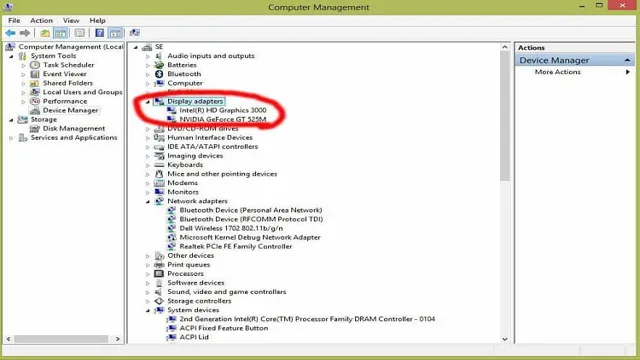
To set graphics card as default on Windows 10, you’ll need to go into the device manager and disable the integrated graphics processor. From there, your computer will automatically prioritize the dedicated graphics card instead. Not only will this improve performance for your favorite games and applications, but it will also ensure that you’re getting the most out of your expensive graphics card investment.
So if you’re struggling with poor performance, consider setting your graphics card as the default on Windows
Manually Selecting Graphics Cards in Display Settings
Graphics Cards If you have a computer with multiple graphics cards, you may want to manually set which one is used by default. This can be useful for tasks that require more powerful graphics processing, such as gaming or video editing. To set the default graphics card, first open the Display Settings on your computer.
From there, click on the “Graphics Settings” option. In this menu, you can select which graphics card you want to use by default for different types of applications. For example, you may want to use your dedicated graphics card for gaming, but your integrated graphics card for everyday tasks.
By manually selecting your graphics card in Display Settings, you can ensure that your computer is using the best possible graphics performance for your specific needs.
Changing Default Graphics Card in the BIOS
Changing the default graphics card in the BIOS may seem like a daunting task, but it’s actually quite simple. By setting your preferred graphics card as the default option, you’ll ensure that your computer runs smoothly and efficiently. First and foremost, you’ll need to enter the BIOS settings by restarting your computer and pressing the appropriate key (typically F2 or Delete).
From there, you can navigate to the “Advanced” or “Integrated Peripherals” section and locate the option for setting the default graphics card. Depending on your computer and the BIOS version, you may need to consult the user manual or online resources for specific instructions. Once you’ve made the necessary changes, be sure to save and exit the BIOS settings.
Voila! Your preferred graphics card is now set as the default option. This simple adjustment can make a big difference in your computer’s performance, so don’t hesitate to give it a try.
Troubleshooting Tips for Setting Graphics Card as Default
If you’re having trouble setting your graphics card as default on Windows 10, there are a few troubleshooting tips you can try. First, make sure that your graphics driver is up to date and compatible with your operating system. You can typically download the latest driver from your GPU manufacturer’s website.
Next, go into the Windows Device Manager and make sure that your graphics card is enabled and listed as the default device. If it’s not, you may need to disable other graphics devices that are on your system. Additionally, you might need to adjust your graphics settings within specific applications to ensure that they’re using your preferred graphics card.
By taking these steps, you should be able to set your graphics card as default and enjoy improved graphics performance.
Conclusion
In conclusion, setting your graphics card as the default option on Windows 10 is crucial for any gamer or graphics enthusiast looking to take their experience to the next level. It’s the equivalent of putting a turbocharger on your car – it gives you that boost in performance and visual quality that makes a world of difference. So don’t settle for mediocrity, take charge and make your graphics card king! After all, as the saying goes, ‘Graphics card is the heart of a gaming PC, so treat it right and it will treat you better.
‘”
FAQs
How do I set the graphics card as default in Windows 10?
To set the graphics card as default in Windows 10, follow these steps:
1. Right-click on the desktop and select “Display settings”.
2. Click on “Advanced display settings”.
3. Click on “Display adapter properties”.
4. Click on the “Adapter” tab.
5. Click on “Properties”.
6. Click on the “Driver” tab.
7. Click on “Update driver”.
8. Select “Browse my computer for driver software”.
9. Select “Let me pick from a list of available drivers on my computer”.
10. Select your preferred graphics card and click “Next”.
11. Restart your computer for the changes to take effect.
How do I check which graphics card is currently being used in Windows 10?
To check which graphics card is currently being used in Windows 10, follow these steps:
1. Right-click on the desktop and select “Display settings”.
2. Click on “Advanced display settings”.
3. Click on “Display adapter properties”.
4. The name of your current graphics card will be displayed on the “Adapter” tab.
What should I do if I can’t find my graphics card in Windows 10?
If you can’t find your graphics card in Windows 10, follow these steps:
1. Check to see if your graphics card is properly installed in your computer.
2. Make sure your graphics card is compatible with your computer’s specifications.
3. Download the latest driver for your graphics card from the manufacturer’s website and install it.
4. Restart your computer and check if your graphics card is now detected by Windows 10.
How do I update my graphics card driver in Windows 10?
To update your graphics card driver in Windows 10, follow these steps:
1. Right-click on the desktop and select “Display settings”.
2. Click on “Advanced display settings”.
3. Click on “Display adapter properties”.
4. Click on the “Driver” tab.
5. Click on “Update driver”.
6. Select “Search automatically for updated driver software”.
7. If an update is found, follow the on-screen instructions to install it.
8. Restart your computer for the changes to take effect.