Looking to up the home entertainment game with a brand new projector? Installing one can be a daunting task, but don’t worry! We’ve got you covered with this step-by-step guide to make the process easy and stress-free. From choosing the right spot for the projector to setting up the screen, we’ll walk you through everything you need to know. So sit back, relax, and get ready to enjoy a cinematic experience in the comfort of your own home.
Let’s get started!
Planning Your Projector Installation
Installing a projector can be a great way to improve your viewing experience, whether you’re watching movies or giving presentations. However, planning your projector installation is crucial to ensuring it achieves the desired results. Start by deciding the ideal location for your projector, taking into account factors such as the size of your room, the distance from the projector to the screen, and any potential obstructions that might affect the quality of the image.
Once you’ve chosen the location, consider how you’ll mount the projector and run cables to it, ensuring they’re hidden from view. You should also check the brightness and resolution of the projector you’re installing, taking into account the ambient lighting in the room. Finally, test your projector thoroughly and make any necessary adjustments before inviting friends, family, or clients to enjoy your new setup.
By taking the time to plan your projector installation properly, you can enjoy high-quality images and a more immersive viewing experience.
Choosing the Right Location for Your Projector
When planning your projector installation, one of the most important factors to consider is the location. Picking the right location for your projector can make all the difference in ensuring that your viewing experience is enjoyable. The ideal location for your projector should be one that is easily accessible and has the appropriate amount of space for the screen and any additional materials.
It’s also important to consider the lighting conditions in the area and try to avoid any glare or reflections that may affect the image quality. Once you have found the perfect location for your projector, you can then begin the installation process and start enjoying your new home entertainment system. When it comes to setting up your projector, whether it’s for a movie night or a game, always prioritize the location as it can vastly impact your viewing experience.
Determining the Distance from Projector to Screen
When it comes to setting up a projector, one of the most important considerations is determining the distance between the projector and the screen. This distance can significantly impact the quality of the image projected. To determine this distance, you need to consider the throw ratio of your projector.
This is the ratio between the distance from the projector to the screen and the width of the projected image. For instance, a projector with a 5 throw ratio should be placed
5 feet away from a screen to display an image that’s five feet wide. You should also consider the aspect ratio of your screen, which is the ratio of the width to the height of your projector screen. With adequate planning, you can achieve an optimal projection setup that delivers a clear and detailed image for your viewing pleasure.
Selecting the Appropriate Projector Mount
When it comes to planning your projector installation, selecting the appropriate projector mount is crucial. Not only does it ensure the safety and stability of your projector, but it also affects the quality of your projection. There are several factors to consider when choosing a projector mount, such as the weight and size of your projector, the location of the mount, and the type of ceiling or wall it will be attached to.
You will want to ensure that the mount you select can handle the weight and size of your projector, as well as be compatible with the specific model you have chosen. Additionally, make sure to choose a mount that fits the location where you plan on installing your projector, whether it’s a suspended ceiling, a concrete wall, or a wooden beam. By selecting a high-quality projector mount that can accommodate your specific needs, you can ensure that your projector is securely and safely mounted and that you get the most out of your projection experience.
Preparing for Your Projector Installation
If you’re planning on installing a projector, there are a few things you’ll want to consider before getting started. First and foremost, you’ll need to choose a location for your projector. Ideally, you’ll want to select an area that is free from obstructions and has plenty of space for your audience to sit comfortably.
You’ll also want to make sure that the area you’ve chosen is easily accessible to the necessary power outlets and cables. When installing your projector, it’s important to take the time to properly calibrate it. This means adjusting the focus, alignment, and color settings to ensure that you get a crisp, clear image.
If you’re not comfortable doing this yourself, it may be worth hiring a professional to help. Finally, don’t forget about sound! A good sound system is just as important as a high-quality image, so make sure to invest in some speakers or a soundbar to complete your setup. Overall, a little bit of preparation can go a long way when it comes to projector installation.
Gathering the Necessary Tools and Equipment
If you’re planning to install a projector in your home, it’s essential to gather the right tools and equipment before starting the process. First and foremost, you’ll need a functioning projector and a screen to display the images. Aside from the projector and screen, you’ll also require a mounting bracket, screws, and power cables.
Make sure to measure the distance between the projector and the screen to ensure that you have the right length of cables and that the mounting bracket will fit appropriately. To prevent potential damage to your new equipment, ensure that the room is properly lit before starting the installation. Moreover, consider the type of wall or ceiling where you plan to mount the projector.
Some materials, such as drywall, require special considerations like anchors to prevent damage or accidents. With the right tools and careful preparation, you can have a successful and stress-free projector installation.
Setting Up Your Projector Screen or Surface
When it comes to setting up your projector screen or surface, preparation is key. First, choose the location where you want to install your projector and ensure that the space is suitable. You’ll need ample room to project your images and an area that’s both clean and free from obstructions.
Once you’ve found the perfect spot, consider the type of projector screen or surface you want to use. Do you want a traditional projector screen, or are you considering a painted wall or sheet? Depending on your choice, you may need to prepare the surface by cleaning it thoroughly and adding a coat of paint or luminescent surface. Finally, make sure your projector’s placement is optimal.
It should be positioned at a distance and angle that offers optimal visibility and prevents any shadows from obstructing the image. With a little preparation and the right tools, in no time, you’ll have a fantastic movie theater in the comfort of your home.
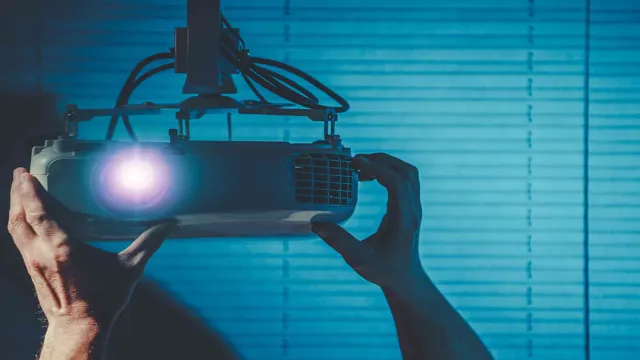
Installing the Projector Mount
So, you’ve got your hands on a shiny new projector mount, and you’re ready to install it in your home theater setup. Before you start tinkering, there are a few things to consider to make sure your installation goes smoothly. First and foremost, you’ll need to check the weight capacity of your mount and ensure that it’s compatible with your projector.
Make sure to gather all the necessary tools and hardware, including a good quality drill and screws that are appropriate for your wall type. You’ll also need to find the right spot to mount your projector, taking into consideration factors like ceiling height, distance from the screen, and potential obstructions. With these steps in mind, you’ll be well on your way to a successful projector installation that will take your home theater experience to the next level.
Installing Your Projector
When it comes to projector installation, there are a few things you need to keep in mind to ensure a seamless setup. First and foremost, you want to find the perfect spot for your projector. Consider factors such as distance from the screen, height, and any ambient lighting that may affect the image quality.
Once you’ve found your spot, it’s time to mount or place the projector. Make sure you have all the necessary hardware and that the projector is level. Once you’ve secured the projector, it’s time to connect the cables.
Make sure the projector is compatible with your device and that all cables are properly connected. Test the image quality and make any necessary adjustments. Lastly, you want to take care of any additional features such as speakers or remote control.
With these tips, you’ll have your projector installation up and running in no time!
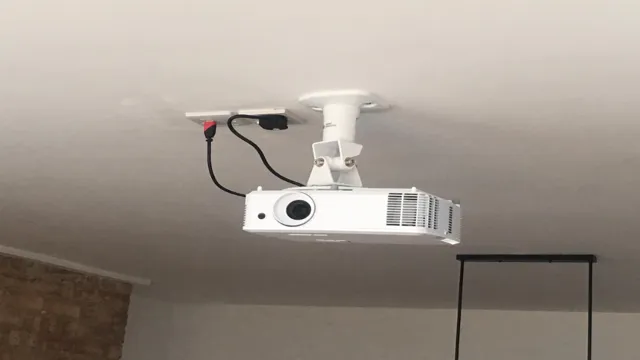
Mounting the Projector to the Ceiling or Wall
When it comes to installing your projector, setting it up on the ceiling or wall can be a great space-saving solution. However, it can seem like a daunting task if you don’t have the technical know-how. But fear not, it’s easier than you may think! First, choose the right spot for your projector and ensure the surface is sturdy enough to hold it.
Then, use a mounting kit to secure your projector to the ceiling or wall. It’s important to follow the instructions carefully and use the correct tools for the job. Pay attention to the angle and distance of your projector to ensure the best image quality.
Once you have everything set up, all that’s left is to plug in your projector and adjust the settings for optimal display. With a bit of patience and attention to detail, you can have a professional-looking setup in no time!
Connecting the Projector to Power and Audio/Video Sources
Once you’ve got your new projector, it’s time to start installing it in your home theater or office. First, you need to connect it to a power source. Most projectors come with a power cable that you can plug into a nearby outlet.
Depending on the model you choose, you may also need to connect it to an external amplifier or speakers for audio. For video sources, you can connect your projector to a Blu-ray player, DVD player, or streaming device using an HDMI cable. Some models may also have VGA or composite connections, but HDMI is typically the best option for high-quality video.
Once you’ve connected everything, turn on the projector and adjust the focus and image size until you have a clear and crisp picture. With a little bit of effort and know-how, you’ll be enjoying your favorite movies and TV shows on the big screen in no time.
Calibrating Your Projector
Projector installation can be an exciting but sometimes daunting task. Once your new projector is installed, it’s essential to calibrate it correctly to ensure the best image quality possible. Calibration involves adjusting the various settings on your projector to optimize brightness, contrast, and color accuracy.
It’s crucial to do this in a well-lit room and to use an appropriate calibration tool for the job. The process of calibrating your projector should start with adjusting the brightness and contrast. The brightness should be set to the point where you can see all the details of the image without it being too bright or too dark.
Similarly, the contrast setting should be adjusted to balance the amount of white and black on the screen. Once these settings are in place, it’s time to move onto the color settings, which includes hue, saturation, and color temperature. Ultimately, the goal is to achieve an accurately colored image that suits your specific preferences.
Taking the time to calibrate your projector after installation will provide a more enjoyable viewing experience overall, with stunning, rich, and vibrant colors that perfectly suit your needs.
Adjusting the Focus and Keystone Correction
Calibrating your projector involves adjusting the focus and keystone correction to ensure your image is clear and straight. To adjust focus, use the zoom or focus ring on your lens to make the image as crisp as possible. It may take some trial and error to find the perfect focus, but once you do, your image will be sharp and defined.
Keystone correction is used to fix any distortion caused by projecting the image from an angle. To do this, go to your projector’s settings menu and find the keystone correction option. Adjust the slider until the image is straight and symmetrical.
This can make a big difference in the overall quality of your projection. By calibrating your projector, you can ensure your audience has the best viewing experience possible.
Setting the Color and Brightness Levels
Calibrating your projector is essential to getting the best results possible from your device, and one crucial aspect of this process is setting the color and brightness levels. These settings can significantly affect the final image quality, so it’s vital to fine-tune them to your specific needs. Start with adjusting the brightness and contrast settings to ensure that your projector presents an image with just the right amount of brightness and sharpness.
You can then move onto adjusting the color using the color temperature settings or color balance controls to maximize the color quality. Always remember to do this calibration in a darkened room with the projector’s lamp on to get the best results. With the right settings, you can improve the image quality of your projector and enjoy a high-quality cinematic experience or seamless presentations.
So why settle for a subpar output when you can get the best out of your projector?
Final Thoughts and Troubleshooting Tips
In conclusion, projector installation can be tricky, but it doesn’t have to be. With the right preparation and knowledge, you can avoid common problems and make the installation process a breeze. One important tip is to make sure that your projector is compatible with your device and that you have the right cables and adapters to connect them.
Additionally, ensure that the mounting location is secure and that the projector is aligned properly. When troubleshooting, start by double-checking all of your connections and settings. If the problem persists, try adjusting the focus or brightness settings.
Remember to also keep your projector and surrounding area clean to avoid dust and debris interfering with your picture quality. Overall, taking the time to properly install and maintain your projector can result in a seamless and enjoyable viewing experience.
Conclusion
In conclusion, installing a projector is like setting up a blank canvas for an artist to create their masterpiece. It allows for limitless possibilities and creativity, enabling you to bring your ideas to life on a larger scale. From business presentations to movie nights with friends, a properly installed projector can elevate any experience to the next level.
So why settle for a small screen when you can go big and bold with a projector installation?”
FAQs
What should I consider before installing a projector?
Before installing a projector, consider the room size, screen size, throw distance, and ambient lighting conditions to ensure optimal performance.
Can I install a projector without professional help?
Installing a projector can be a complex process. It is highly recommended to hire a professional technician for proper installation to avoid technical problems and ensure safety.
How much will it cost to install a projector?
The cost of installing a projector depends on various factors, such as room size, screen size, projector type, and installation complexity. On average, it can cost anywhere from $100 to $1000 or more.
How far should a projector be placed from the screen?
The projector’s placement distance from the screen depends on the projector’s throw ratio and the screen size. Generally, for a screen size of 100 inches, the projector should be placed between 9 to 16 feet away.