
Mounting your HP B300 monitor can be a challenging and daunting task. With numerous pieces to assemble, it’s easy to feel overwhelmed. Luckily, there are a few simple steps you can follow to make the process a breeze.
In this blog post, we’ll provide you with easy-to-follow instructions so you can mount your HP B300 with ease and confidence. So, let’s dive in!
What is HP B300 PC Mounting Bracket?
The HP B300 PC Mounting Bracket is a device used to attach a desktop PC to the back of a monitor or display screen. It provides a convenient and secure mounting solution, particularly for those with limited desk space. The bracket is made of durable materials and is built to withstand the weight of the PC.
It is compatible with a range of HP desktop computers, including the EliteDesk 705 G1, 705 G2, and ProDesk 600 G The bracket can be easily installed using the included screws and instructions, and it allows for quick and easy access to the PC if any upgrades or maintenance is required. With the HP B300 PC Mounting Bracket, you can keep your workspace organized and make the most of your desktop PC.
Description of the Product
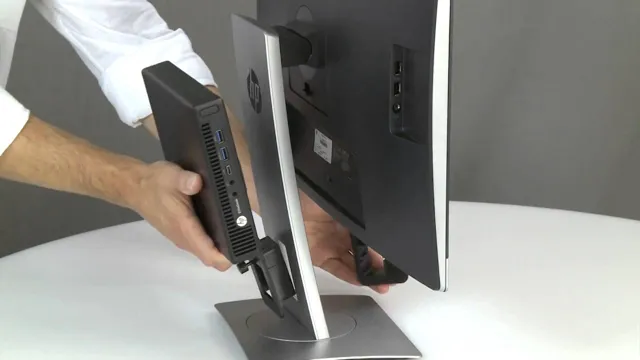
HP B300 PC Mounting Bracket is a device that is specifically designed to mount an HP Ultra-slim Desktop to the back of select HP ProDisplays or a stable flat surface. The bracket is made of sturdy steel, making it a durable and reliable mounting solution for your desktop computer. With the use of this mounting bracket, you can free up desk space and keep your workstation organized.
It also adds an extra layer of security by reducing the risk of theft or damage caused by accidental falls or spills. This product is easy to install and provides a secure fit, ensuring that your desktop computer stays in place. Consider getting the HP B300 PC Mounting Bracket if you want to maximize your workspace, increase convenience, and add an extra layer of security to your setup.
Compatibility with your HP B300 PC
If you’re a proud owner of an HP B300 PC, you might be wondering how to mount it in the most efficient and practical way possible. This is where the HP B300 PC Mounting Bracket comes in! This bracket is precisely designed to fit your HP B300 PC and secure it to most surfaces securely. This mounting bracket is versatile, sturdy, and durable, and it allows you to mount your computer on any VESA-compliant display or wall mount.
It’s ideal for businesses, schools, organizations, and individuals who want to save space, reduce clutter and improve the overall functioning of their workspace. Whether you want to mount it on your desk, wall, or any other surface, the HP B300 PC Mounting Bracket is a must-have accessory for anyone who wants to keep their HP B300 PC safe and secure while promoting an ergonomic and hassle-free work environment.
How to Install the Bracket?
If you’re looking to mount your HP B300 PC securely, the HP B300 PC mounting bracket is the perfect solution. Installing it is quite simple and requires only a few basic tools. The first thing you need to do is turn off your computer and disconnect it from any cables.
Next, you need to remove the stand from the back of the computer. Once the stand is removed, align the mounting bracket with the mounting holes on the back of the computer. Use the screws provided in the mounting kit to secure the bracket to the computer.
Finally, attach the bracket to a VESA-compliant mounting solution. With these steps, your HP B300 PC will be securely mounted, giving you more workspace and a more organized desk. So, don’t hesitate to grab an HP B300 PC mounting bracket and get started with the installation process today!
Tools Required for the Job
When it comes to installing a bracket, having the right tools can make all the difference. Depending on the type of bracket and its intended use, you may need a drill, screws, screwdriver, level, measuring tape, and a stud finder. Before beginning the installation process, consider the weight that the bracket will support and choose appropriate tools accordingly.
Once you have assembled your materials, begin by marking the position where you want the bracket to be installed. Use a level and measuring tape to ensure accuracy. If you are installing the bracket onto a wall, use a stud finder to locate a secure anchor point.
Securely mount the bracket onto the wall or other surface using screws and a screwdriver. Double-check that the bracket is level before placing any items onto it. With the proper tools and a bit of care, installing a bracket can be a simple and straightforward task.
Step-by-Step Tutorial
Installing the bracket may seem like a daunting task, but with the right tools and instructions, the process is straightforward. Before beginning, ensure that you have the correct size and type of bracket for your project. The first step in installing the bracket is to find the studs or support beams in the wall.
Using a stud finder, locate the points where the bracket will be mounted. Once the studs are located, mark the spots with a pencil for reference. Next, hold the bracket against the wall, lining it up with the marked points.
Use a level to ensure that the bracket is even. Once in the right spot, thread screws through the bracket holes and into the studs, using a drill if necessary. Finally, double-check that the bracket is level, and make any necessary adjustments.
Congratulations, you have successfully installed the bracket to the wall!
Tips and Tricks
If you’re someone who enjoys DIY projects, installing a bracket can be a fun and rewarding task. However, it can be quite confusing for beginners. Here’s a step-by-step guide on how to install a bracket:
Firstly, decide on the location where you want to install the bracket. Choose a spot that is strong enough to hold the weight of the object you plan on mounting onto the bracket.
Measure the width and height of the bracket and mark the points where you will drill your holes. Use a drill bit that is slightly smaller than the screws that you’ll be using to mount the bracket onto the wall.
This ensures a firm grip for your screws. Once you’ve drilled the holes, insert wall anchors if necessary, and then screw the bracket onto the wall with your power drill.
Finally, test the bracket’s stability by applying light pressure and pushing on it gently with your hand. If it’s not sturdy enough, tighten the screws a little more.
By following these simple steps, you can easily install a bracket by yourself. Remember to choose the right location, measure precisely, and use a drill bit that fits your screws. With a little practice, you’ll be able to mount objects onto brackets like a pro!
Why Use HP B300 Mounting Bracket?
If you’re looking for a reliable and sturdy mounting solution for your HP B300 PC, you should consider getting the HP B300 Mounting Bracket. It’s specifically designed to securely mount your computer to a variety of surfaces, including walls, under desks, and even on a VESA-compatible monitor. With this mounting bracket, you not only save valuable desk space, but it also keeps your PC safe and out of the way.
Plus, it’s very easy to install, with a simple, yet effective design that ensures a snug fit. So, if you’re tired of dealing with a cluttered workspace or worried about your PC getting knocked over, give the HP B300 Mounting Bracket a try. It’s a smart and practical investment that will make your life easier and your workstation cleaner.
Benefits of Using the Bracket
If you’re looking for a reliable and durable mounting bracket for your HP B300 monitor, there’s no better choice than the HP B300 Mounting Bracket. This bracket is designed specifically for use with the HP B300 monitor, ensuring a perfect fit and maximum stability. One of the key benefits of using this bracket is that it allows you to free up valuable desk space by mounting your monitor on the wall or a compatible monitor arm.
This not only gives you more room to work, but also helps prevent neck and eye strain by allowing you to adjust the height and angle of your monitor to your liking. The HP B300 Mounting Bracket is also incredibly easy to install, so you can have your monitor up and running in no time. Whether you’re working from home or in an office, the HP B300 Mounting Bracket is a smart investment that will make your workspace more comfortable and efficient.
Comparing it to Other Mounting Solutions
If you are in need of a mounting solution for your workstation, HP B300 Mounting Bracket is the way to go. There are a lot of mounting solutions available in the market, but the HP B300 Mounting Bracket stands out due to its versatility and durability. It can be easily attached to any VESA-compatible display and be used as a standalone mount or with an arm.
Additionally, it has been tested extensively to ensure that it can hold displays up to 24 inches and weighing up to 13 kg. The HP B300 Mounting Bracket is also easy to install with a tool-less design that eliminates the need for screws and nuts.
With its black powder-coated finish, it blends in seamlessly with your workstation and its accessories. So, if you want a reliable and durable mounting solution that is versatile and easy to install, the HP B300 Mounting Bracket is definitely worth considering.
Conclusion and Recommendations
In conclusion, the HP B300 PC Mounting Bracket is the ultimate tool for those who want to seamlessly integrate their PC into their workspace. With its sleek design and durable construction, this bracket offers both form and function, providing a secure and easy-to-access solution for mounting your computer. So, whether you’re a busy professional or a tech-savvy enthusiast, the HP B300 PC Mounting Bracket is the perfect addition to your setup.
Trust us, once you’ve used this bracket, you’ll wonder how you ever managed without it. It’s like a big hug for your computer – that’s both witty and clever!”
FAQs
What is an HP B300 PC mounting bracket?
An HP B300 PC mounting bracket is a device used to secure a small form factor HP business desktop or workstation to a fixed location, such as a desk, wall, or under a counter.
What are the dimensions of an HP B300 PC mounting bracket?
The dimensions of an HP B300 PC mounting bracket are 14 x 19 x 8.9 cm, and it is compatible with HP EliteDesk 705 G1 MT/WMT, HP ProDesk 405 G1 MT, and HP ProOne 400 G1 All-in-One Business PC (19.5-inch diagonal, non-touch).
How do I install an HP B300 PC mounting bracket?
To install the HP B300 PC mounting bracket, first, remove the security screw from the back of the HP EliteDesk or HP ProDesk. Next, attach the brackets to the HP EliteDesk or HP ProDesk using the four screws provided. Finally, attach the bracket to a surface using the screws or bolts appropriate for the surface type.
Is the HP B300 PC mounting bracket compatible with other HP desktops or workstations?
No, the HP B300 PC mounting bracket is not compatible with other HP desktops or workstations. It is designed specifically for use with the HP EliteDesk 705 G1 MT/WMT, HP ProDesk 405 G1 MT, and HP ProOne 400 G1 All-in-One Business PC (19.5-inch diagonal, non-touch).