If you’re someone who frequently uses a Mac and you’re looking to display your screen on a larger scale, you may be wondering how to properly connect your computer to a projector. Luckily, it’s easier than you might think! By following a few simple steps, you’ll be able to project your Mac screen onto a wall or a larger screen and enjoy the benefits of a bigger display. From sharing presentations or videos with a group of people to gaming in a more immersive way, a projector can greatly enhance your overall experience.
So, are you ready to learn how to use a projector with your Mac? Let’s dive into it!
Connecting your Mac to the Projector
If you’re wondering how to use a projector with your Mac, don’t worry – it’s easier than you might think! First, make sure your projector is connected to a power source and turned on. Then, connect your Mac to the projector using a compatible cable (such as HDMI, VGA, or Thunderbolt). Once connected, your Mac should automatically recognize the projector and display the image on both screens.
However, if this doesn’t happen, you may need to adjust your display settings manually. Simply go to “System Preferences” on your Mac, then select “Displays”. From there, you can choose to “mirror” your display onto the projector, or extend your desktop across both screens.
Voila! With just a few simple steps, you’ll be ready to share your Mac’s screen with a larger audience using a projector.
Check the ports on your Mac and the projector
Connecting your Mac to a projector can be a complicated process if you’re not familiar with the various ports and connections involved. One of the first steps is to check the ports on your Mac and the projector. Most Macs have either a Mini DisplayPort or a Thunderbolt port, which are often used to connect to projectors.
Older models may also have a VGA or HDMI port. On the projector side, it’s important to check the ports as well. You’ll want to ensure that the projector has a port that matches the one on your Mac.
Some projectors have multiple ports, so it’s a good idea to check which one will give you the best image quality. Once you’ve identified the correct ports on both your Mac and the projector, you can then proceed with the physical connection process. With a bit of practice, connecting your Mac to a projector should become a breeze.
Choose a cable and connect Mac to the projector
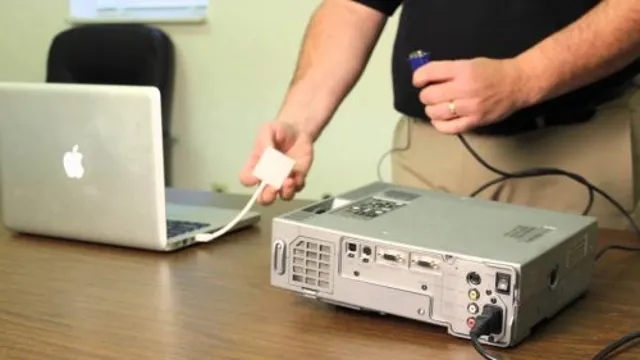
Connecting a Mac to a projector is a breeze if you have the right cable. Most projectors come with different input options, but if you’re using a Mac, chances are you’ll need a VGA or HDMI adaptor. For newer Macs, a Thunderbolt to HDMI adaptor should get the job done.
First, hook up one end of the cable to your Mac’s video output port and the other end to one of the projector’s input ports. Press the button on the projector to switch to the correct input source, and voilà, your Mac’s display will appear on the projector. You might still need to adjust the resolution and screen layout to make sure everything’s displayed correctly.
Remember, a reliable cable is essential to ensuring maximum signal quality and minimizing distortion, so it’s worth investing in a good-quality cable if you plan on using your Mac with projectors often.
Adjusting Display Settings on your Mac
So, you want to know how to use a projector with your Mac? Well, it’s actually quite simple. The first thing you need to do is connect your Mac to the projector using the appropriate cable. Once you’ve done that, you’ll need to adjust your display settings to get everything set up correctly.
To do this, go to the Apple menu and select System Preferences. From there, click on Displays and then choose the Arrangement tab. You’ll see a box that says “Mirror Displays” – make sure this is unchecked.
Next, drag the white bar to the external display (which should be the projector) and position it where you want it. You can also adjust the resolution to make sure it fits properly. And that’s it! With these settings adjusted, you should be ready to give your presentation or watch your favorite movie on the big screen.
Open System Preferences and Click Displays
If you’re using a Mac and want to adjust your display settings, the first step is to open System Preferences. You can do this by clicking on the Apple icon in the top left corner of your screen and selecting “System Preferences” from the drop-down menu. Once you’ve opened System Preferences, you’ll see a list of different sections to choose from.
Click on “Displays” to access the settings for your screen. From here, you can adjust the resolution, brightness, and other display settings to your liking. Whether you want a bigger view or a clearer picture, changing your display settings can make a big difference in how you use your Mac.
So why wait? Open up System Preferences and start customizing your display today!
Choose the display mode and arrangement you want
When it comes to using your Mac, the display settings are crucial in providing an optimal viewing experience. Fortunately, adjusting these settings is a breeze. From the “System Preferences” menu, you can choose between various display modes and resolutions that work best for you.
You can opt for a larger text size or chose to display more content on the screen by adjusting the scaling. You can even select the arrangement of multiple monitors to find a configuration that works best for your needs. Display settings also allow you to calibrate the colors of your display for more accurate rendering.
With just a few simple clicks, you can transform your Mac to enhance your viewing experience. So, don’t hesitate to experiment with your display settings and find the perfect balance between aesthetics and functionality.
Adjust the resolution and brightness settings
When it comes to using a Mac, adjusting the resolution and brightness settings can make a big difference in your overall user experience. Luckily, it’s easy to do! To adjust the resolution, simply go to your System Preferences, click on Displays, and then select the resolution you want from the list provided. Keep in mind that the higher the resolution, the crisper and more detailed the image will be, but everything will be smaller.
On the other hand, if you prefer larger icons and text, choose a lower resolution. When it comes to brightness, you can either use the F1 and F2 keys on your keyboard or go to Displays in System Preferences and adjust the brightness slider. Having a brighter display can make it easier to read under certain lighting conditions, while a lower brightness can be easier on the eyes in darker environments.
Overall, taking the time to adjust your display settings can greatly improve your Mac experience.
Troubleshooting Common Problems
Using a projector with a Mac can be a bit of a challenge, but with a few simple steps, you can easily overcome any issues that may come up. The first step is to make sure that your Mac and the projector are both powered on and properly connected. This can usually be accomplished by plugging the appropriate cables into the Mac and the projector, and then selecting the correct input on the projector.
If you’re still having trouble, try restarting both devices or consulting the user manual for your specific model. Another potential issue is resolution compatibility – make sure that the resolution settings on your Mac are compatible with the projector’s native resolution. By troubleshooting these common problems, you can quickly and easily set up your projector for a successful presentation or movie night.
Check the connections and cables
When faced with technical issues, one of the first things you should always check are the connections and cables. Loose connections or damaged cables can cause various problems, including audio or video disturbances, power outages and network connectivity issues. Inspect the cables in your system and make sure they are all securely plugged in.
If you see any frayed or damaged cables, replace them immediately. Additionally, you may want to check that the settings on your device are correct, and test the device on a different input or output. Ensuring that all your connections and cables are in good condition can help troubleshoot and solve a range of common technical problems, allowing you to avoid costly repairs or replacements.
Remember, prevention is always better than cure!
Restart your Mac and the projector
If you’re experiencing difficulties with your projector and Mac, restarting both devices is always a good place to start. This might seem like an obvious solution, but it can be quite effective in resolving common issues such as connectivity problems and display glitches. Before restarting, make sure to disconnect any cables and power sources to avoid any damage.
Give both devices a few minutes to rest before powering them back on and attempting to connect them again. This simple process can often do wonders in restoring your projector’s performance and getting a clear and smooth display on your Mac. Remember to also check your cables and connections for any damage or debris that may be interfering with the connection.
If the problem persists, look for further troubleshooting options or consult a professional technician to diagnose the issue.
Conclusion
In conclusion, using a projector with your Mac is easier than ever before. Whether you’re presenting ideas in a boardroom or streaming your favorite movies at home, the key is to make sure your Mac and projector are connected correctly. With a little bit of patience and the right cables or wireless technology, you’ll be projecting your screen for all to see in no time.
So go forth, Mac enthusiasts, and let your ideas shine bright like the bulbs in your projectors!”
FAQs
How do I connect my Mac to a projector?
You can connect your Mac to a projector using a VGA, HDMI, or Mini DisplayPort adapter. Simply plug one end of the adapter into your Mac and the other end into the projector, then select the appropriate input on the projector.
Why is my Mac screen not displaying on the projector?
There could be several reasons why your Mac screen is not displaying on the projector, including a faulty cable, incorrect input selection on the projector, or a display resolution mismatch. Make sure you’ve selected the appropriate input on the projector and check the display settings on your Mac.
How do I mirror my Mac screen on a projector?
To mirror your Mac screen on a projector, go to System Preferences > Displays and select “Detect Displays” if the projector doesn’t appear automatically. Then, select “Mirror Displays” to duplicate your Mac screen on the projector.
Can I use AirPlay to connect my Mac to a projector?
Yes, if your projector supports AirPlay, you can use it to wirelessly mirror your Mac screen on the projector. To do so, connect your Mac and projector to the same Wi-Fi network, then select the AirPlay icon in the menu bar and choose the projector as your display.