Installing a heatsink on a motherboard is a key step to ensure that your computer operates at its optimal performance level. Without proper heat management, your system could overheat and cause damage to its components. However, the process of installing a heatsink may seem daunting to those who have never done it before.
Don’t worry! In this blog post, we will take you through the step-by-step guide on how to install a heatsink on a motherboard. We will provide you with a clear and concise set of instructions so that anyone, regardless of their technical expertise, can accomplish this task with ease. So, let’s dive right in and get started!
Prepare Your Equipment
Installing a heatsink on a motherboard can help keep your computer running smoothly and prevent overheating. But before you get started, it’s important to have the right tools and equipment on hand. First, make sure you have a suitable heatsink for your CPU.
Check the specifications of your motherboard and make sure the heatsink is compatible with your CPU socket. You’ll also want to have a thermal paste on hand to help transfer heat away from the CPU. Once you have all your equipment ready, you can begin the installation process by carefully removing any existing heatsink or thermal paste from the CPU and applying a small amount of the new thermal paste.
Then, carefully align the new heatsink onto the CPU and secure it in place. Remember to follow the manufacturer’s instructions carefully and take your time to ensure everything is installed correctly. With the right equipment and a bit of patience, you can easily install a heatsink on your motherboard and keep your computer running smoothly for years to come.
Getting the Heatsink and Thermal Paste
When it comes to installing a heatsink and thermal paste, preparation is key. Make sure you have all the necessary equipment ready before you start. You will need a screwdriver, rubbing alcohol, a clean cloth or rag, your new heatsink, and thermal paste.
It’s essential to choose the proper size heatsink for your CPU. A heatsink that’s too small won’t cool your processor efficiently, whereas one that’s too large won’t fit the socket. Also, make sure you have a high-quality thermal paste that can adequately conduct heat to the heatsink.
A good thermal paste can make a significant difference in your computer’s temperature. Remember, proper preparation will ensure a successful installation and keep your computer running smoothly.
Motherboard and Screwdrivers Required
If you’re planning on building your own computer, it’s important to have the necessary equipment to get the job done. Two essential items you’ll need are a motherboard and screwdrivers. The motherboard is the backbone of your computer, connecting all the components together and allowing them to communicate.
Without it, your computer won’t function properly. You’ll also need screwdrivers to secure the motherboard and other components in place. It’s important to choose the right size and type of screwdriver to avoid damaging your equipment.
Make sure to do your research and purchase equipment that is compatible with your specific needs. It’s better to invest in quality equipment upfront than to compromise on cheaper options that could lead to problems down the line. Remember, building a computer requires precision and attention to detail, so take your time and ensure that everything is properly installed and secured.
Detach the Existing Heatsink
If you’re looking to install a new heatsink onto your motherboard, the first step is to detach the existing heatsink. This process can be a bit tricky, so be sure to follow these steps closely. Start by unplugging your computer and removing the side panel.
Locate the heatsink on your motherboard – it will usually be near the processor. Use a screwdriver to unscrew any screws holding the heatsink in place. You may need to twist the heatsink a bit to loosen it from the thermal paste that’s holding it in place.
Once the heatsink is detached, use a lint-free cloth or paper towel to wipe away any thermal paste residue from the surface of your processor. And that’s it – your existing heatsink is now detached and you’re ready to install your new one!
Removing the Thermal Paste
Removing the thermal paste is an important part of maintaining your CPU’s health and performance. To do this, you will first need to detach the existing heatsink. Start by shutting down your computer and unplugging it from the power source.
Then, carefully remove the screws or clips that hold the heatsink in place. Remember to be gentle and avoid applying any force that could damage your CPU or motherboard. Once you’ve removed the heatsink, you may notice that the thermal paste has become dry or caked.
This can negatively affect your CPU’s ability to cool down, which can lead to performance issues or even physical damage. To remove the old thermal paste, use a clean cloth or paper towel to wipe it away carefully. If there are any stubborn spots, you can use rubbing alcohol or a specialized thermal paste remover to make the process a bit easier.
Don’t forget to clean both the CPU and the heatsink thoroughly before applying new thermal paste and reattaching the heatsink. By taking the time to properly remove and replace the thermal paste, you can ensure that your CPU stays cool and performs at its best for years to come.
Unscrewing the Existing Heatsink
When upgrading your computer’s CPU or replacing the existing heatsink, the first step is to remove the old heatsink. This may seem like a daunting task for beginners, but it can be accomplished with some basic tools and careful attention. Begin by shutting down your computer and unplugging it from the power source.
Next, locate the existing heatsink on your CPU and carefully unscrew the screws or clips that are holding it in place. This may require some force and patience, but be careful not to damage the CPU or surrounding components. Once the screws or clips have been detached, gently lift the heatsink off the CPU, taking care not to twist or pull too hard.
With the old heatsink removed, you are now ready to install the new heatsink and begin optimizing your computer’s performance.
Prepare the Motherboard for a New Heatsink
If you’re planning to upgrade your computer’s cooling system, you’ll want to know how to install a heatsink on your motherboard. Before you begin, make sure you have a compatible heatsink and thermal paste. First, remove any existing heatsink and clean the CPU surface with isopropyl alcohol.
Next, apply a small amount of thermal paste in the center of the CPU (about the size of a grain of rice). Then, align the mounting bracket with the motherboard’s holes and screw it into place. Gently secure the heatsink onto the bracket and tighten the screws in a crisscross pattern.
Be sure not to overtighten the screws, as this can damage both the heatsink and motherboard. Finally, connect the heatsink’s fan cable to the motherboard’s fan header, and you’re all set! Properly installing a heatsink on your motherboard can help keep your computer running smoothly and prevent overheating issues.
Clean the CPU and Heatsink Area
When it comes to installing a new heatsink onto your motherboard, it’s crucial to prepare the CPU and heatsink area properly. You don’t want any dust, debris, or thermal paste remnants to affect the performance of your new heatsink. Start by turning off your computer and unplugging it from the power source.
Then, open your computer case and locate the heatsink and CPU area. Use a can of compressed air to blow away any dust or debris that may have accumulated over time. Next, carefully remove the old heatsink and use a lint-free cloth and rubbing alcohol to clean the CPU surface of any excess thermal paste.
Finally, apply a small amount of thermal paste to the center of the CPU, making sure to spread it evenly. With the CPU and heatsink area now clean and prepped, you can safely install your new heatsink and enjoy improved cooling performance for your computer system. Remember, taking the time to properly clean and prep your motherboard for a new heatsink can save you from potential overheating and system failure issues.
Apply Thermal Paste on Heatsink
To prepare the motherboard for a new heatsink, you’ll want to apply thermal paste to the underside of the heatsink before attaching it to the processor. This paste ensures that heat is transferred efficiently from the processor to the heatsink, allowing the fan to cool it down. Applying thermal paste can be a bit tricky, but with a steady hand, you’ll be able to do it easily.
Keep in mind that too much paste can actually hinder heat transfer, so a pea-sized amount in the center of the processor is all that’s needed. Think of it like spreading butter on bread – you want enough to cover it, but not so much that it becomes goopy. Once the paste is applied, carefully attach the heatsink to the processor, making sure it’s firmly in place.
With your new heatsink in place, you can enjoy a cooler and more reliable computer.
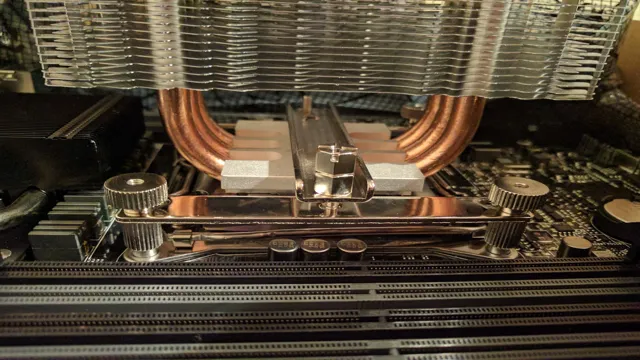
Positioning the Heatsink Correctly on the CPU
heatsink, CPU, motherboard, positioning When it comes to installing a new heatsink on your CPU, one of the most important things to consider is the positioning of the heatsink on the motherboard. Before you start, it’s important to prepare the motherboard by removing any old heatsink, cleaning the CPU, and applying new thermal paste. Once you have everything ready, carefully place the heatsink onto the CPU, making sure it’s aligned properly.
It’s important to avoid any accidental bending or misalignment of the heatsink, as this can create uneven temperatures and decrease the efficiency of the cooling system. Additionally, make sure to tighten the screws or clips evenly, checking the evenness with a small level if possible. By taking the time to properly position the heatsink on the CPU, you can ensure optimal cooling performance and avoid any potential damage to your hardware.
Attaching the New Heatsink
Installing a heatsink onto a motherboard may seem tricky, but it’s actually a relatively straightforward process. First, make sure you have the appropriate heatsink for your CPU and motherboard. Once you have that, remove any previous thermal paste or adhesive from the CPU and heatsink with a cleaning solution.
Now it’s time to attach the new heatsink. Depending on the type of heatsink you have, you may need to align it with specific mounting holes on your motherboard. Once aligned, attach the mounting bracket or retention mechanism to secure the heatsink in place.
After that, apply a small amount of thermal paste onto the center of the CPU and evenly spread it out with a spatula or your finger before placing the heatsink onto the CPU. Finally, connect the fan to the appropriate power source on your motherboard, and you’re done! With this easy process, you can enjoy a cooler and more efficient CPU.
Screwing the New Heatsink Into Place
Attaching a new heatsink to your computer can seem daunting, but it’s actually a relatively simple process. Once you have removed the old heatsink, you’re ready to install the new one. Begin by carefully aligning the new heatsink with the mounting holes on your motherboard.
Next, insert the screws and tighten them down, being careful not to over-tighten. You want the heatsink to be snugly in place, but not so tight that you risk damaging your motherboard or CPU. It’s important to ensure that the screws are tightened in a criss-cross pattern to ensure even pressure distribution.
Once the screws are secure, you can plug in any power cables and turn on your computer to ensure that everything is working correctly. Don’t forget to monitor your system’s temperatures to ensure that your new heatsink is doing its job and keeping your CPU cool. With these simple steps, you’ll be up and running with your new heatsink in no time!
Plug in your Power and Test the System
Attaching the New Heatsink is a crucial step in setting up your computer and ensuring that it runs smoothly. To begin, make sure you have your heatsink ready and the necessary tools, including thermal paste and a screwdriver. Before installing the new heatsink, it is critical to clean the CPU with a lint-free cloth and rubbing alcohol to remove any old thermal paste or debris.
Once you have done this, apply a small dot of the new thermal paste to the center of the CPU, and then gently place the heatsink on top, aligning it with the motherboard. Next, secure the heatsink in place by slowly tightening the screws in a diagonal pattern until they are snug. It is important not to over-tighten the screws as this could damage your CPU.
Once you have attached the heatsink, you can plug in your power and test the system to make sure it is working correctly. By following these simple steps, you can ensure that your computer’s cooling system is working at its optimal level, allowing you to experience peak performance and minimize the risk of damaging your components.
Conclusion
Installing a heatsink on your motherboard is like finding the perfect puzzle piece for your computer’s cooling system. It may seem daunting at first, but with a little patience and the right tools, your CPU will be running cooler than a cucumber in a snowstorm. Just remember to follow the manufacturer’s instructions, be gentle with your delicate components, and always use thermal paste to ensure proper heat transfer.
So go ahead, get your hands dirty, and give your computer the love and care it deserves. Your CPU will thank you!”
FAQs
What tools do I need to install a heatsink on my motherboard?
You will need a screwdriver, thermal paste, and the heatsink itself.
How do I remove an old heatsink from my motherboard?
First, disconnect any power cables from the motherboard. Then, use a screwdriver to carefully unscrew any screws securing the heatsink in place. Gently wiggle the heatsink back and forth to loosen it from the motherboard.
How do I apply thermal paste to my CPU before installing the heatsink?
Use a small pea-sized amount of thermal paste in the center of the CPU. Use a plastic card or similar tool to carefully spread the paste over the surface of the CPU.
How do I align the heatsink with the CPU on my motherboard?
Most heatsinks come with brackets or other mounting mechanisms that need to be attached to the motherboard before the heatsink can be installed. Align these brackets with the screw holes on the motherboard, then gently lower the heatsink onto the CPU and secure it in place with screws.