Have you ever been in a meeting or presentation where you needed to show something on your computer screen to a larger audience? It can be frustrating when everyone needs to gather around your computer or when you have to constantly point things out. Luckily, there’s a simple solution – duplicating your screen on a projector. Duplicating your screen on a projector allows you to show everything on your computer screen to a larger crowd.
This can be useful in a variety of situations, from presentations and meetings to movie nights and gaming sessions. It’s an easy way to ensure that everyone can see what you’re looking at without having to squint or strain their eyes. So, how do you duplicate your screen on a projector? The process may vary depending on your computer and projector, but it’s generally a straightforward procedure.
The simplest way is to connect your computer to the projector using an HDMI cable. Once connected, you can usually duplicate your screen by pressing the Windows key and “P” or by going into your display settings and selecting “duplicate.” If your computer or projector doesn’t have an HDMI port, you may need to use a different cable or adapter.
It’s important to make sure that you have the right cables and adapters before attempting to duplicate your screen. In sum, if you need to show something on your computer screen to a larger audience, duplicating your screen on a projector is the way to go. It’s an easy way to ensure that everyone can see what you’re looking at without any hassle.
So, next time you’re in a meeting or presentation, give it a try and see how much easier it makes things.
Connect Your Device to the Projector
If you’re wanting to display your device’s screen on a projector, it’s actually pretty simple to do. The first step is to ensure that the projector and your device are both connected to the same network. From there, you can either use a cable to connect your device directly to the projector, or you can use a wireless connection via Wi-Fi.
Once you have connected your device to the projector, you can easily duplicate your screen onto the larger display using the settings on your device. This is especially useful for presentations or when you’re watching a movie with friends or family. By duplicating your screen onto the projector, everyone can enjoy the content together without having to huddle around a small screen.
With just a few simple steps, you can easily connect your device to a projector and enjoy your content on a larger screen.
Use cables or wireless connections
If you’re looking to connect your device to a projector, there are two main ways to do so- using cables or wireless connections. Using cables is the traditional method and involves connecting your device to the projector using an HDMI, VGA, or DisplayPort cable. This method provides a stable connection and ensures that your device is always connected to the projector.
On the other hand, using wireless connections is a newer technology that provides a more convenient and flexible way of connecting to a projector. With wireless connections, you can connect your device to the projector without any cables, which makes it easier to move around and more versatile. However, the downside of wireless connections is that they can sometimes be less reliable and dependent on the strength of the network.
Whether you choose to use cables or a wireless connection, make sure that your device is compatible with the projector and that you have the necessary cables or devices to make the connection possible. By using these methods, you can ensure a successful presentation or movie night without any technical difficulties.
Adjust Projector Settings
To adjust projector settings, you first need to connect your device to the projector. This is usually done through the use of HDMI or VGA cables. Once you have connected the two devices, turn on the projector and locate the settings menu.
These menus may vary depending on the brand and model of the projector, but you should be able to find options for adjusting the picture quality, brightness, contrast, and aspect ratio. It’s also important to make sure that your device’s resolution matches the resolution of the projector for optimal picture quality. With just a few adjustments, you can enjoy a crystal-clear image that is perfectly tailored to your viewing preferences.
Remember, taking the time to adjust your projector settings can greatly enhance your viewing experience, whether you’re watching a movie at home or giving a presentation at work.
Duplicate Screen on Windows
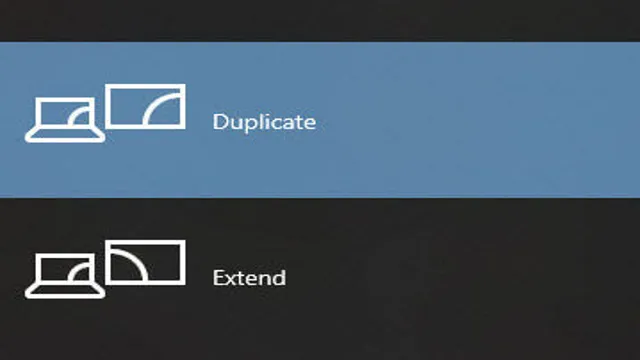
If you’re giving a presentation or watch party and want to display what’s on your computer screen through a projector or second monitor, duplicating your screen is an easy solution. To duplicate your screen on a Windows computer, first connect your computer to the projector or second monitor, then press the Windows key and the P key at the same time. This will open up a menu where you can choose to duplicate, extend, or only display on the projector or second monitor.
Select “Duplicate” to display exactly what’s on your computer screen onto the other display. It’s that simple! Now, everyone in the room can see exactly what’s on your screen without having to crowd around your computer. Whether you’re presenting a PowerPoint or watching a movie, duplicating your screen is a convenient way to share your content with a group.
So, next time you need to use a projector, remember this quick and easy trick to duplicate your screen on Windows.
Press Windows Key + P
If you’ve ever needed to show your computer screen to a group of people or present something on a larger display, you might have struggled with figuring out how to duplicate your screen. Windows makes it easy though! All you have to do is press the Windows key + P, and a menu will appear with options for how you want to display your screen. You can choose to duplicate your screen, extend it onto another display, show only on one display, or use a presentation mode.
By selecting the “duplicate” option, your screen will be mirrored to another display, which is perfect for sharing your work with others or presenting a slideshow. It’s a quick and easy solution that anyone can do, so next time you need to show your screen to others, remember to press Windows key + P and choose “duplicate.”
Select Duplicate
If you’re a frequent user of Windows, you may have faced the need to duplicate your screen at some point. It’s a handy feature that comes in useful when you need to share your screen with others or simply want to view the same content on multiple screens simultaneously. Thankfully, Windows offers a simple and easy way to duplicate your screen.
All you need to do is press the Windows key + P on your keyboard and select “Duplicate.” It’s that simple! This will mirror your primary screen onto your secondary one, providing you with an identical view. So next time you need to share or view something with others, give the “Duplicate” feature a try and make your life easier.
Duplicate Screen on Mac
Are you having trouble duplicating your Mac screen on a projector for your presentation or movie night with friends? Don’t fret, it’s actually a simple process! All you need is to connect your Mac to the projector using an HDMI, VGA, or adapter cable, depending on the ports available on your devices. Once connected, head to System Preferences > Displays and click on the “Arrangement” tab. Check the box that says “Mirror Displays” to duplicate your Mac’s screen onto the connected projector.
From there, adjust the resolution and size to fit the projector’s display size for optimal viewing. With these easy steps, you’ll be able to seamlessly showcase your content on both your Mac and projector screen. Happy presenting!
Click Apple Menu
The Apple menu is your gateway to accessing a host of features on your Mac, including duplicating your screen. To get started, simply click on the Apple menu located at the top left corner of your desktop. Next, select the System Preferences option and click on Displays.
Under the Arrangement tab, you’ll see a checkbox labeled “Mirror Displays”. This option allows you to duplicate your Mac screen onto a connected display, such as a projector or a second monitor. Once you’ve checked the box, your Mac screen will be duplicated in real-time on the chosen display.
It’s a fantastic feature that’s perfect for presentations, demonstrations or gaming, and only takes a few clicks to set up. So next time you need to duplicate your Mac screen, remember to start at the Apple menu and follow these easy steps!
Select System Preferences
If you want to duplicate your Mac screen, it’s easy to do with a few simple steps. First, click on the Apple icon in the top left corner of your screen, and then select “System Preferences.” From there, choose the “Displays” option, and then click on the “Arrangement” tab.
Finally, select the box next to “Mirror Displays” to duplicate your screen on all connected displays. It’s important to note that not all Macs support screen mirroring, so make sure to check your device’s specifications before attempting to duplicate your screen. Additionally, keep in mind that duplicating your screen may affect the resolution and quality of your display, so it’s not recommended for high-resolution tasks like photo or video editing.
In conclusion, duplicating your Mac screen can be a helpful tool for presentations, group work, or simply expanding your workspace. Just be sure to check your device’s compatibility and consider the potential impact on display quality before utilizing this feature.
Click on Displays
If you want to mirror your Mac’s screen to another display, it’s pretty simple. First, click on Displays in your System Preferences. Then select the option to “Show mirroring options in the menu bar when available.
” Now, whenever you want to duplicate your screen, simply click on the AirPlay icon in your menu bar and select the display you want to mirror to. This is especially useful for presentations or if you want to watch a movie or show on a larger screen. Making sure that your mirroring options are easily accessible means that you can quickly switch between displays without having to fiddle with your settings each time.
So go ahead and give it a try! With just a few clicks, you can seamlessly replicate your Mac’s display on any external screen.
Select Mirror Displays
If you’re using a Mac and want to display your screen on an external monitor or TV, you can use the Duplicate Screen feature. To do this, you need to select the Mirror Displays option from the Display menu. This will allow you to view the same content on both screens, making it ideal for presentations, video playback, or multitasking.
Simply connect your external display to your Mac using a cable, such as HDMI or VGA, and then go to the Apple menu and select System Preferences. From there, choose Displays and then click on the Arrangement tab. You should then see an option for Mirror Displays.
Click this option and you’re all set. Your external display should now show the same content as your Mac’s screen. It’s that easy!
Test and Troubleshoot
Have you ever needed to present something on a projector and found yourself struggling to get the screen to display properly? One common issue is duplicating the screen on the projector. However, this is a relatively simple task. To duplicate your screen, first connect your computer to the projector using an HDMI or VGA cable.
Then, press the Windows key and the P key at the same time to open the Project menu. From there, select “Duplicate” to display the same thing on both your computer and the projector screen. If you encounter any issues with the display, ensure that the projector is turned on and properly connected to your computer.
You can also adjust the display settings in the Control Panel to troubleshoot any problems. With these tips, you should be able to easily duplicate your screen on a projector for seamless presentations.
Check cables and connections
When it comes to troubleshooting computer problems, one of the first things you should always check is your cables and connections. Loose or faulty connections can cause a myriad of issues, from poor connectivity to complete system failure. To test your connections, start by checking that all cables are securely plugged into their ports.
If you spot any loose connections or frayed wires, try replacing the cable with a new one. You should also examine your power source. Make sure your computer is properly connected to a reliable power outlet, and that your surge protector or power strip is working correctly.
If you’re still experiencing problems, try unplugging and replugging all your cables, one by one, to see if that resolves the issue. Remember, even small cable and connection problems can have significant impacts on your computer’s performance, so it’s always worth checking these first before delving into more complex troubleshooting techniques.
Restart devices if needed
When troubleshooting issues with your devices, sometimes all it takes is a simple restart. This may seem like a no-brainer, but many people overlook it and jump straight to more complex solutions. Restarting your device can often clear up any temporary glitches or hangups that are causing problems.
It’s important to note that when you restart a device, it completely powers down and then starts back up again, which can help refresh its system and clear out any issues. So if you’re experiencing problems with your phone, computer, or other devices, try restarting them before doing anything else. It could save you a lot of time and frustration in the long run.
Adjust display settings if needed
When it comes to testing and troubleshooting your display, adjusting the settings can make a huge difference. Every computer screen is different, and sometimes the default settings may not be ideal for your needs. You may experience eye strain, brightness that’s too high or low, or colors that are either too vivid or not vivid enough.
You can adjust settings such as brightness, contrast, and color saturation to make your display more comfortable to view. There are also specialized settings for video playback, gaming, and other applications to optimize your viewing experience and make it more enjoyable. It’s always a good idea to experiment with various display settings until you find what works best for you.
Don’t hesitate to consult your device’s manual or online forums to get tips and advice from other users. By adjusting your display settings, you can get the most out of your screen and optimize your viewing pleasure.
Conclusion
In conclusion, if you want to duplicate your screen onto a projector, it’s as easy as pie! All you have to do is plug in your projector, make sure your computer recognizes it, and select the duplicate option. Voila! Your screen will be projected onto a larger display for all to see. And if anyone asks how you did it, just tell them it’s all about the power of connection – between your devices and your audience!”
FAQs
How do I connect my laptop to a projector?
To connect your laptop to a projector, you can use either a VGA cable or an HDMI cable. First, make sure your laptop and projector are turned off. Then, connect one end of the cable to your laptop’s video output port and the other end to the corresponding input port on the projector. Turn on both devices and select the appropriate input source on your projector.
Can I duplicate my laptop screen on a projector?
Yes, you can duplicate your laptop screen on a projector. To do this, press the Windows key + P on your keyboard, then select “Duplicate” from the options. This will display the same image on both your laptop screen and the projector.
Why is my laptop screen not displaying on the projector?
There could be several reasons why your laptop screen is not displaying on the projector. First, make sure both devices are turned on and properly connected. Check that the correct input source is selected on the projector. Also, check your laptop’s display settings to make sure it is set to Duplicate or Extend the display.
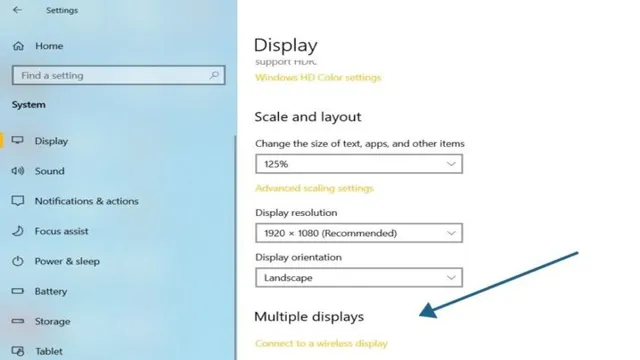
How do I change the display resolution when connecting to a projector?
To change the display resolution when connecting to a projector, right-click on your desktop and select “Display settings.” Scroll down to the “Scale and layout” section and click on “Advanced scaling settings.” From here, you can adjust the resolution to match the recommended setting for your projector.