Do you find it frustrating when you need to share your screen with colleagues during a presentation or meeting, but your Optoma projector won’t connect to your Mac? Well, worry no more! Connecting your Optoma Projector to your Mac is easy, and with just a few steps, you’ll be up and running in no time. In this blog post, we’ll show you a step-by-step guide on how to connect your Optoma Projector to your Mac, so you can wow your audience with your presentations or enjoy your favorite movies on a big screen. So, grab your popcorn, and let’s get started!
Check Mac Connections
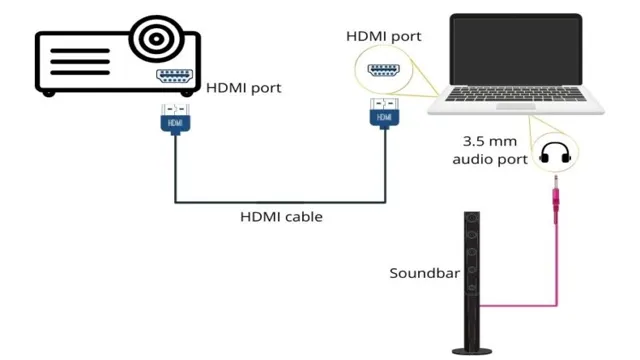
If you’re wondering how to connect your Optoma projector to your Mac computer, the first step is to check your connections. Make sure that both the projector and your Mac are turned off before you begin. Once everything is powered down, take a look at the ports on both your projector and your Mac to ensure that you have the correct cables.
Typically, you’ll need an HDMI cable to connect these two devices. If your Mac doesn’t have an HDMI port, you’ll need an adapter that allows you to connect your Mac’s output to an HDMI cable. Once you have the necessary cables and adapters, connect them to your Mac and the projector.
Turn on your Mac first, followed by the projector, and voila! You should now see your Mac’s screen being projected onto the wall or screen. Connecting your Optoma projector to your Mac is a simple process, once you know the right steps to take.
Inspect Ports
When it comes to checking Mac connections, inspecting ports is an absolute must. It doesn’t matter whether you’re connecting to the Internet, transferring data, or charging your device – ports are what make it possible. Macs come with a range of ports, including Thunderbolt, USB, HDMI, and Ethernet.
This can make it a bit overwhelming to figure out which port to use for what purpose. However, the good news is that each port is marked and color-coded, making it easy to differentiate them. The Thunderbolt ports, for instance, have a lightning bolt icon on them, while USB ports have a rectangular shape.
Checking the ports for dust, damage, or debris is also crucial. A dirty or damaged port can cause connectivity issues, slow charging, or data transfer problems. Make sure to keep them clean and free of debris, and if you notice any damage, seek professional repair services right away.
Whether you’re a student, professional, or casual user, knowing how to inspect your Mac’s ports is essential for maintaining optimal connectivity.
Select Cable
When it comes to connecting your Mac to another device or display, choosing the right cable is critical. First, identify what ports your Mac has and what ports your other device or display requires. Then, select a cable that matches those connections.
For instance, if your Mac has a Thunderbolt 3 port and your display only accepts HDMI, you’ll need a Thunderbolt 3 to HDMI cable. It’s essential to confirm compatibility beforehand to prevent wasting time or money on the wrong cable. Additionally, consider the cable’s length – you don’t want to end up with a cable that’s too short or too long for your needs.
By following these steps, you’ll be equipped with a cable that allows seamless connectivity between your Mac and other devices.
Connect Projector to Mac
If you’re wondering how to connect your Optoma projector to your Mac computer, you’re in the right place! Thankfully, the process is quite simple. First, make sure your Optoma projector is plugged in and turned on. Then, connect your Mac to the projector using either an HDMI cable or a VGA cable, whichever is appropriate for your devices.
Once the two are connected, your Mac should automatically detect the new display and extend your desktop to the projector. From there, you can use your Mac just as you normally would, but the display will show up on the projector instead of your computer screen. So, whether you’re giving a presentation, watching a movie, or just need a bigger screen, connecting your Optoma projector to your Mac is a quick and easy solution.
Plug in Cable
If you’re looking to connect your Mac to a projector, the first step is to plug in the cable. You’ll need to check what type of connector your Mac has, and what type of connector the projector requires. If they both have the same type of connector, all you need is a cable that connects the two.
If they have different connectors, you may need an adapter or a different type of cable. Once you have the right cable or adapter, connect one end to your Mac and the other to the projector, and you should be good to go. Make sure you select the correct input on the projector, and adjust the resolution settings on your Mac if necessary.
With a little bit of setup, you’ll be able to enjoy your Mac’s display on a much larger screen thanks to the projector.
Configure Display Settings
To connect a projector to your Mac, you need the appropriate cable. Once you have it, plug one end into your projector’s video input and the other one into your Mac’s Thunderbolt port or HDMI port. Make sure both devices are turned off before making this connection.
Next, turn on the projector and set it to the appropriate input source. Look for a button on the projector that’s labeled “Input” or “Source” and press it until the display from your Mac appears on the screen. You may need to configure the display settings on your Mac to optimize the projected image.
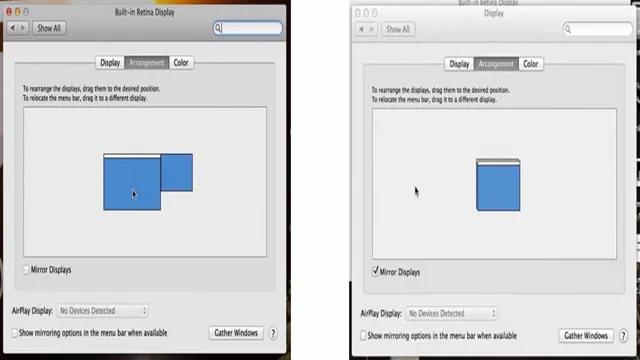
To do this, go to System Preferences, then Displays, and select the arrangement tab. From there, you can adjust the resolution and scaling options to best fit your setup. With these simple steps, you’ll be able to easily connect your Mac to a projector and project your screen onto a larger display for presentations, movies, or gaming.
Display Image on Projector
Connecting a projector to your Mac is simple and straightforward. You’ll need to use a compatible cable to ensure your Mac and projector are connected seamlessly. The most common type of cable you’ll need is an HDMI to VGA adapter or a Mini DisplayPort to VGA adapter, depending on what ports your particular projector has.
Once you know which adapter you need, plug one end into your Mac and the other end into your projector, and you’re good to go! Keep in mind that you may need to adjust the resolution on your Mac to match the projector’s native resolution to ensure the best image quality. With a few simple steps, you can display images on your projector in no time. Happy projecting!
Adjust Projection
If you’re trying to connect your Optoma projector to your Mac for the first time, you may be wondering where to start. First, you’ll need to connect the two devices using an HDMI cable. Once connected, your Mac should automatically detect the projector as an external display.
However, if you’re having trouble with the projection appearing on the screen in the correct orientation, you may need to adjust the projection settings on your Mac. This can typically be done by going to the Displays section of your System Preferences and selecting the “Arrangement” tab. Here, you can rearrange the position of the display or adjust the scaling and resolution to ensure the projection fits properly on the screen.
With a few minor adjustments, connecting your Optoma projector to your Mac should be a simple and straightforward process, allowing you to enjoy all your favorite content on the big screen.
Focus the Image
When it comes to projecting an image, focusing is key. A blurry or distorted image can be distracting and take away from the impact of your presentation. Fortunately, adjusting the projection is a simple solution.
To start, make sure the projector lens is clean and free from smudges or dirt. Next, adjust the focus ring to sharpen the image. You may need to move the projector closer to or further from the screen to achieve the best focus.
Additionally, some projectors have a keystone correction feature that can straighten distorted images. By taking the time to adjust the projection, you can ensure that your audience is fully engaged with your content and not distracted by technical difficulties.
Resize the Image
When it comes to projecting images, it’s important to have the right size for optimal clarity and visibility. This is where resizing your image comes in handy. Resizing an image allows you to adjust its dimensions to fit the screen or projector.
This is especially useful when dealing with multiple projectors or screens and wanting to ensure that the image fits perfectly. Additionally, resizing an image can help with file size and storage. If your original image is too large, resizing it can help reduce the file size without sacrificing quality.
It’s important to note that when resizing an image, it’s best to maintain its aspect ratio to prevent distortion. Whether you’re projecting images for a presentation or for personal use, resizing the image can make a significant difference in its appearance and overall clarity.
Conclusion
In conclusion, connecting your Optoma projector to your Mac is a piece of cake! Simply make sure your cables are in order and follow the steps outlined in your projector’s manual. With a little bit of patience and some tech-savviness, you’ll be enjoying a movie on the big screen in no time. And there you have it, another perfect example of how technology brings us together, whether it be a movie night with friends or a presentation at work! Happy projecting!”
FAQs
What cables do I need to connect my Optoma projector to my Mac?
To connect your Optoma projector to your Mac, you will need a VGA or HDMI cable and an adapter that fits the Thunderbolt 2 or USB-C port on your Mac.
Can I connect my Optoma projector wirelessly to my Mac?
Yes, you can use AirPlay to wirelessly connect your Mac to your Optoma projector if it has built-in AirPlay support or if you have an Apple TV connected to it.
How do I adjust the screen resolution when connecting my Mac to my Optoma projector?
To adjust the screen resolution when connecting your Mac to your Optoma projector, go to “Displays” in the System Preferences on your Mac, select the Optoma projector, and choose the desired resolution from the drop-down menu.
Why is the image on my Optoma projector blurry when connected to my Mac?
If the image on your Optoma projector is blurry when connected to your Mac, it may be due to a mismatch in the screen resolution settings, a faulty cable or adapter, or a dirty lens on the projector. Try adjusting the resolution or checking and cleaning the cable and lens.