Have you ever experienced lag while playing your favorite game? Or maybe you’ve noticed that your video editing software is running slower than usual. Before you throw your computer out the window or start blaming your internet provider, take a closer look at your graphics card. Your graphics card is responsible for rendering images and video on your computer screen, and if it’s not up to par, you could experience some serious speed and performance issues.
In this blog post, we’ll be discussing ways to check your graphics card and make sure it’s running smoothly. So grab a drink, sit back, and let’s dive in!
Windows Users
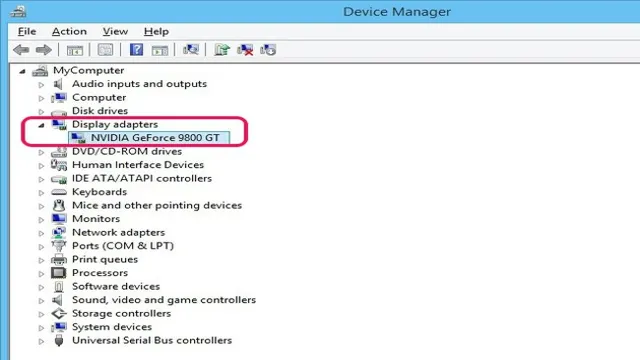
If you’re a Windows user, checking your graphics card is a fairly easy process. One way to do it is through Device Manager. Simply click on the Start button and search for “Device Manager” in the search bar.
Once the Device Manager window is open, click on “Display Adapters” and your graphics card should be listed there. You can also check your graphics card through the DirectX Diagnostic Tool. To do this, click on the Start button and search for “dxdiag” in the search bar.
Once the tool is open, go to the Display tab and your graphics card information should be listed. Knowing your graphics card information is important, as it can help ensure compatibility with certain software and games. So if you’re unsure about your graphics card, these simple steps can help you find out in no time.
Method 1: Using Device Manager
If you’re a Windows user looking to uninstall a program or driver, the Device Manager is a great place to start. This tool allows you to view and manage all the devices on your computer, including drivers and their associated programs. To access Device Manager, simply right-click on the Windows icon in the bottom left corner of your screen and select “Device Manager”.
From there, you can expand different categories to view all the devices and drivers installed on your computer. Once you’ve located the program or driver you want to uninstall, simply right-click on it and select “Uninstall”. You’ll be prompted to confirm your action, and then the program or driver will be removed from your computer.
Using Device Manager is a quick and easy way to uninstall unwanted software and drivers without having to navigate through multiple menus or settings. So, if you’re looking for a simple solution to managing your computer’s devices, give Device Manager a try.
Method 2: Using System Information
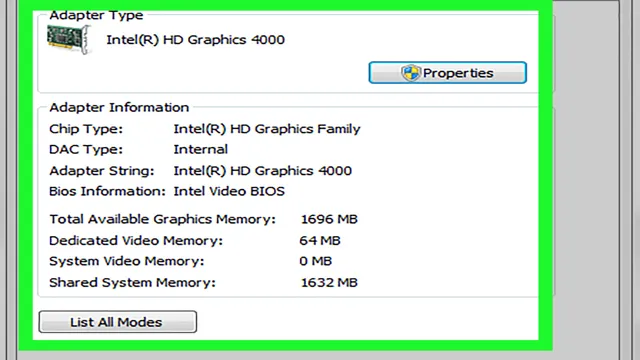
If you’re running Windows, another way to check your computer’s specifications is by using the System Information tool. This tool provides you with a detailed report of your system’s hardware and software, including your processor, RAM, graphics card, and installed programs. To access System Information, click on the Start Menu and search for “System Information.
” Once the tool has opened, you’ll see detailed information about your computer’s hardware under the “System Summary” tab. If you’re looking for more specific information, such as which drivers are installed or what applications are running, you can explore the other tabs within the System Information tool. Overall, System Information is a useful tool for Windows users who want a detailed report of their system’s specifications without needing to open up their computer’s case.
Mac Users
As a Mac user, checking your graphics card can be a vital aspect, especially if you’re into gaming or media production. The good news is that you can quickly check your graphics card by following some simple steps. First, click on the Apple icon at the top left corner of your screen and select “About This Mac.
” Next, click on “System Report,” and then on “Graphics/Displays” on the left-hand side. In the graphics section, you’ll find detailed information about your graphics card, including the name, type, and VRAM capacity. You can compare this information to the recommended specifications for any software or games you’re planning to use.
Checking your graphics card can be essential, as it can help you identify any compatibility or performance issues and take necessary steps to fix them. So, whenever in doubt, don’t forget to check your graphics card!
Method 1: Using System Information
As a Mac user, there are various ways to check your system information, and one of them is through the System Information app. You can access System Information by clicking on the Apple menu, then selecting “About This Mac” and clicking on the “System Report” button. This will open the System Information app, which provides you with detailed information about your Mac’s hardware, software, and network settings.
You can view your Mac’s model, processing speed, memory size, serial number, and many more by exploring the different categories. This information can be useful in troubleshooting issues, upgrading or replacing hardware, or checking your current system requirements for software installations. So, if you are a Mac user and you’re curious about your system specs, the System Information app is a handy tool to have at your disposal.
Method 2: Using Terminal
If you’re a Mac user and want to delete files using Terminal, there is a simple method you can follow. First, open Terminal, which you can find in the Utilities folder within your Applications folder. Once that’s done, type “rm” followed by a space, and then drag and drop the file or folder you want to delete into the Terminal window.
Press enter, and the file or folder will be gone for good. It’s important to remember that this method is irreversible, so make sure you’re certain you want to delete the file before proceeding. Additionally, you’ll need to have the necessary permissions to delete the file, so you may need to enter your password or use the “sudo” command.
This method may seem intimidating at first, but it’s actually quite simple once you get the hang of it. With a bit of practice, you’ll be using Terminal to delete files like a pro in no time!
Conclusion
In conclusion, checking your graphics card is easier than ever thanks to the technology available. You can simply type in a quick command, download a specialized program, or even take a peek inside your computer if you’re feeling daring. With this knowledge, you’ll be able to confidently navigate the world of gaming and visual media.
So go ahead and flex your tech muscles – armed with the ability to check your graphics card, there’s no stopping you now!”
FAQs
What is a graphics card and why do I need one?
A graphics card is a hardware component that’s responsible for processing and displaying visual images on your computer or laptop screen. It’s crucial for running demanding applications, gaming, and even basic tasks like video playback. Without a dedicated graphics card, your computer will rely solely on its CPU to handle graphics, which can slow down performance.
How can I find out which graphics card I have?
There are several ways to check your graphics card. On Windows, you can click on “Start” and search for “Device Manager”. Then expand the “Display adapters” category to see your graphics card. You can also use third-party software like GPU-Z or Speccy to get detailed information about your graphics card.
Can I upgrade my graphics card?
Yes, you can upgrade your graphics card if your computer supports it. However, it’s important to make sure that your power supply can handle the upgraded card, and that the card is compatible with your motherboard and other hardware components.
How do I update my graphics card driver?
To update your graphics card driver, you can go to the manufacturer’s website (such as NVIDIA or AMD) and search for the latest driver for your specific graphics card model. Then follow the instructions to download and install the driver. You can also use software like Driver Booster or Driver Easy to automatically update your drivers.