Imagine being able to experience the excitement and suspense of a big-screen movie theater right in the comfort of your own home. You can create an immersive movie-watching experience using a homemade projector. Yes, you heard that right – a homemade projector that you can build yourself! Building your own projector might sound like a daunting task, but with the right guidance and resources, it can be done easily and affordably.
While it may require a bit of effort, the end result is well worth it. Not only will you have a unique and customized piece of technology, but you’ll also have your very own movie theater at your fingertips. With a homemade projector, you can watch movies, TV shows, and even play video games on a large screen with crisp and clear picture quality.
No more small, fuzzy screens that strain your eyes and detract from the movie experience. With a homemade projector, you’ll feel like you’re actually part of the action. In this blog, we’ll guide you through the process of creating your very own homemade projector.
We’ll go over the materials you’ll need, the steps involved, and even provide some tips and tricks to ensure that your projector is top-quality. So, get ready to turn your living room into the ultimate movie theater and experience the magic of the big screen in your own home.
Gathering Materials
To create a homemade projector, you’ll need to gather a few materials to get started. One of the most important things you’ll need is a lens to project the image. You can either purchase a lens online or you can repurpose an existing one from an old camera or projector.
Another crucial component is a light source for the projector. This can be a simple lamp or flashlight that you can attach to the back of the projector. You’ll also need a cardboard box or other material to construct the base of the projector.
This will hold all the components securely in place. And finally, you’ll need a device like a laptop or tablet to connect to the projector and play the content you want to display. Once you have all the necessary materials, you can begin the fun and exciting process of building your very own homemade projector.
Explore Ideal DIY Projector Components
When it comes to DIY projector components, gathering the right materials is key to a successful project. You’ll need a few essential components, such as a high-brightness LED, magnifying lens, and a power source. Additionally, a housing unit, glass or acrylic lens, and a reflector will help ensure a crisp and clear image.
While these components can be found online or at a hardware store, it’s important to double-check compatibility and quality before purchasing. It’s also worth considering the size of your components in relation to your projector’s desired size and resolution. By taking the time to gather the right materials, you’ll be well on your way to a fantastic DIY projector.
Finding the Right Light Source
When it comes to finding the perfect light source for your project, the first step is to gather your materials. You’ll need to consider your specific needs and the type of light you require. Some popular options include natural sunlight, LED lighting, fluorescent lighting, and incandescent lighting.
Each has its benefits and drawbacks, so it’s important to do your research. Take into account factors such as color temperature, brightness, energy efficiency, and cost. Once you’ve determined which type of lighting will work best for your project, you can begin to gather the necessary materials.
This may include light bulbs, fixtures, lampshades, and any additional accessories. Don’t forget to consider the size and scale of your project, as this will impact the amount of lighting you’ll need. With the right materials in hand, you’ll be one step closer to achieving the perfect lighting setup for your space.
Choosing the Correct Lens
When it comes to choosing the right lens for your camera, there are a few materials you will need to gather to ensure you make an informed decision. First and foremost, you will need to have your camera body on hand to ensure that the lens you choose is compatible. Additionally, it is important to consider your shooting style and the type of photography you plan on doing.
If you are primarily interested in landscape photography, for example, a wide angle lens may be the best choice, while those interested in portrait photography may want to opt for a lens with a wider aperture. Finally, it is important to consider your budget when selecting a lens, as prices can vary widely depending on the quality and features offered. By gathering these materials and considering all of these factors, you will be well on your way to selecting the perfect lens for your needs.
Step-by-Step Guide
If you want to experience movie night in a whole new way, making your own homemade projector is a creative and fun option. Here’s a step-by-step guide to help you create your own! First, gather the supplies you’ll need. You’ll need a cardboard box, a magnifying glass, a smartphone, scissors, black construction paper, and tape.
To start, cut out a rectangle on one side of the box, leaving space around the edges. Next, cover the inside of the box with black construction paper to minimize any unwanted light. Now, take your magnifying glass and tape it to the opposite side of the cutout rectangle.
This will act as the lens for your projector. Next, place your smartphone face down inside the box, with the screen facing the cutout rectangle. Adjust the position of the phone until the projected image appears as large and clear as possible on the opposite wall.
Finally, turn off the lights and enjoy your homemade movie experience! While this projector won’t have the same level of brightness and clarity as a professional projector, it’s a fun and budget-friendly way to make your movie night more enjoyable.
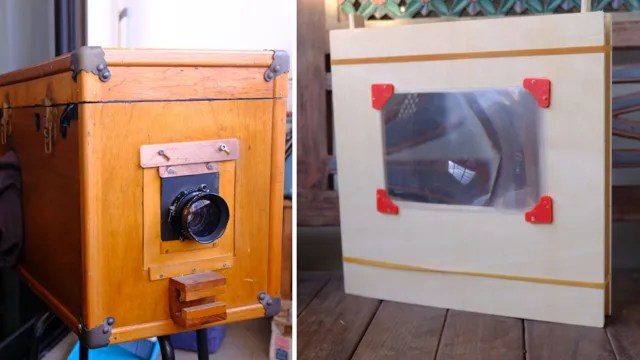
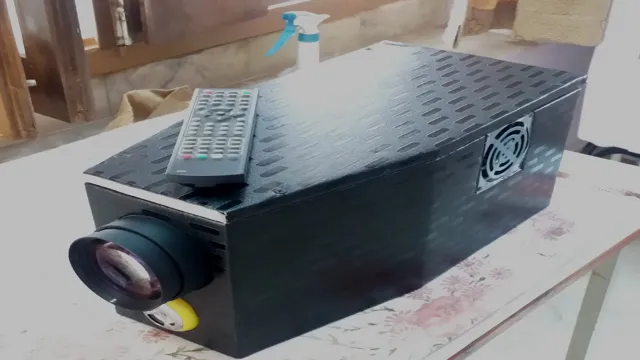
Assembling the Projector Body
Assembling the projector body is an important step towards creating your own home theater setup. To begin, make sure you have all the necessary components including the projector lens, frame, and mounting brackets. First, attach the mounting brackets to the frame using the provided screws and a screwdriver.
Once secured, attach the projector lens to the frame using the same screws but be careful not to over-tighten them. It’s also important to ensure that the lens is adjusted to the correct distance from the screen to get the best image quality. Finally, attach the power cord and any other necessary cables and test the projector to make sure everything is working properly.
Completing these steps will give you a fully functional projector that will provide you with a great viewing experience. So, why wait? Get started on your own DIY home theater setup today!
Connecting the Light and Lens
Connecting the light and lens can seem daunting at first, but with a step-by-step guide, it’s easy to achieve amazing results. First, choose the appropriate lens for your needs. Different lenses have different focal lengths and apertures, which can impact the sharpness and depth of field of your images.
Once you have your lens, set up your lighting. Natural light can be beautiful, but it’s not always available or predictable. Instead, consider investing in artificial lighting, such as LED panels or strobes, to create the right atmosphere for your subject.
Position the lights to create interesting shadows and highlights; this can add depth and dimension to your images. Next, it’s time to adjust your camera settings. For sharp images, use a smaller aperture, such as f/8 or f/1
Adjust the shutter speed to control the amount of motion blur or freeze action. Finally, experiment with different angles and perspectives to add interest to your images. With practice and patience, connecting the light and lens can lead to stunning results.
Creating a Stand or Mounting System
Creating a proper stand or mounting system for your equipment can be critical for its longevity and overall functionality. Before you start, it is important to consider the weight and dimensions of the equipment you will be mounting, as well as the size and weight limits of the mounting system you choose. There are many different types of stands and mounting systems available on the market, including tripod stands, ceiling mounts, and wall mounts.
Once you have chosen the best option for your needs, it’s time to begin the installation process. When creating a stand or mounting system, it is vital to follow the manufacturer’s instructions carefully. This will ensure that you don’t damage the equipment during installation or compromise its stability and safety.
It’s also essential to choose high-quality materials that can hold the weight of your equipment securely. When constructing the stand or mounting system, take your time and work methodically to make sure everything is level and secure. To sum up, creating a stand or mounting system that is both stable and safe requires careful planning and execution.
By choosing the right system and following the manufacturer’s instructions, you can rest assured that your equipment will be securely mounted. With the proper installation and care, your equipment can provide years of reliable service and stay safe and secure while in use.
Testing and Adjusting
After creating your DIY homemade projector, it’s essential to test and adjust it to ensure the best possible viewing experience. One necessary test is to project the image on a blank wall or projector screen to understand the quality and sharpness of the image. The distance between the projector and the screen also plays a significant role in the final image quality.
Adjusting the focus also helps tailor the image to achieve a sharp and detailed result. It is no secret that homemade projectors require regular adjustments to achieve optimum performance. Besides, testing the projector’s audio output and speaker quality is necessary to have an all-around, enjoyable experience.
With all these tests and adjustments combined, viewers will enjoy the ultimate home theater experience with their homemade projector.
Adjusting Focus and Brightness
Adjusting the focus and brightness of your camera is crucial in getting the best results. Testing and adjusting these settings will ensure your photos or videos come out clear and bright. To adjust the focus, you can use manual focus or auto-focus, depending on what you prefer.
However, keep in mind that auto-focus may not always work as expected in low light conditions or when the subject has a busy background. When adjusting the brightness, ensure that the highlights and shadows are well-balanced, so your photos or videos don’t come out too bright or too dark. A good tip is to use the camera’s histogram to see the exposure levels and adjust accordingly.
With these adjustments, your photos or videos will look amazing and impress all your friends and family. So, next time you take a photo or video, remember to take a moment and adjust focus and brightness for the best results!
Testing Picture and Sound Quality
When it comes to testing picture and sound quality, it’s important to take the time to adjust and ensure everything is up to par. Before jumping into any content creation or presentation, it’s beneficial to run a few tests to check for any potential issues. Start by checking the picture quality – does it appear crisp and clear or are there any blurriness or distortion? Adjusting the brightness and contrast can often make a big difference in improving the overall picture quality.
Next, focus on the sound. Test the volume level, ensuring it’s not too loud or too quiet, and check for any fuzziness or echoes. Adjusting the equalizer settings can help fine-tune the sound quality.
Remember, taking the time to test and adjust can make a significant difference in the overall success of your presentation or content creation.
Conclusion: Enjoy Your Home-Created Movie Experience
In summation, creating a homemade projector is a fun and exciting way to bring entertainment to your home without breaking the bank. With just a few simple materials and some creative ingenuity, you can transform any room into a cinematic experience. So why shell out loads of cash on an expensive projector when you can easily make your own? It’s a no-brainer, folks.
Let’s get crafty and impress our friends and family with our homemade cinema skills.”
FAQs
What materials do I need to make a homemade projector?
You will need a shoebox, magnifying glass, smartphone, scissors, glue, and a marker.
Is it possible to use any type of magnifying glass for a homemade projector?
For best results, you should use a biconvex magnifying glass with a focal length of at least 3 inches.
How do I connect my smartphone to the projector?
Simply place your smartphone face down inside the box and position it so that the image is projected through the magnifying glass.
Can I adjust the size and focus of the image on a homemade projector?
Yes, you can adjust the distance between the magnifying glass and the smartphone to change the size of the image, and you can adjust the focus by moving the magnifying glass closer or further away from the smartphone.
What types of surfaces can I project the image onto with a homemade projector?
You can project the image onto any flat, white surface such as a wall, sheet, or projector screen. Just make sure the room is dark enough for the image to show up clearly.