Do you feel like your computer is underperforming when it comes to graphics-heavy tasks? It could be because your Nvidia graphics card is not enabled. Enabling your Nvidia graphics card can give you a significant boost in performance, allowing you to play games and run applications smoothly. However, enabling the card may not be as simple as you may think, especially if you’re not a tech-savvy individual.
But don’t worry, we got you covered! In this blog, we’ll walk you through the steps you need to take to enable your Nvidia graphics card and get the most out of your system.
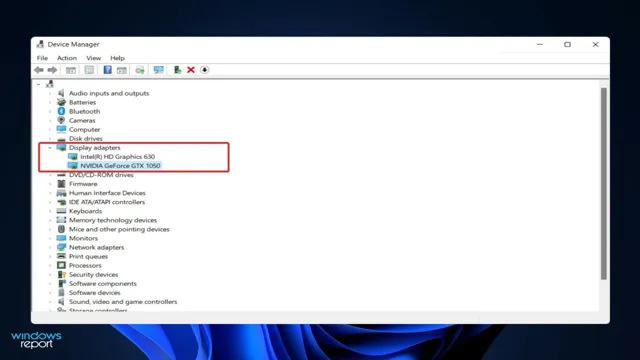
Check Compatibility and Drivers
If you want to enable your NVIDIA graphics card, the first thing you need to do is to check your computer’s compatibility with this type of hardware. It’s important to know that some older computers may not be able to house an NVIDIA graphics card due to their size and power supply limitations. Once you have determined your computer’s compatibility, it’s essential to download and install the latest driver for your graphics card.
This will ensure that your NVIDIA graphics card is fully integrated into your system and can provide the highest performance possible. Keep in mind that outdated drivers can cause compatibility issues and reduce your graphics card’s performance. Regularly updating your graphics card driver is crucial to keeping your system optimized for all the latest games and applications.
So, make sure to check your compatibility and always keep your drivers up-to-date to get the most out of your NVIDIA graphics card.
Verify system meets requirements
When it comes to verifying that a system meets the necessary requirements, checking compatibility and drivers is essential. Ensuring that the software or hardware is compatible with the operating system is crucial, as it can prevent any potential conflicts or errors from occurring. Compatibility can be confirmed by checking system requirements and recommended specifications for the software or hardware being installed.
Additionally, it’s important to update and install necessary drivers to ensure that devices and software function properly. Without the proper drivers, devices such as printers or sound systems may not function as intended. It’s important to note that outdated drivers can also cause system instability and crashes.
By verifying compatibility and installing necessary drivers, you can ensure that your system runs smoothly and is optimized to meet your needs. Remember to always check for updates and compatibility before installing any software or hardware.
Update graphics card drivers
Updating graphics card drivers is essential to ensure compatibility between your computer hardware and software. Whenever you upgrade the operating system or install new games or applications, the graphics card drivers must match the hardware requirements. You can check the compatibility of the graphics card with your computer specifications by visiting the manufacturer’s website or using third-party software.
Once you confirm the compatibility, you can download and install the latest driver version to avoid any compatibility issues. Keeping drivers up-to-date ensures better performance, stability, and security. However, it is also essential to ensure that you don’t install incompatible drivers as it may cause more harm than good.
So, always double-check before you update graphics card drivers and avoid downloading drivers from untrusted websites. With some research and due diligence, you can ensure that your computer’s hardware and software work together flawlessly.
Access Nvidia Control Panel
Enabling your Nvidia graphics card can significantly improve your computer’s performance in demanding applications such as gaming and video rendering. To access the Nvidia Control Panel, you need to ensure that your graphics card driver is up-to-date. You can check this by right-clicking on the Windows desktop and selecting “Nvidia Control Panel.
” If you cannot find it, you may have to download the latest driver from Nvidia’s website and then install it. Once you have confirmed that your graphics card driver is up-to-date, double-click on the Nvidia Control Panel icon to access the settings. Here, you can customize various features such as the graphics card’s resolution, refresh rate, and performance settings.
Enabling the Nvidia graphics card will give you the power to tackle resource-intensive programs with ease. So, make sure to access the Nvidia Control Panel and optimize your graphics card’s settings to get the most out of your computer.
Right-click on desktop and select ‘Nvidia Control Panel’
Accessing the Nvidia Control Panel can seem like a daunting task for some, but fear not, it’s actually quite simple. All you need to do is right-click on your desktop and select “Nvidia Control Panel” from the drop-down menu. It’s important to note that this option will only appear if you have the Nvidia graphics card installed on your computer.
Once you’ve clicked on the option, the Nvidia Control Panel window will appear, and you will be presented with a range of settings and options that you can customize to your liking. From adjusting display settings to managing 3D settings and configuring video playback, the Nvidia Control Panel is a powerful tool that allows you to fine-tune your graphics card and get the most out of your computer’s performance. So, next time you need to access the Nvidia Control Panel, just right-click on your desktop and select the option from the drop-down menu.
Click on ‘Manage 3D settings’
If you own an Nvidia graphics card, you might have heard about the Nvidia Control Panel. It is a powerful tool that allows you to tweak and customize your graphics settings to get the best performance out of your card. To access the Nvidia Control Panel, you need to right-click on your desktop and select it from the context menu.
Once you have opened it, look for the “Manage 3D settings” option in the left-hand panel, and click on it. This will bring up a window that provides you with a range of options to optimize your 3D graphics settings. You can set your preferred graphics processor, adjust the image sharpness, and set the anti-aliasing and texture filtering options to improve your gaming experience.
With the Nvidia Control Panel, you can take complete control over your gaming graphics, so you can enjoy the best visuals possible.
Set Preferred Graphics Processor
If you’re experiencing slow performance on your computer, it might be due to your preferred graphics processor. If your computer has both an integrated graphics card and an NVIDIA graphics card, it’s essential to ensure that your preferred processor is set to the NVIDIA graphics card to optimize your computer’s performance. To enable the NVIDIA graphics card, you’ll need to follow a few simple steps.
First, open the NVIDIA Control Panel by right-clicking on your desktop and selecting it from the dropdown menu. From there, navigate to the Manage 3D settings option and select the Program Settings tab. Click on the drop-down menu under “Select a program to customize,” choose the program you want to run on the NVIDIA graphics card, and then select the NVIDIA processor from the options under “Select the preferred graphics processor for this program.
” Once you’ve selected the NVIDIA card, click Apply and restart the program. This process is straightforward and can significantly improve your computer’s performance.
Choose ‘High-performance NVIDIA processor’
If you’re an avid gamer or use your computer for high-performance tasks such as video editing, it’s important to configure your preferred graphics processor. When setting the preferred graphics processor, it is recommended to choose “High-performance NVIDIA processor.” This option allows your computer to use the power of NVIDIA’s graphics card, which is designed specifically for performance-heavy applications.
When configuring this option, you may notice improved performance in programs such as video games or video editing software. The NVIDIA processor provides features such as real-time ray tracing and AI-powered graphics, which can significantly enhance your visual experience. It’s important to note that not all computers will have an NVIDIA graphics card, so this option may not be available for you.
However, if you do have an NVIDIA graphics card, selecting “High-performance NVIDIA processor” is an easy way to optimize your computer’s performance for heavy tasks. Overall, setting your preferred graphics processor is an important step in optimizing your computer’s performance. By choosing the “High-performance NVIDIA processor,” you can ensure that your computer’s graphics card is contributing to the performance of your applications, providing a smoother and more visually enhanced experience.
Click ‘Apply’
If you’re running a PC with an Nvidia or AMD graphics card, you can set your preferred graphics processor through your graphics driver software. This enables you to choose which graphics card to use for running different applications or games. To set your preferred graphics processor, open your graphics driver control panel and navigate to the section for managing 3D settings.
Look for an option to set your preferred graphics processor and select it. Now you can choose which graphics card to use for different applications. For instance, you might select the high-performance Nvidia graphics processor for playing games, but switch to the integrated graphics processor for basic web browsing or office applications to save power.
Once you’ve made your selections, click “Apply” to save your changes. This straightforward process can significantly improve your PC’s performance and enhance your overall experience for gaming and other graphics-intensive activities.
Test and Troubleshoot
Enabling your NVIDIA graphics card is essential to make sure your computer runs at its best. It can be frustrating when you’re not sure why your graphics card isn’t performing to its fullest potential. One of the easiest ways to enable your NVIDIA graphics card is to make sure you have the latest drivers installed.
You can do this by going to NVIDIA’s website and searching for your graphics card model. Once you find the drivers you need, download and install them. Another way to enable your NVIDIA graphics card is to make sure it’s selected as the default graphics card in your computer’s settings.
This can be done by going to your computer’s display settings and finding the graphics card options. From there, select your NVIDIA graphics card and save the changes. By enabling your NVIDIA graphics card, you’ll notice a significant improvement in your computer’s performance, especially when it comes to gaming or heavy graphic tasks.
Check performance with graphics-intensive tasks
When it comes to ensuring the performance of your computer, particularly for graphics-intensive tasks, testing and troubleshooting are essential. It’s important to check how well your computer handles tasks such as photo or video editing, gaming, or graphic design to ensure that it isn’t lagging or experiencing any glitches. One way to check your computer’s performance is by using benchmarking software.
These programs can compare your computer’s performance to other systems with similar hardware and provide a score to see how it measures up. If you do encounter issues, troubleshooting can involve checking for outdated drivers, ensuring your computer is free from malware or viruses, or adjusting graphics settings. By monitoring and troubleshooting performance, you can ensure your computer is equipped to handle any graphics-intensive task you throw its way.
Resolve any issues with compatibility or configuration
When it comes to resolving compatibility or configuration issues, the key is to test and troubleshoot. This means checking all the settings and parameters of the hardware and software involved and identifying any conflicts that may arise. One important step is to ensure that all components are up-to-date and that drivers and firmware are properly installed.
In some cases, it may be necessary to reinstall software or even replace hardware components. It’s important to have a thorough understanding of the system, its components, and its configuration to avoid further complications. Running diagnostic tools and changing settings incrementally can help pinpoint issues and prevent future problems from arising.
Ultimately, taking the time to test and troubleshoot compatibility and configuration issues can save time and prevent frustration down the road.
Conclusion
Enabling your Nvidia graphics card is like putting a turbocharger on your computer. With the newfound power, you can enjoy smoother and faster performance in your favorite games and applications. It’s the ultimate upgrade for the tech-savvy and adrenaline-fueled gamer or professional, ready to take on any challenge.
“
FAQs
How do I enable my Nvidia graphics card?
First, open the Nvidia Control Panel. Then, click on “Manage 3D settings” and select the “Global Settings” tab. Here, under “Preferred graphics processor,” choose “High-performance Nvidia processor” and save changes.
Why isn’t my Nvidia graphics card being utilized?
Make sure your drivers are up to date and that your graphics card is selected as the default in your graphics settings. Also, check that the programs you’re running are compatible with Nvidia graphics cards.
Can I use my Nvidia graphics card for gaming on a laptop?
Yes, as long as your laptop has an Nvidia graphics card and meets the minimum requirements for the game you want to play. Be sure to adjust your graphics settings accordingly.
What do I do if my Nvidia graphics card is not recognized by my system?
First, try updating your drivers and restarting your computer. If that doesn’t work, check that your graphics card is properly installed and connected to your motherboard. If all else fails, contact Nvidia support for assistance.