You’re in the middle of a big print job and suddenly, your Brother printer stops working. You check the display and see a message saying “Drum Stop.” What does that mean? Why did it happen? And more importantly, how can you fix it? Don’t panic, we’ve got you covered! The Brother printer drum is an essential component of the printing process.
It’s responsible for transferring toner onto paper, creating the images and text you see on the page. If the drum stops working, you won’t be able to print anything. Fortunately, there are several troubleshooting steps you can take to get your printer back up and running.
In this guide, we’ll walk you through each one step by step, so you can get back to printing in no time. Whether you’re a tech novice or an experienced user, this guide will provide you with the knowledge you need to solve the problem and get back to work. So, if you’re struggling with a Brother printer drum stop error, keep reading! We’ve got some handy tips and tricks that will help you resolve the issue and get your printer back on track.
What Causes Drum Stop Errors?
Brother printer drum stop errors can be caused by a variety of factors. One common cause is a worn-out drum unit that needs to be replaced. Over time, the drum unit becomes worn down with use and will eventually need to be replaced to maintain optimal printer performance.
Another possible cause is a buildup of toner on the drum unit, which can cause the printer to stop functioning properly. Additionally, improper installation or handling of the drum unit can result in errors. It’s important to follow manufacturer instructions carefully when installing or replacing the drum unit.
Finally, compatibility issues with the drum unit and the printer can also cause stop errors. Make sure you’re using the correct drum unit for your specific printer model to avoid any potential compatibility issues. By understanding the causes of drum stop errors, you can take steps to prevent them and ensure your Brother printer runs smoothly.
Overheating and Overuse
Drum stop errors have been a persistent headache for printers and photocopiers users for years. The problem has been attributed to several factors, with overheating and overuse being the most prominent. Overheating is the most common cause of the drum stop errors, and it occurs when the machine’s components become too hot and start malfunctioning.
Overuse, on the other hand, happens when the machine operates for extended periods without sufficient rest. When the printer or photocopier is overused, the drum can wear out, and the quality of the documents produced reduced. It is important to take care of your machine by minimizing overheating and taking regular breaks during use to prevent overuse.
By doing so, you can avoid drum stop errors and ensure that your printer or photocopier is always in tip-top condition.
Mechanical Issues
Drum stop errors are some of the most frustrating mechanical issues that can occur in a printer. They are typically caused by a malfunction in the drum unit, which is responsible for transferring toner to the paper. A number of factors can contribute to drum stop errors, but the most common cause is a buildup of toner on the drum surface.
This can happen if the printer is not properly maintained or if the toner cartridge is not replaced in a timely manner. In addition to toner buildup, drum stop errors can also be caused by a damaged drum unit or a faulty motor. If you’re experiencing drum stop errors on your printer, it’s important to take action quickly to avoid further damage.
Try cleaning the drum unit first, and if that doesn’t work, consider replacing the toner cartridge or seeking professional help. With the right care and maintenance, you can prevent drum stop errors from occurring and keep your printer running smoothly.
Toner Cartridge Issues
Drum stop errors in toner cartridges can be frustrating, especially if they occur frequently. There are several reasons why this issue can arise. One of the most common causes is improper installation.
If the cartridge is not installed correctly, it can lead to drum stop errors. Another possible reason for this issue is a damaged drum unit. Over time, the drum unit can wear out, resulting in decreased print quality and eventually, drum stop errors.
Additionally, poor-quality toner cartridges can also cause this problem. If the cartridge is not manufactured to high standards, it can lead to issues with the drum unit. To avoid drum stop errors, it’s important to ensure that the cartridge is installed correctly, use high-quality toner cartridges, and replace the drum unit when necessary.
By doing these things, you can keep your printer running smoothly and avoid disruptions to your workday.
Steps to Fix Drum Stop Errors
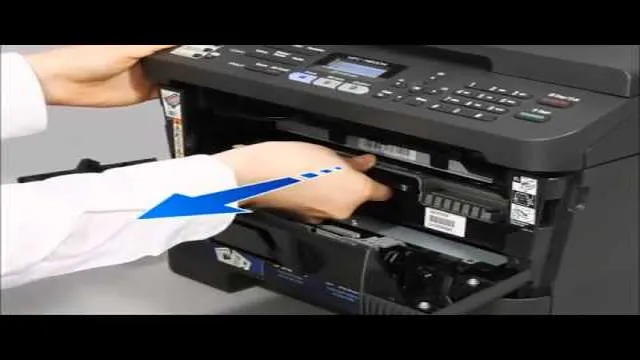
If you’re experiencing issues with your Brother printer drum stop error, don’t worry, there are simple steps you can take to resolve the problem. First, start by turning off your printer and unplugging it from the power source. Next, remove the toner and drum unit from the printer and check for any paper jams or obstructions.
If you find any, carefully remove them and reassemble the unit. If there are no obstructions, try cleaning the corona wire by gently sliding the green tab back and forth a few times. Once done, reinstall the toner and drum unit and test the printer.
If you’re still experiencing drum stop errors, you may need to replace the drum unit altogether. By following these simple steps, you’ll be able to fix your Brother printer drum stop error quickly and efficiently. Remember, proper maintenance of your printer can prevent these issues from occurring in the future.
Remove and Reinstall the Toner Cartridge
If you’re encountering a “Drum Stop” error when attempting to print from your laser printer, the issue might lie with the toner cartridge. Luckily, one of the easiest solutions to this problem is to remove and reinstall the toner cartridge. First, open the printer’s front cover and carefully remove the toner cartridge.
Check to make sure there aren’t any paper jams or other obstructions. Reinsert the cartridge back into the printer, ensuring that it is properly secured. Close the printer’s front cover and try printing again.
This simple step might be the solution to your “Drum Stop” error. However, if the problem persists, there may be a more technical issue with your printer that requires professional attention. Don’t hesitate to contact a technician or the manufacturer’s customer support for further assistance.
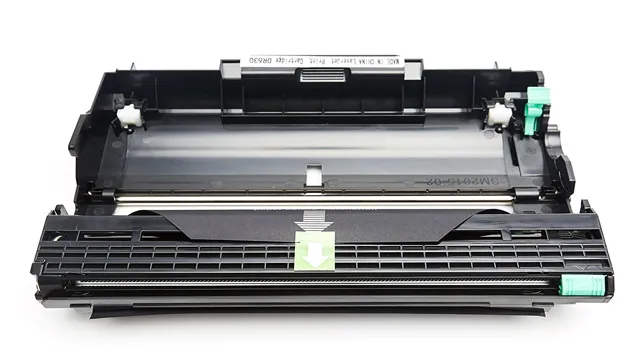
Clean the Printer Drum
When it comes to printing documents, a common issue faced by many is the drum stop error. This error can be frustrating and hinder productivity, but there’s a simple solution – cleaning the printer drum. The printer drum is responsible for transferring toner onto the paper, and when it gets dirty or covered in toner residue, it can cause the drum to stop.
To fix the issue, start by turning off the printer and unplugging it. Then, remove the toner cartridge and locate the drum assembly. Gently wipe the surface of the drum with a clean, lint-free cloth to remove any toner residue.
Be sure to avoid touching the drum with your fingers as this can leave oil residue and cause further issues. Once you’ve cleaned the drum, reassemble the printer and turn it back on. By taking these simple steps, you can easily fix drum stop errors and get back to printing with ease.
Reset the Drum Counter
Do you have a Brother printer but keep encountering drum stop error messages? If so, don’t worry! There’s an easy fix for this problem, and it involves resetting the drum counter. The most common cause of drum stop errors in Brother printers is their outdated drum unit. A Brother printer’s drum unit needs to be replaced every 12,000 to 15,000 pages.
However, the drum counter doesn’t automatically reset once you replace the unit. So, if you’ve installed a new drum unit and are still seeing drum stop error messages, then resetting the counter may solve the problem. To do this, simply follow these few easy steps: press the “OK” button, followed by “Up” arrow, then “OK” two times, and finally “Up” arrow again.
Once the counter is reset, your printer should be ready to use again without any further issues. So, go ahead and try this simple fix, and don’t let drum stop errors stop you from getting your important printing tasks done!
Prevent Drum Stop Errors
If you own a Brother printer, you may have experienced the frustrating “drum stop” error message at some point. This error occurs when the drum unit in your printer reaches the end of its lifespan or becomes faulty, resulting in poor print quality or even the inability to print altogether. To prevent this problem, it’s important to regularly clean your printer’s drum unit and perform maintenance tasks such as replacing the toner cartridge when necessary.
Additionally, be sure to use high-quality toner cartridges from reputable brands to prevent damage to your printer’s drum unit. Keeping these maintenance tasks in mind can help you avoid the headache of a drum stop error and keep your printer running smoothly for years to come.
Avoid Overuse and Overheating
When it comes to drumming, there’s a lot more to it than just banging on the drums. You need to be mindful of how much you use them and how hot they get to prevent drum stop errors. Overuse can cause your drums to wear down faster than normal, leading to costly repairs or replacements.
It’s important to take breaks and give your drums time to cool down in between sessions. Additionally, be aware of how much pressure you’re applying to your drums. Too much force can cause them to warp or crack, which could lead to them becoming unusable.
By taking these preventative measures, you can avoid drum stop errors and keep your drum set in excellent condition for years to come. Remember to only use your drums within reason and treat them with care to ensure they remain in working order.
Regular Maintenance
Regular maintenance is crucial to keep your drum machine working smoothly without any unexpected stoppages. To prevent drum stop errors, it’s important to maintain a good cleaning routine. Start by wiping down the drum pads and the body of the machine with a soft cloth.
Regularly inspect your cables for fraying or damage which can cause connection issues. You can use a contact cleaner to keep your connections free of dirt and debris. Also, check your power supply, AC cords, and batteries regularly.
If you want to maintain your drum machine in excellent condition, follow a routine maintenance schedule, which includes cleaning, inspection, and calibration processes. These steps will help to prevent any unexpected drum stop errors and keep your drum machine ready to deliver its best performance.
Conclusion
In conclusion, if your brother printer drum has stopped, it’s time to give it a break. Perhaps it needs a nap, some TLC, or even a little R&R. Maybe it’s tired of printing the same old documents or needs a new drum to spin up its creativity.
Whatever the reason, let’s not beat around the bush – it’s time for a drumroll, please: give your trusty printer the attention it deserves, so it can get back to its stellar performance and drum up some amazing prints once again!”
FAQs
What does it mean when my Brother printer drum stop error message appears?
The drum is an important component of a laser printer that transfers toner to the paper. When the drum stop error message appears, it means that the drum may have reached the end of its life or needs to be cleaned or replaced.
How can I clean the Brother printer drum to prevent drum stop errors?
To clean the drum, open the printer and remove the drum unit. Gently wipe the drum with a soft, lint-free cloth. Be careful not to scratch the drum’s surface. Then, reinstall the drum unit and try printing again.
Can I reset the Brother printer drum stop error message?
Yes, you can reset the drum stop error message by following these steps:
1. Open the front cover of the printer and press and hold the “GO” button for four seconds.
2. Release the “GO” button and close the front cover.
3. Your printer should now be reset and you should be able to continue printing.
How often should I replace the Brother printer drum to avoid drum stop errors?
It is recommended that you replace the drum unit after every three to four toner cartridge replacements to ensure optimal print quality and prevent drum stop errors. However, the drum’s lifespan can vary depending on usage and printing habits, so it’s important to monitor the print quality and replace the drum when necessary.